Unreal Engine 4: use Swarm to distribute Lighting build on Local Network
This is a quick tutorial on how to install and configure Unreal Engine 4’s Swarm Agent and Coordinator to distribute Lighting build (that is, UE4’s Lightmass’s ray-tracing precomputations, running on the CPU) across a Local Network of 64 bits Windows 10 machines. There are already a few good ressources on the subject, but I had to read through a bunch of them to pick all the needed information.
Existing online documentation
- Edit: There is now a brand new official documentation of Unreal Swarm!
- UDK’s documentation Unreal Swarm – Massive Application Distribution for Unreal Engine 3 is actually quite good, though not entirely up-to-date
- UE4’s documentation Lightmass Global Illumination is more high level, and lacking a section on Swarm Settings is very good but slightly out-dated, not saying how to install the Swarm tools gives information on the performances you can expect of it gives a lot of in-details technical information (but far too much)
- Edit: Swarm Agent Troubleshooting (wiki) seems to be the source of some of the official documention 🙂
- Edit: And now, a great Youtube tutorial:
What is Swarm
The Swarm Agent is the process launched in the background (daemon) when you hit “Build Lighting” on your Unreal Engine Editor. That is, it is the application that bake your lighting in the UE Lightmass. By default it uses your computer’s CPU cores to do so.
The Swarm Coordinator is a sibling process that you can launch manually to distribute your Lighting build on multiple Agents across the network.
Installation of Agent/Coordinator
Installation on a Windows 7/8/10 64 bits up-to-date is straightforward:
- You need the .NET 4.0 framework, which comes by default with any recent version of Windows.
- You should also deactivate the power saving/standby mode on every PC, else it will disable the Swarm Agent on the sleeping machines.
Note that this should also work on Linux & macOS with wine.
To install, you can either:
- Use existing installation of Unreal Engine on each computers of the network. All versions are cross-compatible so you can distribute your Lightmass work to Swarm Agents of outdated UE4 installation without any problem.
- Or, on computers without UE4, just copy the content of the Engine/Binaries/DotNET folder. You don’t need all this files, and no subfolders, but the whole is only a few MB in size. Put this on a fast disk with more than 10 GB free space for Agent cache.
You need to choose an always-on machine, like a small/old server to act as the Swarm Coordinator. If you don’t have one, you can select any other Agent machine to host the Coordinator, but you should ensure that it stays online all the time you need it! On my use-case, I’ve selected my laptop (named “ASUS-I7”) to be the Coordinator, so that I can use it when away.
Lastly, you should ask the system to auto-start the Swarm Agent (and/or Coordinator on the selected machine) when the user log-in. To do so, put a shortcut to the executable on the Windows Startup folder, which is located here:
Swarm Agent Settings
The Coordinator does not really need any settings. You need to accept the Windows Firewall request to let it communicate freely, though!
The Swarm Agent needs to be told how to distribute it’s work. To do that, launch the Swarm Agent if it is not already running, and double-click on it’s small icon hidden on the tray bar:
Go to the “Settings” tab of its UI:
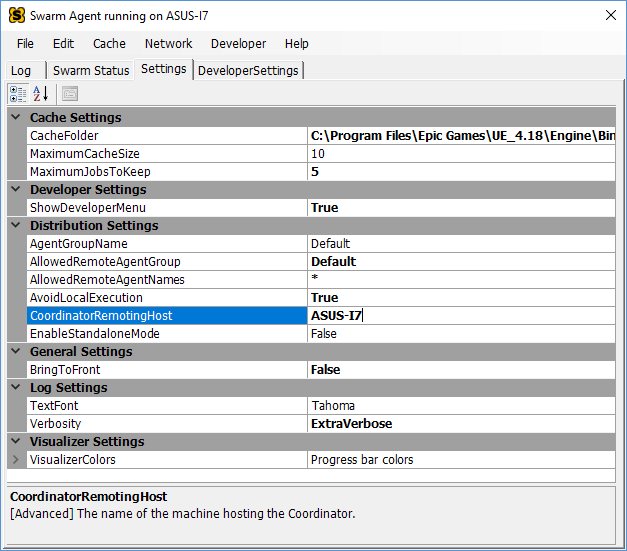 Swarm Agent Settings (after full configuration).
Here, the only important Settings are (in bold those you need to change):
- AgentGroupName: Default (is fine)
- AllowedRemoteAgentGroup: Default (to match, instead of DefaultDeployed)
- AllowedRemoteAgentNames: * (to match everything, instead of RENDER*)
- CoordinatorRemotingHost: ASUS-I7 (name or IP of the Coordinator computer)
Whenever you set the last one, the Coordinator should start to show the new Agent as soon as it connects across the network:

Usage
Next time you build your lighting on any computer correctly configured, you should get your work distributed across multiple Agents, assuming that:
- the Coordinator is up,
- other Agents are running, connected and Available (not Busy, Working, nor Dead),
- and your workload is big enough to distribute (enough mesh to bake lighting onto)
At this stage, a look at the local Agent will tell show you the following Status:
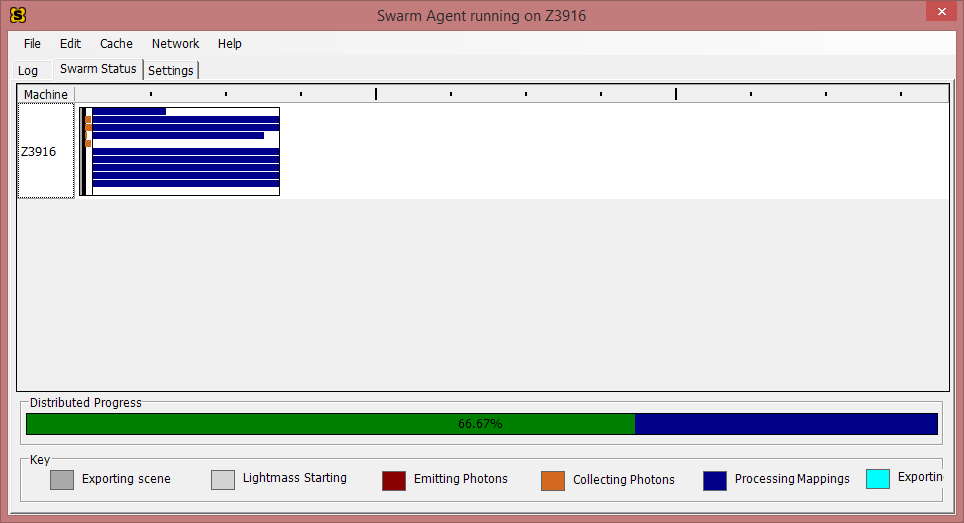 Swarm Agent Status while Working.
A look at the Coordinator will tell you the Agent(s) involved in the work:
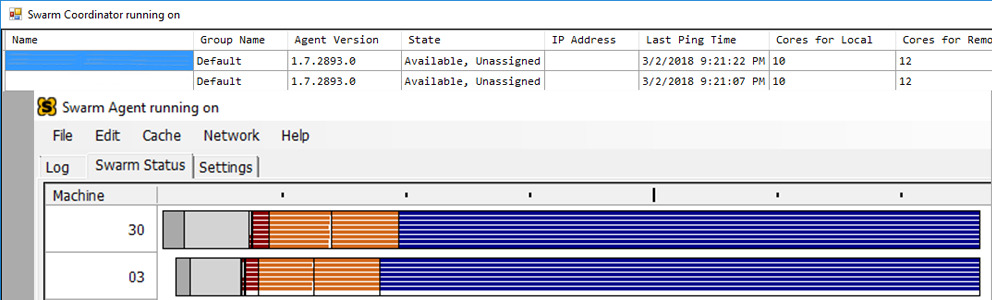 Swarm Coordinator with Working Agents.
I hope this can help, and show how all this is incredibly easy and worthy to setup!
Updated: November 10, 2017
You May Also Enjoy
Astrophotography: Mount and Telescope setup time-lapse
February 20, 2023 1 minute read
I was asked to show how I setup my mount and telescope, so I recorded me accelerated 30 times, and shared it on YouTube:
Power Shell cheat sheet
December 8, 2022 1 minute read
I figured that I should keep track of some useful command-line tools that I am learning, so I’ll write down them as blog posts and keep updating them.
DIY building an RC plane from Depron
November 26, 2022 4 minute read
The idea to build my own quadcopter drone, or my own RC plane, has always been tempting. My main issue was the lack of a dedicated space to build, and more i.
I Joined Unity!
February 22, 2022 less than 1 minute read
Hey, I have joined Unity Technologies as a Senior Software Engineer in the VCS Integrations team, part of DevOps! A significant part of my mission will be to.
Swarm overview
One of the challenges in game development is pre-computing static lighting. Emulating photons bouncing around in a virtual environment can require legions of compute cycles. This process is called baking. The end result is a lightmap, a compact data structure that represents the way static objects are lit.
The Unreal Engine suite provides software that makes baking lightmaps easy and fast. There are three components involved:
Unreal Lightmass: the app that does the actual lighting computations. It’s designed to run on many different PCs simultaneously.
Swarm Agent: a background app that runs on any PC that has been designated to bake lighting. The Swarm Agent invokes Lightmass to do bakes.
Swarm Coordinator: an app that runs on a single always-on PC that receives requests for lighting builds and determines which Swarm Agents are available to participate in the bake.
To build lighting, anybody running the Unreal Editor can kick off a bake by selecting Build Lighting in the editor. This results in a number of Swarm Agents across the local network participating in the build. The number is a function of the size and quality of the bake, and also depends on which Agents have free CPU cycles. Each selected Swarm Agents receives Lightmass along with enough data to run its portion of the bake. The combined results are ultimately assembled back into a complete lightmap.
By running Swarm Agents on many computers on your local network, lighting builds can be performed very quickly. What might take hours on a single machine takes only a few minutes with Swarm.
The documentation on Swarm and Lightmass is sparse. The best reference is a single Unreal AnswerHub post.
Where I work at HBO, only a subset of employees use Unreal. However, we want every machine on our network to participate in lighting builds — without the hassle of installing Unreal. That goal turned into an interesting adventure. Although Epic recommends copying the Engine\Binaries\DotNET folder to install Swarm, that alone is insufficient.
Without rehashing what the existing documentation already covers, I’m including everything I’ve learned about Swarm as of Unreal version 4.9. This information is useful to anybody setting up Swarm on your network or wanting to understand how to best configure Swarm.
Swarm Coordinator#
The Coordinator keeps track of all of the Swarm Agents on the network and the status of each. You can also use the Coordinator to restart Swarm Agent instances.
- SwarmCoordinator.exe is designed to run on a single machine on your network. We run it on a low-end always-on Windows box. We also run Swarm Agent on the same machine.
- Swarm Coordinator does not require that Unreal Engine be installed. I didn’t do the original setup of the Coordinator on our network, but based on empirical evidence, it requires the same files as the Swarm Agent (see below), plus the SwarmCoordinator.exe.config file.
- We place a shortcut to SwarmCoordinator.exe in the Windows Startup folder so that the Coordinator always begins at system start.
- In theory you could have multiple Coordinators on the network, each managing an independent set of machines/Agents. We haven’t tested this theory.
Unreal Lightmass#
Lightmass is the workhorse application that bakes lighting. It is automatically distributed to Swarm Agents on a per bake basis.
Do not install UnrealLightmass.exe directly; it’s automatically copied and run whenever a bake is kicked off.
Because Lightmass is completely independent of Swarm, Swarm Agents can run different versions of Lightmass. That means you can have teams running different versions of Unreal and using different versions of Swarm Agents to bake lighting. Nice.
Lightmass will utilize multiple CPU cores (you can configure how many) and peg the CPU on most machines. However, because (by default) it is run at below normal priority, it doesn’t normally impact the productivity of anybody actually using the machine.
Lightmass is RAM intensive. It is not uncommon for it to use 1GB or more RAM depending on the bake size/quality.
Lightmass does not utilize the GPU (as of 4.9).
Depending on the size/quality of your bakes, Lightmass can require significant hard drive space. For instance, for our current small project, Lightmass uses many hundreds of MB per lighting build. See notes on configuring the Swarm cache for more details.
Lightmass source code is located at Engine\Source\Editor\UnrealEd\Private\Lightmass and Engine\Source\Programs\UnrealLightmass
The version of UnrealLightmass.exe that an Agent receives is dependent on processor architecture. There are 32 and 64-bit versions. Epic [recommends][post] only using Swarm/Lightmass on 64-bit systems for best performance, and we follow this advice.
Lightmass requires the following be installed in order to run. If you’re installing Swarm Agents on machines, you’ll need to be sure these components are also installed.
DirectX v9 extensions, specifically D3DX9_43.dll, DComp.dll and XInput1_3.dll
Microsoft C runtime for Visual Studio 2013, specifically MSVCP120.dll and MSVCR120.dll
Swarm Agent#
Swarm Agent is designed to run on multiple machines across your network, building lighting on demand.
SwarmAgent.exe runs on Windows XP and up. It does not run on MacOS or Linux (as of 4.9).
Swarm is built with C# using the .NET 4.0 framework
SwarmAgent.exe and its associated DLLs are 32-bit images
We place a shortcut to SwarmAgent.exe in the Windows Startup folder so that the Agent always begins at system start.
Swarm can technically run a variety of distributed tasks, but as of 4.9 it only runs lighting calculations by distributing and spawning Lightmass
There are two types of logical Swarm Agents. The same SwarmAgent.exe client supports both modes.
The Local agent is the agent that kicked off the lighting bake
Remote agents running on other network PCs are assigned to participate in a given lighting bake
After initial communication with the Coordinator, Swarm Agents appear to perform all Agent-to-Agent communication in a peer-to-peer fashion.
The Local agent distributes UnrealLightmass.exe and lighting information to each assigned Remote agent. The Local agent also participates in the bake (unless otherwise configured), collects the work from remote agents and merges the results.
Swarm will not execute bakes on machines where it detects that the CPU usage has been, on average, above 20% for the past 10 seconds (see CPUBusyThreshold in Agent.cs)
Swarm spawns the Lightmass process at BELOW_NORMAL_PRIORITY_CLASS on the Local agent and IDLE_PRIORITY_CLASS on Remote agents to reduce the CPU impact on busy machines. These values are configurable.
Swarm will not necessarily use all available non-busy agents. The number of agents appears to depend on the size and complexity of the lighting bake.
Swarm does not require that Unreal Engine be installed.
Swarm requires the following files be present in the same folder as SwarmAgent.exe. These files are found in the Engine/Binaries/DotNET folder.
Swarm requires that the .NET 4.0 framework (or greater) be installed. If you’re running on Windows 8 or better, it’s already present. On Windows 7, it’s not preloaded, but comes automatically with Windows Update.
Although Swarm itself doesn’t require DirectX v9 extensions or the C runtime, Lightmass does need these, so if you’re installing Swarm, be sure to install those components, too.
Swarm Agent runs as a Notification (or System Tray) app. It is designed to run continuously in the background.
To view the Swarm Agent interface, locate the app in the system tray (yellow and black S icon) and double click the icon.
SwarmAgent.exe does not respond to WM_CLOSE. To close it manually, you must choose File->Exit from the main menu. To close it programatically, you can run taskkill.exe SwarmAgent.exe.
Empirically (using Microsoft Message Analyzer) SwarmAgent and SwarmCoordinator use the following protocols and ports:
ICMP protocol for ping requests between agents
TCP protocol for all other communication, using ports: 8008, 8009, 54430, 56574, 56587 and 56589
Some ports are configurable. For instance, SwarmCoordinator.exe.config allow you to remap port 8009.
Swarm will not activate on sleeping PCs. I recommend that if you always want your Swarm Agents to be available, those PCs should not enter power-saving sleep states. Alternatively, you can use Windows Task Scheduler to wake machines at the appropriate times to run your bakes. See powercfg command line tool for details. We’ve found that not all machines have BIOS configurations that support powercfg, so your mileage may vary.
Until we explored the issue in detail, the most common Swarm problem was blocked communication between different Swarm agents. Firewalls are the culprits. Windows Firewall will block Swarm by default, even if the user chooses to allow Swarm to do outbound communications. Because Swarm communicates in a peer-to-peer fashion, it must also be configured to allow inbound communication from other agents.
Programmatically, the Windows Firewall can be configured to permit Swarm usage with the following commands. We also do IP filtering to make sure these firewall exceptions only happen on our local network — replace x.y with your actual leading IP octets.
Allow Swarm ICMP pings: netsh advfirewall firewall add rule name=”Unreal Swarm” dir=in action=allow enable=yes remoteip=x.y.0.0-x.y.255.255 protocol=icmpv4 interfacetype=lan
Allow Swarm TCP commands: netsh advfirewall firewall add rule name=”Unreal Swarm” dir=in action=allow enable=yes remoteip=x.y.0.0-x.y.255.255 protocol=tcp interfacetype=lan localport=8008,8009,54430,56574,56587 remoteport=8008,8009,54430,56574,56587
Uninstall firewall exceptions: netsh advfirewall firewall delete rule name=”Unreal Swarm”
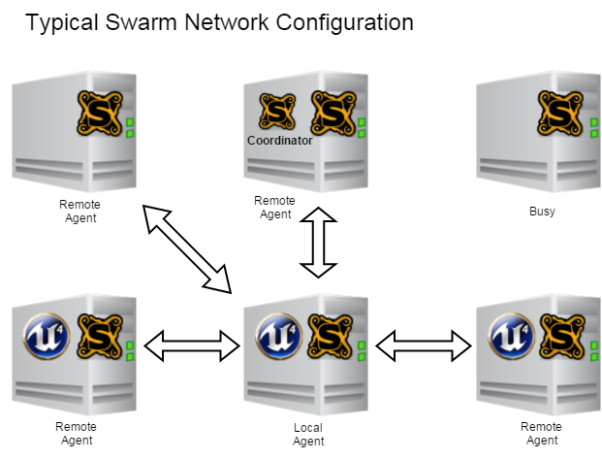
This diagram shows a scenario where the PC in the bottom center has kicked off a Unreal lighting bake. Three PCs have Unreal installed, but all the PCs are running Swarm Agents. The top center PC is running the Swarm Coordinator. Five PCs were chosen to participate in the bake. The other PC was busy (compiling code, etc.). Communication between the local agent and the remote agents, represented by the arrows, happens in a peer-to-peer fashion.
Swarm Parameters#
Many elements of how Swarm operates can be modified. The Settings tab in Swarm Agent allows you to change settings. Configuration information is stored in SwarmAgent.Options.xml and SwarmCoordinator.exe.config. Here are some of the most interesting elements, in order of importance.
CoordinatorRemotingHost: must match the Swarm Coordinator Computer name from Control Panel->System
CacheFolder: where Swarm caches job information. At install time, we set this to the equivalent of %temp%/SwarmCache
MaximumCacheSize: the maximum amount of HDD space that Swarm will consume in GB. We use 10 (the default).
MaximumJobsToKeep: the maximum number of cached jobs (and logs) to keep around. We use 5 (the default), but it’s extremely rare that we need to look at logs of old jobs, so I think 1 or 2 would be fine.
AllowedRemoteAgentNames: allows you to select a subset of Remote agents that you want to use. We always want to use all available, so we set this to *
AllowedRemoteAgentGroup: allows different PCs to participate in different Swarm groups. We currently have a single group with our team name.
AgentGroupName: this is the name of the group that the local agent belongs to. We use our team name.
LocalJobsDefaultProcessorCount and RemoteJobsDefaultProcessorCount (developer settings): the number of CPU cores used by Lightmass for local and remote bakes. These are set automatically to reasonable values, but can be reduced to lessen CPU impact at the cost of bake speed.
Swarm Installer#
To make life easier for our extended team, I wrote a Windows installer that handles the complexity described above. The installer uses the WiX Toolset to generate a standard Windows MSI file. Notes about the installer:
The installer is a 64-bit package. This addresses: 1) Unreal’s recommendation that Lightmass run on 64-bit systems only, 2) a limitation of WiX that doesn’t allow 32-bit packages to include/install 64-bit binaries, plus 3) the fact that everybody in our office is running 64-bit Windows anyway
The following DirectX v9 files must be installed: dxsetup.exe, dxupdate.cab, dsetup.dll, dsetup32.dll, Jun2010_d3dx9_43_x64.cab and Apr2007_XInput_x64.cab. You can grab these files from the DirectX SDK. The WiX toolset page has good instructions for installing DX extensions.
In addition to the normal installer-y stuff (copying files and updating the registry), the installer:
Places a shortcut to SwarmAgent.exe in the Startup folder
For uninstalls, in addition to nuking the right files, the installer:
The Swarm requirements we publish to our team:
64-bit Windows 7 or above
10+ GB free hard drive space
We recommend that everybody on the team with machines that meet the spec — including people that already have Unreal installed — install Swarm Agent.
Mastering Unreal Engine 4.X by Muhammad A.Moniem
Get full access to Mastering Unreal Engine 4.X and 60K+ other titles, with a free 10-day trial of O’Reilly.
There are also live events, courses curated by job role, and more.
The Swarm Agent
The process of building lightmaps is an automated one, which means there is no specific length of time that it will take. Based on your map or game and its complexity, building lightmaps could take too much time and performance from the machine.
But Unreal Engine is full of supporting tools that are built in such a way as to serve you by saving time and delivering the best content. There is a small C# tool that is connected to the Unreal editor, which plays the role of manager to handle the communications between the lightmass and the editor. That manager is called Swarm Agent.
Swarm Agent is autofired in order to perform its job and stay minimized (this means that you don’t have to manually run it from somewhere); it was written .
Get Mastering Unreal Engine 4.X now with the O’Reilly learning platform.
O’Reilly members experience books, live events, courses curated by job role, and more from O’Reilly and nearly 200 top publishers.
Using Swarm Farm For unreal engine
Unreal Engine allows multiple computers to be utilised in a form of so called Swarm Farm. A swarm farm is a collection of computers, each running a special software called Swarm Agent, and one computer running another special software called Swarm Coordinator. The computer running the coordinator can also be an agent, ie running Swarm Agent software, and be part of multi-computing scheme.
It is rather easy to set up a swarm farm for Unreal Engine. Basically, it involves copying all the files in a folder, for example, mostly like will be something like this:
C:\Program Files\Epic Games\UE_4.25\Engine\Binaries\DotNET
If you have installed Unreal Engine is the default direction. In that folder, Swarmagent.exe and SwarmCoordinator.exe can be found. Simply copy this folder to all computers that are part of swarm farm. Important note: it is not necessary to install Unreal Engine on all computers in the farm, just all the files in this folder. All computers must run Swarm Agent to be part of farm and one and only one computer should run SwarmCoordinator. This blog will be focused on my experience with running a three computers swarm farm, so for details on setting up swarm farm, there are many videos out there on the internet about how to do it. Specifically, this video by Ryan Manning, it is the video I followed to set up my swarm server.
TEST SETUP
In my swarm farm, I have three computers and here are their configurations:
WSI5
Intel I5-8500 @3.4Ghz, Asus ITX mother board, 32GB RAM, two 500GB SATA3 SSDs in RAID 0 configuration to form a 1TB drive, one 1Gb ethernet port, one ConnextX 312 with two 10Gb optical ports, but only one port is connected to a 10Gb optical switch. This computer is located in an office at first floor. The CPU has six cores and six logical cores.
HNZ1
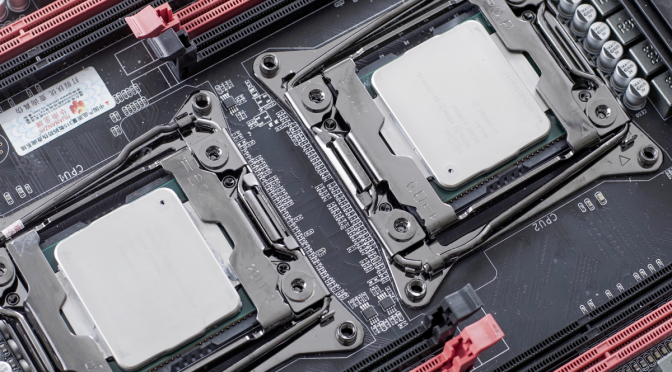
Dual Intel Xeon E5-2678V3 @2.4Ghz, Huananzhi X99-T8D mother board, 128GB RAM, one 2T Samsung NVMe M.2 SSD, one HP 500G SATA SSD, one Samsung 128G SATA SSD, two 1Gb ethernet ports, one ConnectX 312 with two 10Gb optical ports, both are connected to the same 10Gb optical switch. This computer has 2×12 = 24 cores with hyper threading, so total of 48 logical cores.
Dell R720 Server
Dual Intel Xeon E5-2696V2 @2.2Ghz, 128GB RAM, one 500G SSD, two 600G SAS HD configured in RAID 0 for a total 1.2TB, two 10Gb DAC (direct access copper) ether ports connected to 10Gb optical switch via two optical to copper converters, two 1Gb either net ports. This computer has 2×12 = 24 cores with hyper threading, so total of 48 logical cores. This computer was purchased off surplus market at incredibly affordable price considering its configuration.
Swarm Farm Setup
My swarm farm mainly consists of these three computers, namely, WSI5, HNZ1, and R720. To be precise, maybe this setup should be considered as distributed computing rather than a “farm”. The WSI5 and HNZ1 are located at an office on first floor and the Dell R720 is located in basement. Baking jobs can be launched from either WSI5 or HNZ1, it is actually good thing to do tests.
All computers are linked with 10Gb network with custom network configuration with HOST file. They are also on the same 1Gb Ethernet network with a router. The reason for 10Gb network is to avoid network bound bottleneck. The 10Gb link to basement is a little slow, roughly about 6Gb due to optical-to-copper adapter being used. It is still very fast.
The R720 and HNZ1 are comparable in terms of computing power with R720 scoring 2750 on average and HNZ1 scoring 3320 on average with CineBench R-15 benchmark. While the WSI5 scores roughly 950 on average with CineBench R-15 benchmark, so it is roughly about 1/3 of the performance of the other server. Special note is that both R720 and HNZ1 have 48 logical cores and 128GB of RAM, enough to handle most of the jobs.
Unreal Engine Project Used
The project used in this test was purchased off Unreal Engine Market Place, it is by Wooden Design. It is fairly complicated in terms of a home project but probably is on the lighter side when it comes to real architecture visualisation. Nonetheless, it is good enough to test how swarm farm works and how well it works as it takes over one hour to build a production quality lighting build.
Important note, all tests done are for high quality lighting build, not production build
OBSERVATIONS & TIPS
One of the key point to use a swarm farm is to utilise multiple computers to help building, “baking”, lighting for visualisation. However, after building and using a swarm farm, albeit a small one, it does not seem to be a simple matter of adding more computers to the farm, there are things to watch out and there are ways to optimise it.
Baseline Measurements
Scenario #1 — Stand Alone Mode On HNZ1
When running a baking job on the HNZ1 machine without any swarm farm, it started at 12:49:36 and finished at 1:17:17, or for a total time of 27 minutes and 31 seconds.
 The job started 12:49:36 and finished at 13:17:17, or a total of 27 minutes and 31 seconds
Scenario #2 — Start Job On HNZ1 Also Part Of Swarm Farm + R720
In this scenario, both HNZ1 and R720 are part of swarm farm and the baking job was started on HNZ1. From the following screen shots, we can see how each computer performs. The baking job was started at 11:43:39.
The R720 finished all of jobs and tasks assigned to it at 12:01:06, so it took about 17 minutes and 22 seconds. There does not seem to be more, so it became available according to Swarm Coordinator.
 Here, the R720 is done with all jobs and tasks assigned to it
  This Swarm Coordinator screen shot shows R720 was done
The HNZ1 was done and the baking job was complete at 12:03:57, so it took 20 minutes and 18 seconds to complete the job. So, after R720, it took the HNZ1 additional 2 minutes and 51 seconds to finished the job.
 The Job is done
Scenario #3 — Start The Baking Job On HNZ1 With All Three Computers In Swarm Farm
In this scenario, all computers are part of Swarm Farm and the baking job is started on HNZ1 at 12:20:38 The WSI5 finished all jobs and tasks assigned to it at 12:34:38, or it took 14 minutes. The R720 finished all the jobs and tasks assigned to it at 12:35:01, or 14 minutes 23 seconds.

The whole job finished at 12:39:56 or it took 19 minutes 19 seconds for this particular run. Over repeated runs with this configuration it is about 18 minutes.
Overall trend is that adding additional computer in swarm farm improves performance. Though in scenario #2, adding a similar performance computer, the R720, only increased performance by about 26%, it is probably due to some over head when there are only two computers involved. In scenario #3, it shows adding a slower performance computer, the WSI5, actually improved performance comparable to what it could contribute overall.
Network Performance
From all the runs during tests, it does not seem that network is the bottleneck, traffic are light, This may very well be that the project is not big enough, lack of heavy assets. So, this remains to be investigated further in future blog(s) with even larger projects.
Assigning Number Of Logical Cores To Local Machine
It has been observed during test runs that when “LocalJobsDefaultProcessorCount” is set too high, for example, same as available logical core counts, when a baking job is launched from this machine, it tends to crash randomly. It does not always crash, but often enough to use it for any serious work. When crash happens, no further rendering and the process simply stops. Unfortunately, setting “LocalJobsDefaultProcessorCount” by default is set to the same as available logical core count, so be sure to check this value on the machine to be used to launch baking jobs and is part of the swarm farm.
 The “LocalJobsDefaultProcessorCount” is 45, less than total available logical cores 48. This prevents random crashes experienced during all test runs
Does It Matter Where The Job Is Initiated?
In many offices where swarm farm computers are located in a remote area, such as computer room or another office. This is also the beauty of distributed computing. Artists can have their own powerful workstation or they can have a laptop, which often less powerful but so convenient to use, testing their work at low build quality first. So what happens when an artist want to bake lighting at production quality using swarm farm servers?
Scenario #1 — Use a low performance machine (laptop) to start a backing job and also as part of swarm farm.
It is natural to think that using the machine that launched baking job as part of swarm farm to help out. In particular, if the machine that started baking job is a low performance one, such as a laptop, and also part of swarm farm. What could go wrong, right? Well, lets see what is happening when a local machine is configured as part of swarm farm and participate in computing.
To configure local computer to be part of computing in swarm farm, you can set “AvoidLocalExecution” to “False”, which actually is the default setting. So lets do that on a low performance computer, the WSI5.
 Setting “AvoidLocalExecution” to False will allow the computer that launched baking job as part of swarm farm
With this setting and with both R720 and HNZ1 high performance computers as part of swarm farm, it took 39 minutes on average to finish building lighting at high quality setting.
That 39 minutes seems a long time compared to other tests with both HNZ1 and R720 as part of swarm farm. What happened? Lets’ take a look at the SwarmAgent log on the WSI5, the job started on 1:20:13. It shows one of the remote computer (it is the R720) finished its task on 1:32:40, or it took about 12 minutes 27 seconds. The other swarm computer finished its tasks on 1:37:00, or it took about 16 minutes 47 seconds.
 The two red line shows when remote computer finished tasks assigned to them
Both numbers seem to be fine for HNZ1 and R720. However, here are two screen shots, one shows when progress was stuck at 96.84% and stop watch was started. Another screen shot show when building lighting finished. A whopping 22 minutes and 9 seconds
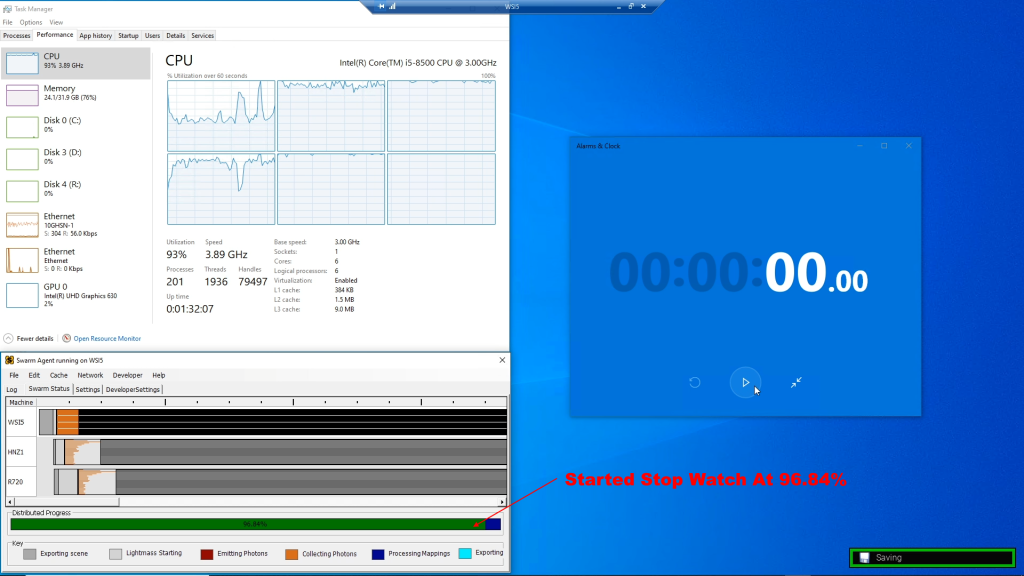 Progress was stuck at 96.84% and that was when the stop watch was started
 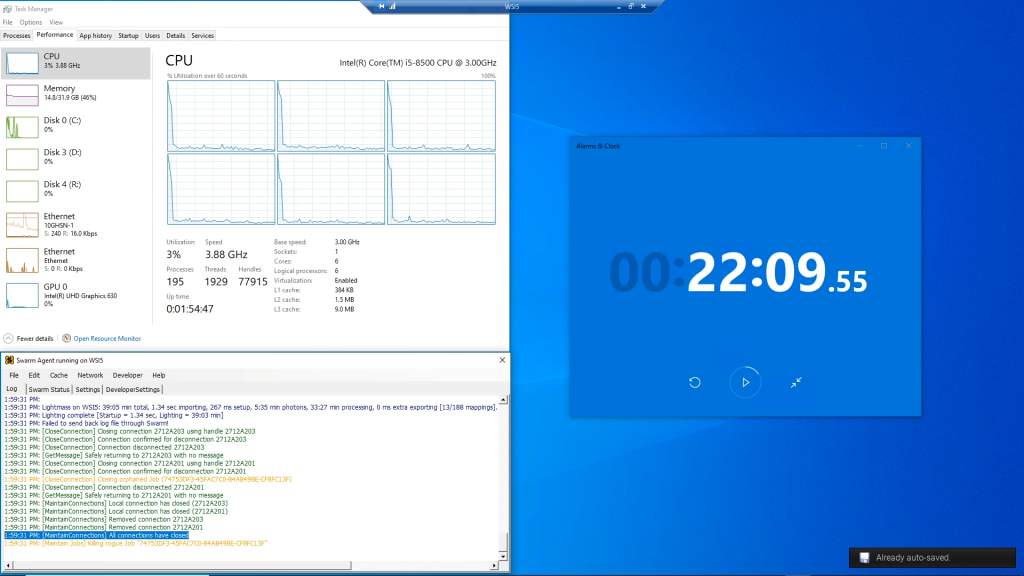 This shows when the process is finished. Whopping 22 minutes and 9 seconds
This is true for all repeated tests with same settings. So why did it take 39 minutes on average to finish building lighting? It is the tasks that the local machine, the slow WSI5, must finish to complete the build. Since the WSI5 is a low performance machine, it actually took much longer to do the rest of the task! Bumper!
Scenario #2 — Use a low performance machine to start a baking job, but exclude it from part of swarm farm.
Unreal Engine allows a computer to be excluded from swarm farm by setting “AvoidLocalExecution” to True. What does it mean? It means that if a baking job is started on this machine, no task will be assigned to itself, besides sending necessary data to remote machines. This also means after all tasks assigned to remote machines are complete, the final tasks to complete the job are also off loaded to a remote machine., which most likely a much faster machine.
 Setting AvoidLocalExecution to True will exclude this machine to be part of swarm farm
So, in my setup, the WSI5 is the slowest machine and lets see how it performs by setting “AvoidLocalExecution” to True. The job was started at 10:15:13 and at 10:28:11, the R720 finished its jobs and tasks and became available as shown in Swarm Coordinator.
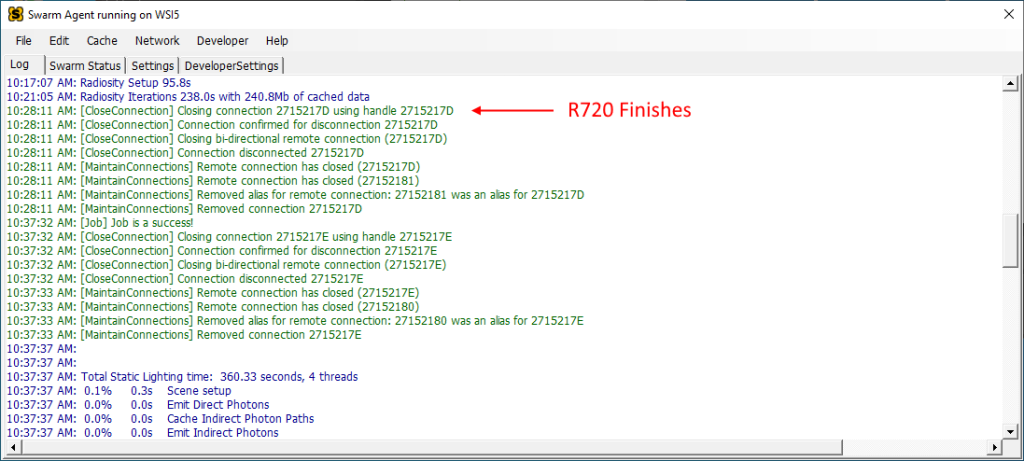 This is when R720, part of swarm farm, finishes tasks assigned to it.
The reason it is the R720 that finished its jobs and tasks can be seen from screen shot of Swarm Coordinator
 This shows that the R720 finishes its jobs and tasks before HNZ1
However, after R720 finishes, the HNZ1 continues until the baking job is done. The HNZ1 is not only tasked to complete whatever jobs and tasks assigned to it, but also the tasks of combining all results and complete the build.
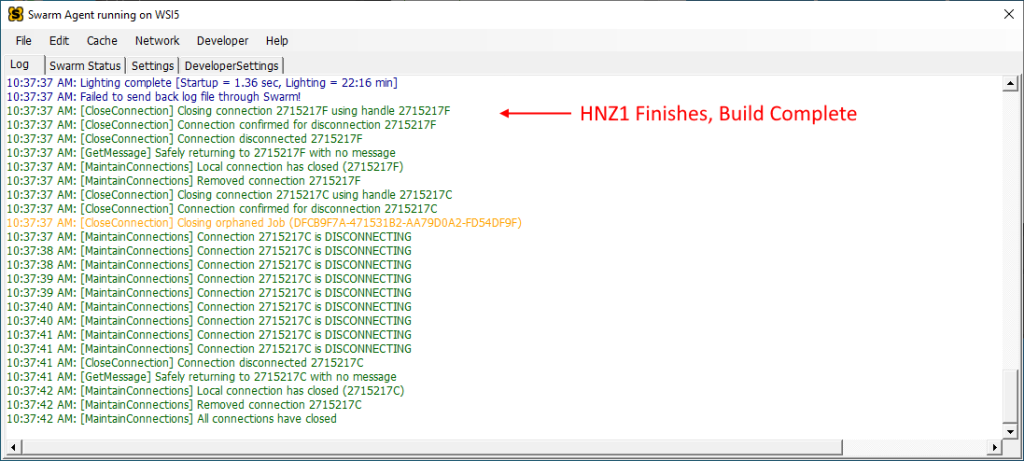 The HNZ1 continues till the job is done. It is performing all jobs and tasks assigned to it. But also the remaining task combining all result to complete the build
The WSI5 on the other hand essentially remain much less burdened as shown by the screen shot of task maanger, utilisation is only about 19% during this period of time.

From the screen shot of WSI5, we can see that the job (Wooden Design project with High Quality setting) started at 10:15:13 and the following are screen shots of Swarm Agent log on WSI5 and finished at 10:37:42, so it lasted about 22 minutes and 29 seconds. This is a little longer than the 20 minutes it took when the job is started on HNZ1 and is part of swarm farm and R720 in the swarm farm. So there are some overhead involved, nonetheless, it is far better than having WSI5 as part of swarm farm (when AvoidLocalExecution is False)
Does That Mean A Slow Computer Can Not Be Part Of Swarm Farm?
The answer is that as long as the slow performance computer is not the one launching the baking job. Or if it is, do not let it be part of swarm farm. As matter of fact, as my next set of experiments show, if a baking job is started on a high performance machine, such as the HNZ1, adding a slow performance machine, the WSI5, indeed helps cutting down overall time. This is basically the scenario #3 in baseline tests.
Yes adding a slow performance machine to the swarm farm does help as long as it is not the one starting the backing job. So, in an office environment, maybe it is a good idea to employ all the idle machines in the office to be part of swarm farm to help out.
If Double Computing Power, Double Baking Speed?
This is the part that is hard to figure out as I only have three computers. When WSI5 is not used, starting the baking job on the HNZ1 alone took 27 minutes on average to finish (high quality). However, adding the R720 in the swarm farm only reduced time to 20 minutes, roughly 26% reduction of time. It seems that the remote computer R720 finished the tasks assigned to it much earlier than overall time. This is probably due to the fact that when all assignable tasks are finished, either by remote machine or local machine, there are tasks to combine the results to complete the build by the launching machine (in this case, the HNZ1), this phenomenon is also supported by previous experiment where it took a slow performance machine LONG time to complete the build after both high performance machines finish the assigned tasks.
Also, as mentioned previously, adding a slow performance machine to the swarm farm does help and it is almost comparable to the increase of amount of computing power: HNZ1 and R720 both have 48 logical cores, totalling 96 logical cores. The WSI5 has 6 cores but running at higher clock, so in terms of performance increase, this amounts to about 10%, roughly that is. This shows there are some degree of scalability by adding another machine, be it a slow one or not.