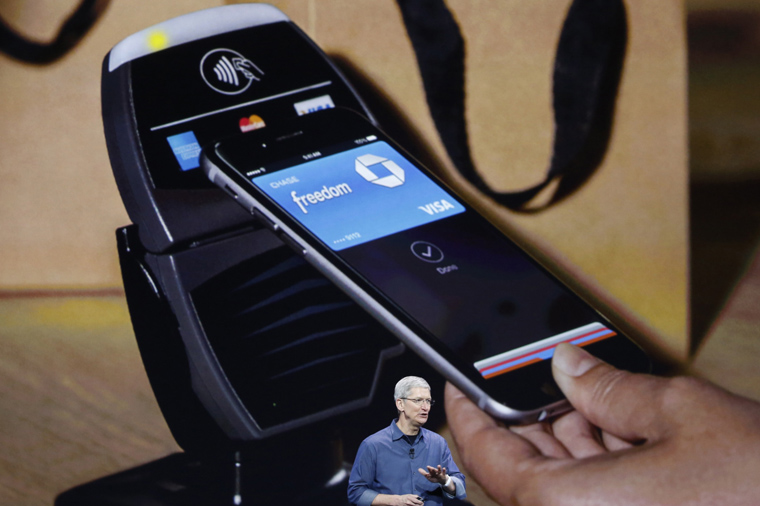
Apple Pay
Apple Pay replaces your physical cards and cash with an easier, safer, more private and secure payment method. Use it online, in apps, and in stores. It’s the simple way to pay every day.
Set up Apple Pay in seconds. Learn how
Faster and easier
than
using cards
or cash.
Privacy and security
built in.
Accepted on millions
of websites and apps.
It’s ready
and set.
Just go.
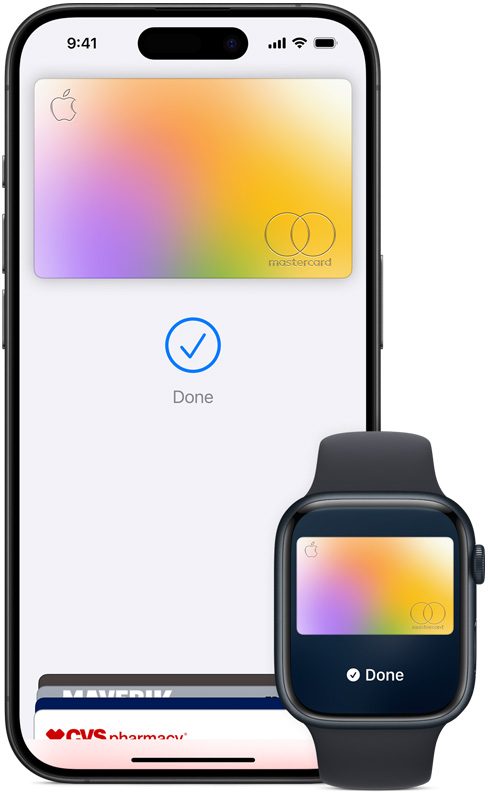
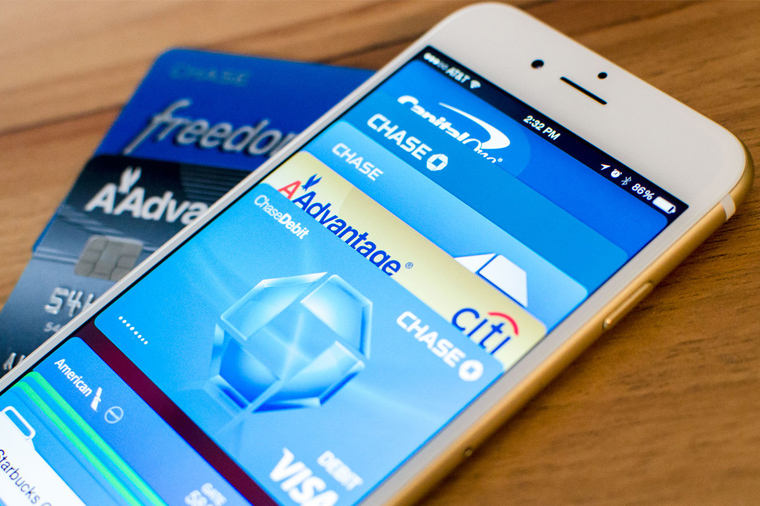
Setup in seconds. Apple Pay is simple to set up. Just add your credit or debit card to the Wallet app on your iPhone and you’re ready to go. You still get all your card’s rewards and benefits — so you won’t miss out on any hard-earned points or miles.
Apple Pay is already on your device. Apple Pay is built into iPhone, Apple Watch, Mac, and iPad. No separate app to download. No complicated processes to complete. No hassles.
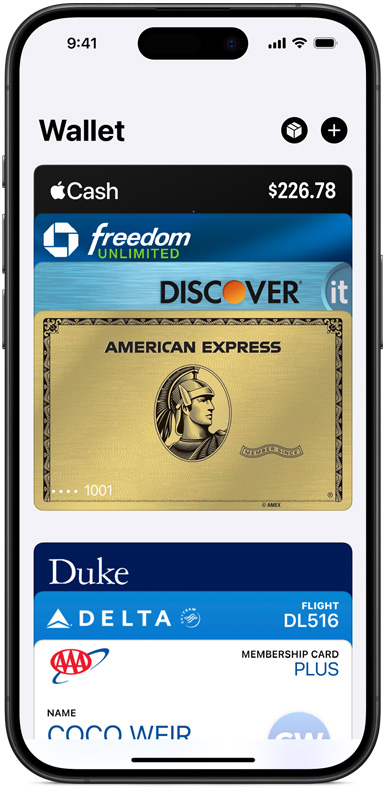
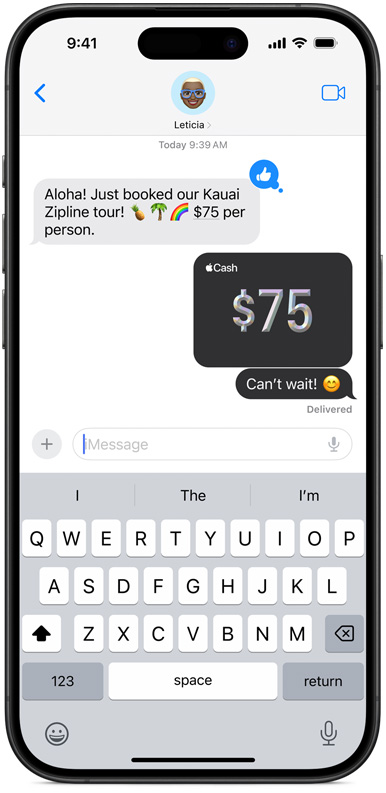
Use Apple Cash with Apple Pay. Apple Cash is a digital card that lives in Wallet — it stores the cash you receive or want to send. 1 You can send money right in Wallet or Messages — pay your squad for brunch or chip in for a coworker’s gift. You can also spend it in stores, in apps, or online with Apple Pay.
- Learn more about Apple Cash
- How to send money
Easy.
Does it all.
Grab from the
corner cafe. Load
up your app.
Order a new online.
Have delivered.
Subscribe to .
Get
from a
vending machine.
supermarket.
Just look
for
or when
you check out.
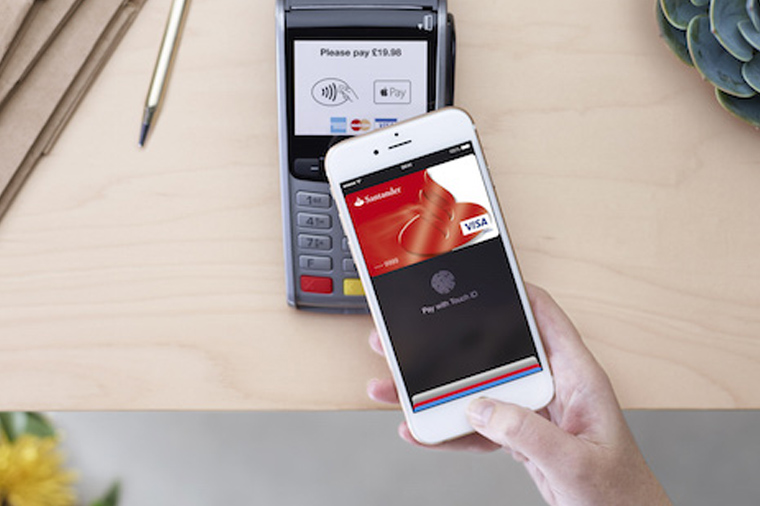
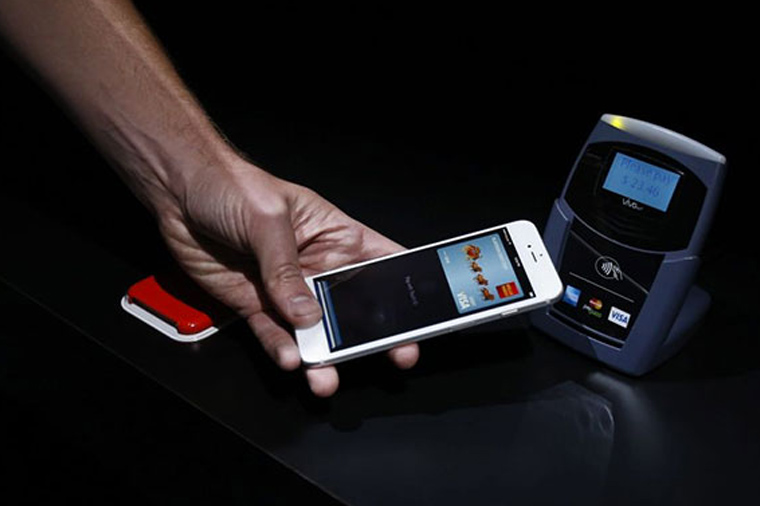
At stores and more. Apple Pay is accepted at over 85 percent of retailers in the U.S., so you can likely use it wherever and however you want. If you’re not sure, just ask. Apple Pay works anywhere that takes contactless payments — from vending machines and grocery stores to taxis and subway stations.
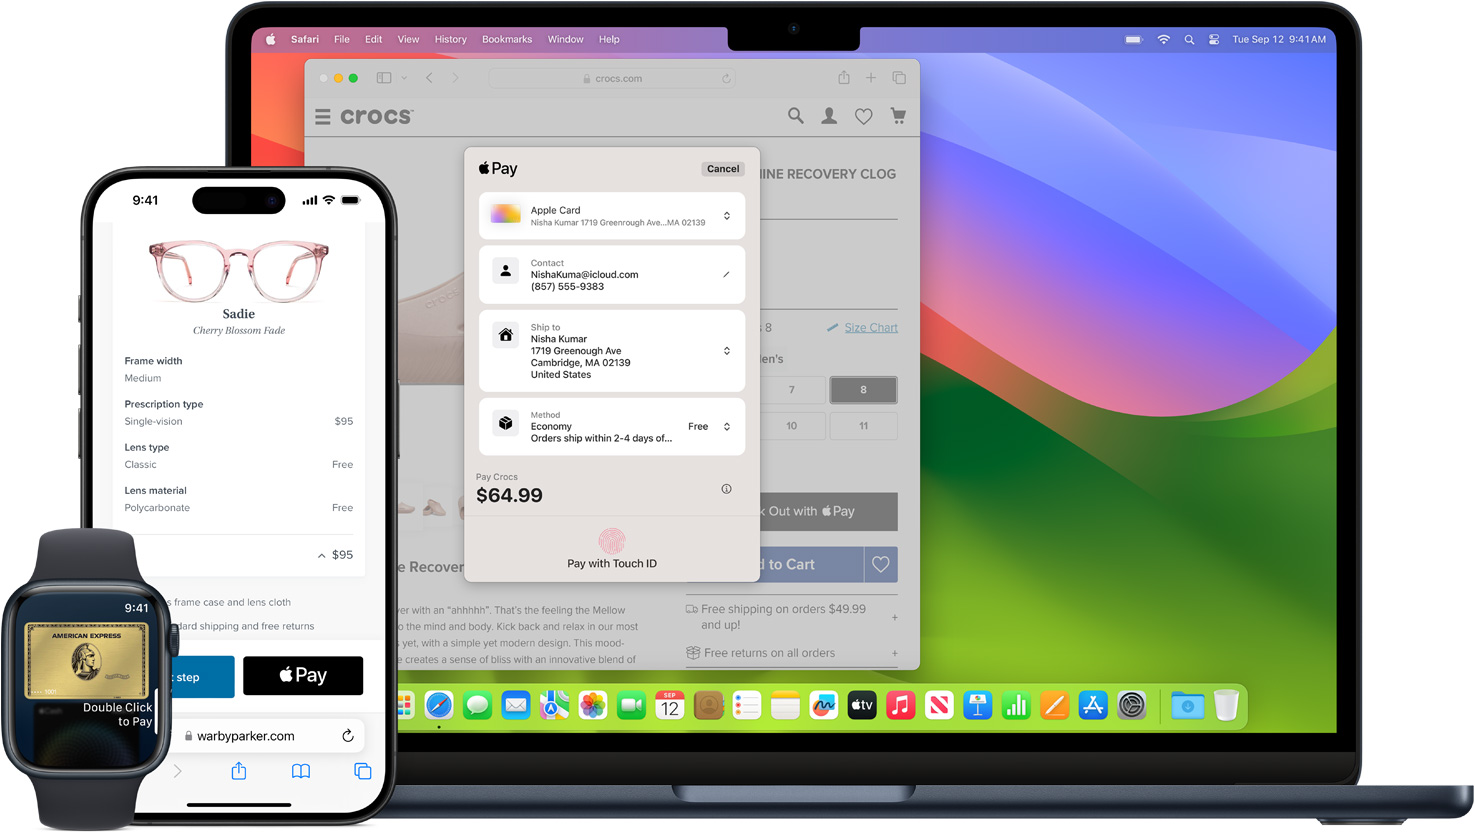
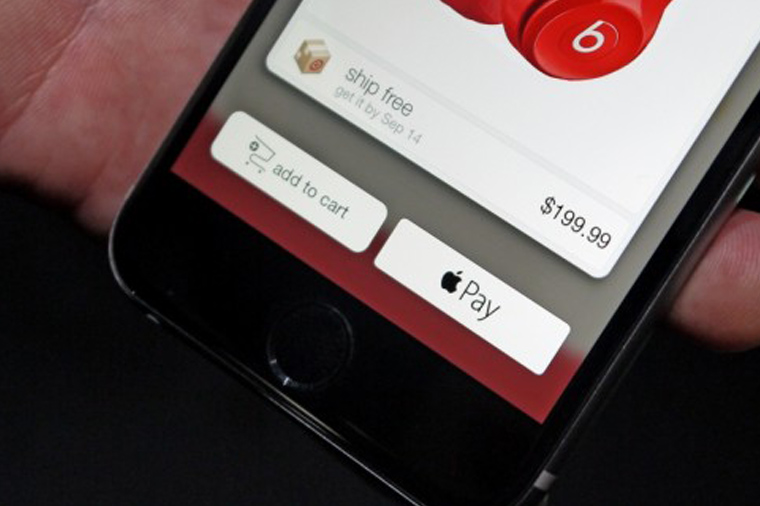
In apps and online. Use Apple Pay for purchases in Safari on your iPhone, iPad, or Mac. You can skip the lengthy checkout forms and pay with just a touch or a glance. Or use Apple Pay to subscribe to services like Apple Music, Apple News+, and Apple TV+, buy apps and games on the App Store, and upgrade your iCloud storage.
Safe and
sound.
![]()
![]()
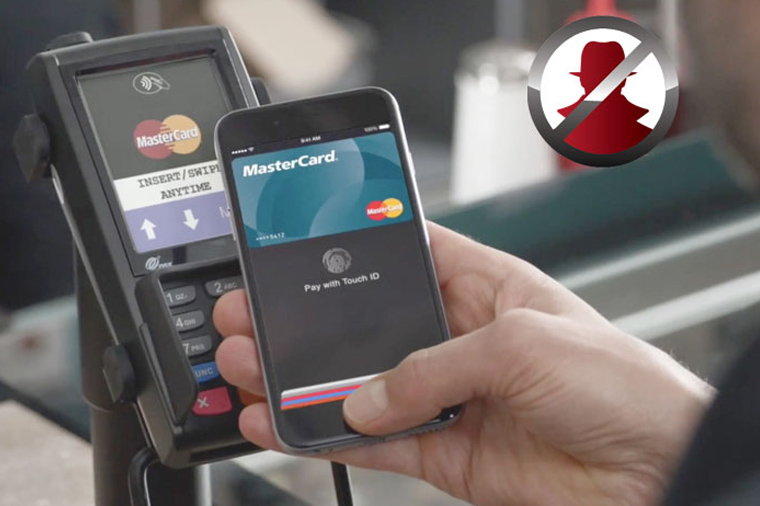
Personal data. Protected. When you make a purchase, Apple Pay uses a device-specific number and unique transaction code. So your card number is never stored on your device or on Apple servers. And when you pay, your card numbers are never shared by Apple with merchants. If you prefer not to share your email address with merchants when paying online, you can use Hide My Email to generate unique, random email addresses that automatically forward to your personal inbox.


Your purchases stay private. When you pay with a debit or credit card, Apple Pay doesn’t keep transaction information that can be tied back to you. And when you use Apple Cash, information is stored only for troubleshooting, fraud prevention, and regulatory purposes.


Tap more. Touch less. Apple Pay works right from your device, helping you avoid touching buttons and terminals, handling cards, and exchanging cash. Every purchase requires Face ID, Touch ID, or a passcode — helping to keep your security in your hands.
Get started
with
Apple Pay.
Questions? Answers.
How do I use Apple Pay?
You can use Apple Pay to make purchases in stores, on websites, and in apps. It’s widely accepted, simple, safe, secure, and private.
- Learn how to use Apple Pay in stores
- How to make a purchase with Touch ID
- How to make a purchase with Face ID
- Learn how to use Apple Pay on websites
- Learn how to use Apple Pay in apps
How secure is Apple Pay?
Apple Pay is safer than using a physical credit, debit, or prepaid card. Face ID, Touch ID, or your passcode is required for purchases on your iPhone, Apple Watch, Mac, or iPad. Your card number and identity aren’t shared with merchants, and your actual card numbers aren’t stored on your device or on Apple servers.
When you pay in stores, neither Apple nor your device will send your actual card number to merchants. When you pay online in Safari or in apps, the merchant will only receive information you authorize to fulfill your order — such as your name, email address, and billing and shipping addresses.
When you pay with a debit or credit card, Apple doesn’t keep transaction information that can be tied back to you. And when you use Apple Cash, information is stored only for troubleshooting, fraud prevention, and regulatory purposes.
How do I set up Apple Pay?
It’s simple. Just add a credit, debit, or prepaid card to the Wallet app on your iPhone, then choose to add the card to any other Apple devices you want to use with Apple Pay. It works on iPhone, Apple Watch, Mac, and iPad. If you upgrade to a new iPhone, you can automatically transfer your cards to the new device in one easy step.
Which banks support Apple Pay?
Apple Pay works with major credit and debit cards from banks around the world, with more added all the time. You can see all the banks that support Apple Pay here. If your card does not yet support Apple Pay, contact your bank for more information.
Does it cost extra to use Apple Pay?
No. Apple does not charge any fees when you use Apple Pay — in stores, online, or in apps.
Can I use Apple Pay abroad?
Apple Pay works in countries and regions that support contactless payments. Confirm with your bank, and ask about any fees they may charge for overseas usage.
How can my business accept Apple Pay?
If your business already accepts credit and debit cards, simply contact your payment provider
to start accepting Apple Pay. If you want to accept Apple Pay on your website or in your app,
visit Apple Pay for developers.
Does my business need any special equipment to accept Apple Pay?
With Tap to Pay on iPhone, you can use an iPhone to accept contactless payments through an app supported by any of the participating payment service providers. No extra terminal or hardware is required. 2 If you already have a payment terminal, contact your payment service provider to find out if it accepts contactless payments.
How do I let my customers know I accept Apple Pay?
Download the Apple Pay mark to use within email, on your terminal screen, on your website, and in your app. You can also order Apple Pay decals to put on your storefront window and register.
- Download the decal and guidelines
- View online marketing guidelines
- Order Apple Pay decals for your store
- Add Apple Pay to your Maps listing
What’s the difference between Apple Cash and Apple Pay?
Apple Cash is a digital card in Wallet that lets you send and receive money in Messages or Wallet. The money you receive appears on your Apple Cash card in Wallet. You can spend it however you like in stores, online, and in apps with Apple Pay.
Apple Pay enables you to make secure, contactless purchases using Apple Cash, Apple Card, and any other credit and debit cards that you add to Wallet.
Availability
Apple pay is available on all devices that has a secure element chip. So secure elements is this hardware chip that dedicated to securely storing your card information and is available on iPhone 6, 6plus and future devices
Apple pay Architecture
- The first thing you need to create a Merchant Identifier , They require this and it uniquely identifies you as a merchant , Now you can set your merchant identifier up on the developer portal or through the Xcode capability window and it’s backed by the private key in a certificate . They used this certificate to securely encrypt the payment information that we generate so it’s unique to you as a merchant , No body else can decrypt the payment information . It’s just another great security benefit of apple pay . use reverse DNS format. EXAMPLE: merchant.com.wwdc.emporium. Apps that use Apple Pay need to enable the Apple Pay capabilities in Xcode. You also register a merchant ID and create a Payment Processing certificate, which is a cryptographic key that is used to securely send payment data to your server.
- Display Apple pay button in app
- Your app then receive a payment token in response (Now a payment token contains all the information you need to charge the payment , It’s encrypted using your merchant identifier certificate, so unique to you only you as the developer can decrypt it )
- Send this token to your processor and display a success sheet in your app
Payment Flow :
- First app will show/ display the your checkout flow
- Then you can ask iOS whether the user has any Apple Pay cards available because if the users doesn’t have any apple pay cards available or the device doesn’t support it, you want take them to traditional payment flow
- Now if they do , then we will present the apple pay sheet, iOS will check wether the touch Id / face ID is valid. If it is valid , apple will actually pass this information down to the dedicated secure element, which is gonna securely wrap all of this payment information in your up, this includes the cryptogram which is an encrypted piece of data required to make the payment , It’s then going to send it to apple servers. Now on apple servers it just get rewrapped using your merchant identifier , so that’s all apple are doing . This is because Apple don’t want to ship your certificate in the app right . So their server re routes the payment and encrypts it uniquely to you and its passed back up through the system where you can then send it for processing , Now assuming the processing is successful you can dismiss the payment sheet and display you own confirmation screen
How Do I process the Payment / How You Get Money (Payment Processing)
So there is two way you can process your apple pay token
- To use a payment platform , The payment platform can handle this decryption and the understanding of the cryptogram on your behalf, When you sign up, you provider them with your merchant identifier and Certificate , and they decrypt it for you and you simply send them the payment token and some payment platform actually provide native iOS development kits Swift/Objc. (Recommended)
- To process the payment your self , Now apple recommend this if you are experienced working with payments and you have some existing payment infrastructure and if you do this you are gonna decrypt it the payment token on your server and then you gonna send this to the underlying cryptogram that the secure element generated to your Merchant Acquirers , your acquiring bank and do a transaction
Merchant ID vs Payment Processing certificate
A merchant ID identifies you to Apple Pay as being able to accept payments. This identifier you register with Apple that uniquely identifies your business as a merchant able to accept payments. This ID never expires, and can be used in multiple websites and iOS apps.
A Payment Processing certificate that is associated with your merchant ID is used to encrypt/decrypt payment information. Apple Pay servers use the certificate’s public key to encrypt payment data. You (or your payment service provider) use the private key to decrypt the data to process payments
Getting Started
STEP 1 → Register a Merchant ID
- In Member Center, select Certificates, Identifiers & Profiles.
- Under Identifiers, select Merchant IDs.
- Click the Add button (+) in the upper-right corner.
- Enter a description and identifier, and click Continue.
- Review the settings, and click Register.
- Click Done.
STEP 2 → Create a Payment Processing certificate
- In Member Center, select Certificates, Identifiers & Profiles.
- Under Identifiers, select Merchant IDs.
- Select the merchant ID from the list, and click Edit.
- In the Payment Processing Certificates section, click Create Certificate. Follow the instructions to obtain or generate your certificate signing request (CSR), and click Continue.
- Click Choose File, select your CSR, and click Generate.
- Download the certificate by clicking Download, and click Done.
STEP 3 → Enable Apply Pay On App
To enable Apple Pay for your app in Xcode, open the Capabilities pane. Select the switch in the Apple Pay row, and then select the merchant IDs you want the app to use as shown in Figure 2
If you want to see Step 1 to 3 through video, here is the link
STEP 4 → Device Availability
As shown in Figure 3 , we Determined whether this device can process payment requests of not in our case true we can pass first check
canMakePayments() → Determine whether this device can process payment requests. YES if the device is generally capable of making in-app payments. NO if the device cannot make in-app payments or if the user is restricted/locked from authorizing payments.
Restricted Account
Many Apple Pay Cash users can’t tell the difference between a locked and restricted account. If you can still transfer the balance from your account to your bank or make payments in stores, within apps, and on the internet, that means that your account is just restricted. Apple has the right to restrict your account if its security system spots any suspicious activity on it.
Locked Account
On the other hand, if your account is locked, you will no longer be able to make purchases via Apple Pay Cash, or send and receive money. That also means that you won’t be able to transfer your balance to your bank account. Just like with a restricted account, Apple may lock your account if it discovers an activity that is considered suspicious on your account.
STEP 5 → Payment Network Support
Payment Network → When you go to the grocery store and swipe your card, the terminal transmits your account information to a third-party company. That company then sends the request to your financial institution, which approves or denies it based on your balance or credit limit. The third-party company then sends that information back to the merchant terminal, which approves or denies the purchase. The third-party company involved in all of this is known as a payment network. Common payment networks today include Visa , MasterCard , and Maestro .
As shown in Figure 4 we Determined whether this device can process payment requests using specific payment network brands YES if the user can authorize payments on this device using one of the payment networks supported // by the merchant // NO if the user cannot authorize payments on these networks or if the user is restricted from authorising payments.
Note: If you implement step 5 you don’t need to do step 4. User may not be able to make payments for a variety of reasons. For example, this functionality may not be supported by their hardware, or it may be restricted by parental controls. On devices that support making payments but don’t have any payment cards configured, the canMakePayments() method returns true because the hardware and parental controls allow making payments, but the canMakePayments(usingNetworks:) method returns false regardless of network.
As shown in Figure 5 in my real device I have only master card , it return false,
STEP 6 → Design Apple Pay Button
The system provides several Apple Pay button types and styles you can use in your app. Don’t create your own Apple Pay button design or attempt to mimic the system-provided button designs . For System provided button use PKPaymentButtonType (iOS). For more details please have a look
When you use the system-provided APIs, you get: Apple-approved configuration , localization , maintain ideal proportions as you change its size
Guidlines:
- Make the Apple Pay button no smaller than other payment buttons, and avoid making people scroll to see it.
- In a side-by-side layout, place the Apple Pay button to the right of an Add to Cart button.
- In a stacked layout, place the Apple Pay button above an Add to Cart button.
- By default, an Apple Pay button has rounded corners. You can change the corner radius to produce a button with square corners or a pill-shaped button
As shown in Figure 6 we setup Apple Pay button
STEP 7 → Creating a Payment Request
Encapsulates a request for payment, including information about payment processing capabilities, the payment amount, and shipping information.
As shown in Figure 7 we created a payment request object. Few things to note
- supportedNetworks → First we provide some supported networks which is array of string (The payment networks supported by the merchant) since our application supports Visa and master card we provide this only. This affects which of your user’s cards show up in the Apple Pay sheet.
- merchantIdentifier → Provided the merchantIdentifier Identifies the merchant, as previously agreed with Apple. Must match one of the merchant identifiers in the application’s entitlement. This also helps us how to encrypt your payment correctly Now you already set this up on the developer portal
- countryCode → You pass then country code ( ISO country code, it should be the country code where your payment processor is in , the country in which you’ll making the charge, so it’s not the country that the user is in ). In short is the 2-character country code where your transaction takes place.
- currencyCode → Set this property to the three-letter ISO 4217 code for the currency used by this payment request. Apple Pay interprets the amounts provided in the summary items of this request as amounts in this currency. The currency code is validated.
- merchantCapabilities → Merchant capabilities so in turns out there two different ways of generating payment data one of them is called 3DS and the other is called EMV. Now you don’t need to know how these works . Most of you use 3DS ,and you should check with your payment processor or you're acquiring bank as to the right setting for you . So agin majority of you will be 3DS but the payment platform or processor can give you the exact advice that you need here
- paymentSummaryItems → Finally what we actually charge PKPaymentSummary piece of information you like to charge it has amount and a label , amount is the class NSDecimalNumber , precisely represents number in base 10 which is very important when you are working on in finance and with currency
As show in Figure 8 This code creates a simple PKPaymentRequest object that represents a single Apple Pay payment, as well as the creation of a PKPaymentAuthorizationViewController constructed with the PKPaymentRequest instance responsible for displaying the Apple Pay payment sheet. Finally, the ViewController presents the PKPaymentAuthorizationViewController .
Recommendation
new in iOS 15, if you are in Xcode and see this error
While creating payment summary object make sure price digits should follow https://en.wikipedia.org/wiki/ISO_4217 as per country wise , we faced problem our coutry is Saudia which has 2 digit standard and we passed apple pay amount 11.397 which is three digit . In this case apple pay sheet will not open, Imagine in your production some people are saying the are unable to use or see apple pay sheet at all and you are tesing in your end with 11.39 two digit cases and you say it is working fine, It tool us 2 days to reproduce the issue
PKPaymentAuthorizationViewController(paymentRequest: paymentRequest) will return nil , And sorry no documentation for that thing
Recommendation
- Use line items to explain additional charges, discounts, pending costs, and add-on donations. A line item includes a label and cost. Don’t use line items to show an itemized list of products that make up the purchase. I saw apple reject application with this “3.1.6 Apple Pay: Apps using Apple Pay must provide all material purchase information to the user prior to sale of any good or service and must use Apple Pay branding and user interface elements correctly, as described in the Apple Pay Identity Guidelines and Human Interface Guidelines. Apps using Apple Pay to offer recurring payments must, at a minimum, disclose the following information:”
- Provide a business name after the word PAY on the same line as the total. Use the same business name people will see when they look for the charge on their bank or credit card statement. This provides reassurance that payment is going to the right place. For example: PAY [BUSINESS_NAME].
- paymentSummaryItems the last index apple automatically male it as Bold, it expect last item in this array will be total so it makes it bigger
As shown in Figure 9 there is another way to present Apple Pay payment sheet using PKPaymentAuthorizationController
PKPaymentAuthorizationController vs PKPaymentAuthorizationViewController
The PKPaymentAuthorizationController class performs the same role as the PKPaymentAuthorizationViewController class, but it does not depend on the UIKit framework. This means that the authorization controller can be used in places where a view controller cannot (for example, in watchOS apps or in SiriKit extensions). So PKPaymentAuthorizationViewController we can present on our view and PKPaymentAuthorizationController do all things itself. In short we have two ways to open apple pay sheet. We will use PKPaymentAuthorizationViewController in this tutorial
STEP 8 → Implement Delegate
As shown in Figure 10 we implemented two important delegates method
1. paymentAuthorizationViewController:didAuthorizePayment:
- Tells the delegate that the user has authorized the payment request and asks for a result. This method gives you PKPayment object and you need to return PKPaymentAuthorizationResult
- PKPayment object holds the Apple Pay authorization token, you send this token to your own server or third party processor , which do actual transaction. You wait for the processor to signal weather transaction is failed or not using PKPaymentAuthorizationResult. In our case we assume transaction is successful.
- If you return PKPaymentAuthorizationResult success case iOS display a nice check mark on the sheet as shown in Figure 10 , if something goes wrong in which case we tell the user what happened you in red message
- Ideally you shouldn’t dismiss the view controller in this delegate
2. paymentAuthorizationViewControllerDidFinish:
- Sent to the delegate when payment authorization is finished. This may occur when, the user cancels the request, or after the PKPaymentAuthorizationStatus parameter of the paymentAuthorizationViewController:didAuthorizePayment:completion: has been shown to the user. The delegate is responsible for dismissing the view controller in this method.
We will explore these method , in later section . This is the only simple example
Can we test Apple pay in simulator:
Yes. You can test apple pay using iOS 9 simulator. So you don’t need to add any testing sheet instead PKPaymentAuthorizationViewController . It’s working on iOS 9 simulator. Make sure your app run on iPhone 6, iPhone 6 plus or latest version of simulator. But you can only test frontend part , means you can’t test with your backend because The simulator Apple Pay flow won’t return a valid payment token ( payment.token.paymentData is empty (payment.token.paymentData.llength == 0 ), which could cause some people to trip up!. In addition to this It provides simulated cards for all the supported payment networks and returns dummy payment data in plain text. On a device, this data is encrypted with your merchant identifier and must be decrypted either on your server or by your payment processor. In previous examples I used fake merchantIdentifier and it is working fine . .
Use the Apple Pay Sandbox environment to test your app on a device with test cards.
Create a Sandbox Tester Account
To test Apple Pay on your sandbox site, you’ll need to use the Apple Pay Sandbox. Getting it setup takes just a few minutes and below are the steps you have to follow:
- If you don’t have one already, create an Apple Developer account.
- Log into iTunes Connect.
- Select Users and Roles, then select the Sandbox Testers link at the top of the page.
- Next to “Testers”, click ⊕ to create a new test user. Fill out the page, taking note of the email and password you used, and click Save on the upper right.
Important: If you mistakenly use a sandbox tester account to sign in to a production environment, like iTunes, on your test device instead of your test environment, the sandbox account becomes invalid and can’t be used again. If this happens, create a new sandbox tester account with a new email address.
Adding a Test Card Number on Real Device(iOS 13 devices)
- Sign out of iTunes & App Store on your device
- Sign out of iCloud
- Run app on device, and tap on Apple pay Button
- When prompted for an ID/Password, enter the Sandbox Tester credentials.
- It took entering the credentials a couple of times, but now you Setting → Tap on iTunes you will see SandBox Environment
- Go to Wallet and tap Add Credit or Debit Card.
- Tap Add Credit or Debit Card, then when prompted to photograph your card tap Enter Card Details Manually.
- Enter 4761 1200 1000 0492, expiration 11/2022, CVV 533 (this is a test Visa card; for more test cards see the Apple Pay Sandbox Guide).
Note: To provision test cards on your device and use the sandbox, you will need to make sure that your device’s region is set to a country or region that supports Apple Pay. Means as shown in Figure 11 we used Visa test card your device region should match or your region should have availability of VISA
Real Device With Wrong Merchant Identifier
If you run the application with wrong merchant identifier , it will not present the payment authentication sheet , and log in the error on the console
Failed to present in-app payment interface: Error Domain=PKPassKitErrorDomain Code=4 “No entitlement for merchant identifier: merchant.com.ali.com” UserInfo=
As show in Figure 12 , you get the payment token on sandbox environment on real device. Note this token will use to test our backend integration, like certificate is working fine . It replicated what we get in production.
On Figure 13 , token we get the simulated and can’t be used to test backend integration
Request Billing Information
A billing address is the address connected to a specific form of payment, which is typically a credit or debit card. Companies use the billing address to verify the authorized use of such a card. It is also where companies send paper bills and bank statements. Billing addresses must match what the card issuing bank has on file, or the attempted purchase may not go through. When the cardholder moves, the billing address must change to match the holder’s current address. This can be accomplished by contacting the card issuing bank.
requiredBillingContactFields → The fields of billing information that you require from the user to process the transaction.Use requiredBillingContactFields to request the user's billing address that is associated with their payment method
As shown in Figure 14 , we added requiredBillingContactFields while creating our PKPaymentRequest object
As show in Figure 15 , we didn’t provide billing address , so it ask us to give in the sheet . Tap on ! mark and you can search already exists or enter manually
As shown in Figure 16, we get extracted billing address , Apple are hopping that you don’t need the billing information just for verification purpose , But it is available if your system still requires it.
As shown in Figure 17 we validate address locally and send specific error to user instead of telling generic error like Invalid Billing address
It will make the error field red so user can , easily update it’s billing information
Request Shipping Information
requiredShippingContactFields → The fields of shipping information that you require from the user to fulfill the order. Use requiredShippingContactFields to request the user's address and other contact information that you require to fulfill the order. You will receive the customer’s name when you request postalAddress . If you don't need the customer's address, you can request the name contact field directly.
As shown in Figure 19 , we requested apple pay to give user shipping address, if you selling physical products and you need to send it someone you’ll want a shipping address as well , It’s very easy for customer to change the shipping information. Since phone number is not provided it gives the error
As shown inn Figure 20 , we display error on payment sheet after validating shipping address and same as billing address user can look what actual failed , in this case invalid zip code.
PKPayment → Represents the result of authorizing a payment request and contains payment information, encrypted in the payment token.
PKPaymentToken → Contains the user’s payment credentials. The information used to process a payment has a nested data structure. A payment token is an instance of the PKPaymentToken class. The value of its paymentData property is a JSON dictionary, which has a header with information used for validation, and encrypted payment data. The encrypted data includes information such as the amount and cardholder name and other information used for the specific payment processing protocol.
Flow After You Send Payment Token to Server / Payment processing platform
Как бесконтактно платить через Apple Pay
С 10 марта 2022 г. Apple Pay больше не функционирует на территории России.
Системы бесконтактных платежей пользуются сегодня большой популярностью. Они позволяют оставить дома кошелек и банковскую карту и оплачивать товары и услуги со смартфона.
Одной из таких систем является Apple Pay, разработанная компанией Apple. Впервые ее запустили 20 октября 2014 года в США. С 4 октября 2016 года она доступна в России. За прошедшие с тех пор годы система Apple Pay на практике доказала свое удобство и безопасность.
Apple Pay: что это такое
Apple Pay – система бесконтактных платежей, доступная тем, кто пользуется некоторыми смартфонами и умными часами производства компании Apple. Ее работа основана на технологии NFC, Near Field Communication, «коммуникации ближнего поля». Для поддержки этой технологии в устройстве должен быть специальный модуль, и это одна из причин, по которым не все девайсы Apple позволяют ее использовать – в старых «Айфонах» нет модуля NFC.
Благодаря Apple Pay для того, чтобы оплатить товары и услуги, надо лишь поднести смартфон к специальному терминалу. Эту систему также можно использовать для оплаты покупок, сделанных через интернет в браузере Safari и в приложениях. В этом случае она работает даже на устройствах без модуля NFC.
Где можно расплачиваться с помощью Apple Pay
Эту технологию можно использовать в магазинах и аптеках, на заправках и в ресторанах, в салонах красоты и в кинотеатрах. Главное, чтобы в точке продаж, где вы хотите воспользоваться системой Apple Pay, принимали бесконтактные платежи.
Самый простой способ узнать, есть ли техническая возможность для использования Apple Pay – это спросить продавца либо менеджера. Но обычно в точках продаж и различных заведениях, где поддерживается эта система, можно увидеть специальные обозначения. Их наносят на терминалы оплаты, на информационные стенды на кассах и даже на двери.
Что нужно для подключения Apple Pay
Ответ на этот вопрос состоит из двух частей.
Во-первых, нужно, чтобы мобильное устройство, которым вы пользуетесь, поддерживало Apple Pay.
Во-вторых, необходимо, чтобы банк, выпустивший вашу карту, взаимодействовал с этой системой бесконтактных платежей.
Какие «Айфоны» поддерживают Apple Pay
Чтобы вы могли воспользоваться этим способом бесконтактной оплаты, у телефона должны быть:
технология блокировки и разблокировки, которая дает возможность идентифицировать пользователя.
Этим требованиям соответствуют все смартфоны производства Apple, начиная с iPhone 6. Полный список устройств выглядит следующим образом:
- iPhone 6/6 Plus;
- iPhone 6s/6s Plus;
- iPhone SE (2016);
- iPhone 7/7 Plus;
- iPhone 8/8 Plus;
- iPhone X;
- iPhone XS/XS Max;
- iPhone XR;
- iPhone SE (2020);
- iPhone 11/11 Pro/11 Pro Max;
- iPhone 12/12 Pro/12 Pro Max;
- iPhone 13/13 Pro/ 13 Pro Max.
Какие банковские карты можно использовать
Apple Pay поддерживает кредитные, дебетовые и предоплаченные карты, выпускаемые крупными банками. В России в списке банков, взаимодействующих с этой системой бесконтактных платежей, представлено примерно 150 организаций. Если вашего банка нет в списке, возможно, он скоро в нем появится.
Также некоторые банки дают возможность использовать Apple Pay только на картах определенной платежной системы, например, только Visa или только MasterCard. Уточнить эту информацию вы можете в банке, услугами которого пользуетесь.
Как добавить банковскую карту
Перед тем как начать пользоваться системой Apple Pay, надо добавить свою банковскую карточку. Это можно сделать в приложении Wallet.
Это предустановленное приложение, которое уже есть в вашем «Айфоне». Оно предназначено для хранения номеров банковских карт, а также бонусных карт, посадочных талонов, билетов в кино и прочей подобной информации.
- Откройте приложение Wallet.
- Нажмите на кнопку «Добавить» – она представляет собой круглую иконку со знаком +.
- Выберите тип карты
- Отсканируйте лицевую сторону карты с номером, именем держателя и сроком действия.
- Далее следуйте указаниям в приложении.
Если раньше вы пользовались картой в приложении Wallet, но не привязывали ее к Apple Pay, после нажатия на кнопку «Добавить» зайдите в раздел «Ранее добавленные карты». Выберите в списке карту или несколько карт и нажмите «Продолжить». После этого следуйте указаниям в приложении.
Как оплачивать товары и услуги с помощью «Айфона»
Если вы пользуетесь «Айфоном» с технологией аутентификации Face ID:
- дважды нажмите на боковую кнопку;
- после того, как на экране отобразится карта, посмотрите на смартфон, чтобы фронтальная камера опознала вас по лицу;
- поднесите телефон к бесконтактному считывающему устройству так, чтобы его верхняя часть оказалась в нескольких сантиметрах от терминала;
- дождитесь, пока на экране появятся надпись «Готово» и галочка.
Если для разблокировки вашего «Айфона» используется дактилоскопический датчик Touch ID:
- приложите палец к датчику;
- поднесите телефон к бесконтактному считывающему устройству – его верхняя часть должна быть в нескольких сантиметрах от терминала;
- дождитесь, пока на дисплее появятся надпись «Готово» и галочка.
В некоторых случаях, например, если сумма покупки составляет более 1000 рублей, понадобится ввести PIN-код своей карты.
Если у вас добавлено в сервис Apple Pay несколько карт, одна из них отображается по умолчанию. Если не предпринять никаких дополнительных действий, оплата проходит с нее. Если вы хотите сменить карту, сначала коснитесь на экране той, которая установлена по умолчанию, а потом выберите подходящую из открывшегося списка.
Доступны ли бесконтактные платежи на умных часах Apple Watch
Все модели смарт-часов Apple поддерживают этот сервис. Чтобы воспользоваться им, надо заранее настроить на умных часах код-пароль, состоящий из четырех знаков. Также нужно привязать банковскую карту в приложении Watch. Даже если вы уже делали это для «Айфона», для умных часов операцию надо будет повторить.
- дважды нажмите боковую кнопку;
- выберите карту;
- введите код-пароль;
- поднесите часы к терминалу – если платеж выполнен, вы услышите звуковой сигнал и почувствуете вибрацию.
Насколько безопасны платежи через Apple Pay
Пользоваться этим сервисом существенно безопаснее, чем наличными или физической картой. Данные вашей банковской карты и ваша личность не будут известны продавцу и не сохранятся на серверах Apple. Система Apple Pay не хранит данные о транзакции, которые можно было бы использовать для раскрытия вашей личности.
Для бесконтактной оплаты необходимо пройти аутентификацию по Face ID, Touch ID или код-паролю. Это значит, что злоумышленник, укравший ваш «Айфон» или умные часы Apple Watch, или тот, кто найдет потерянное вами устройство, не сможет использовать их, чтобы оплачивать свои покупки вашими деньгами.
Важно и то, что при бесконтактной оплате вы касаетесь только своего устройства. Вам не нужно дотрагиваться до наличных денег или кнопок терминала, которых перед этим касались другие люди.
Что такое Apple Pay и как он работает на самом деле
 В закладки

Разбираемся с особенностями и безопасностью бесконтактного сервиса Apple, который сегодня запустился в России.
Для начала обязательно прочитайте инструкцию по настройке Apple Pay в России. Здесь разберём общие вопросы работы и безопасности, чтобы вы знали, чем пользуетесь и как это работает.
Что такое Apple Pay?
Сервис Apple Pay создан для упрощения процесса купли/продажи. Вместо использования пластиковой карты или наличных, любую покупку можно совершить с помощью гаджета Apple.
Совместимые устройства для оплаты в оффлайне:
- iPhone 6 и 6 Plus
- iPhone 6S и 6S Plus
- iPhone 7 / 7 Plus
- Apple Watch
- iPhone SE
Через iPad и Mac можно расплачиваться только в интернете.
Оплата происходит, когда пользователь подносит свой iPhone или Apple Watch к бесконтактному терминалу. После нескольких секунд на экране появляется сообщение о возможности проведения оплаты и предложением подтвердить транзакцию через сканер отпечатка или пароль
Apple Pay существует уже более полутора лет. По состоянию на 2016-й год, он работает в 9 странах: Англия, Австралия, Гонконг, Канада, Китай, Сингапур, США, Швейцария и Франция. Сегодня система появилась в России.
Как это работает?
Основа: механизм системы основан на технологии близкой передачи данных NFC (на расстоянии до 20 см) в связке с чипом Secure Element, который хранит данные о банковской карте в зашифрованном виде. Secure Element представляет индустриальный стандарт в области финансовых операций. На этом чипе выполняется специальное Java-приложение.
Secure Element: это область выделенной памяти, отделенной от системной. В этой области хранятся данные банковских карт пользователя. Ни одна программа не имеет к ней доступ, данные никуда не передаются и даже Apple не может повлиять на эту стратегию. Так что никто не узнает о твоих покупках и движении денежных средств.
Secure Enclave: это компонент, который управляет процессом аутентификации и запускает платежные транзакции. Вместе с тем, он хранит отпечаток пальца для Touch ID.
Apple Pay Servers: это серверная часть, управляющая состоянием кредитных и дебетовых карт в приложении Wallet, вместе с номером устройства, хранящимся в Secure Element. Apple Pay Servers также отвечают за перекодирование платежных сведений внутри приложений.
История и партнёры
Технология бесконтактной оплаты применяется достаточно давно – с середины первого десятилетия 21-го века. Но за всё время своего существования она не снискала популярности. Даже концепция Apple Pay не нова. Google уже пытался занять место в этой нише со своим неудобным сервисом Google Wallet.
Сервис Apple Pay совместим со многими уже существующими бесконтактными считывателями: Visa PayWave, MasterCard PayPass, American Express и ExpressDay.
Кроме того, что сервис от Apple поддерживают сотни банков, расплатиться с помощью смартфона можно на любых терминалах с поддержкой бесконтактных методов оплаты.
Где можно расплатиться Apple Pay
Оплата проводится без ввода номера банковской карты и других сведений о банке. Достаточно просто поднести палец к Touch ID.
В процессе покупки Apple Pay может передавать дополнительную информацию, хранящуюся в телефоне покупателя, такую как: адрес доставки и номер телефона.
В чём «профит» Apple от сервиса Apple Pay? Всё просто: корпорация с каждой транзакции получает по 0,15% – это плата за обслуживание сервиса платежей и создание прикладных инструментов. Эти деньги ей выплачивают банки: Citi, плюс существующие платежные системы, MasterCard и Visa.
Что насчёт безопасности?

Apple Pay обладает многоуровневой системой защиты: уникальный идентификатор устройства, динамически генерируемые коды безопасности для каждой платежной транзакции, биометрические сведения – отпечаток пальца.
В совокупности эти средства обеспечивают более надёжную безопасность, чем магнитная полоса и даже чип в банковской карте.
Во время создания подключения устройства обмениваются одноразовыми токенами, которые удаляются при окончании связи. Токен призван заменить номер карты, чтобы последний никто не узнал. Токен представляет сгенерированный случайным образом номер, поэтому номер банковской карты, скрываемым за ним, нельзя расшифровать.
Все это объединяется и заменяет собой CVV банковской карты для платежной транзакции. После установки связи и обмена токенами для передачи данных, они шифруются. Эти зашифрованные сообщения отражают свою принадлежность определенному устройству, создавшему используемый токен.
Даже если токен будет перехвачен, это не даст злоумышленнику ценной информации, так как после разрыва соединения токен удаляется.

Хотя сообщение содержит информацию о покупателе, продавце, сумме денег, участвующей в транзакции и банке, предоставившем карту, все данные надежно зашифрованы. Apple не раскрывает информацию об алгоритме шифрования, отчего вызывает бурю негодования у некоторых специалистов по информационной безопасности.
Apple мотивирует своих партнеров перейти на более современные терминалы оплаты по спецификации EMV, то есть замены магнитной полосы пластиковых карт на чип – Secure Element, взломать который с помощью перехвата данных практически невозможно.
Теория взлома
В этой бочке меда нашлась ложка дегтя. Как бы ни старались разработчики, в сервисе Apple Pay есть проблемные места. И это во многом зависит не от Apple. В процессе движения средств задействованы многие другие структуры, в том числе банки с их огромными пробелами в безопасности.
Сканер отпечатков пальцев не всегда работает корректно. Предоставляя современное и, казалось бы, надежное средство удостоверения личности, оно одновременно является огромной дырой в безопасности. Если Touch ID выйдет из строя, можно воспользоваться пин-кодом. Это сводит на нет всю продвинутую безопасность.
Пин-код можно подглядеть, спутать, нажать не те клавиши, короче, человеческий фактор в действии. При оплате с помощью часов Apple Watch отпечаток не требуется, в этом случае вопрос о безопасности встаёт острее.
В связи с этим появились дополнительные инструменты проверки: секретный код, одноразовый пароль, звонок в службу поддержки клиентов или предоставление информации о предыдущих покупках.
Некоторые банки в других странах требуют от пользователя авторизации в мобильном интернет-банкинге. Эти действия уменьшают удобство использования Apple Pay из-за появления дополнительных уровней проверки.
На данный момент в России работает самый простой формат оплаты без дополнительных авторизаций в процессе.
Между тем, Apple Pay по-прежнему не взломана.
Конкуренты Apple Pay
В 2011-м году на рынок бесконтактной оплаты вышел Google Wallet, но он не стал популярен во многом из-за того, что на рынке NFC платежей был сильный конкурент – Softcard, поддерживаемый крупнейшими сотовыми операторами США. Но сейчас он сдулся. И Google купила его за $100 млн.
Используя наработки в области бесконтактных платежей Softcard, Google запустила платёжный сервис Android Pay, который работает по принципам близким к Apple Pay.
На рынке также работает сервис Samsung Pay. Для реализации Samsung купила компанию LoopPay за $250 млн. Последняя предлагает дополнительные устройства для бесконтактной оплаты. Главное преимущество LoopPay, а теперь Samsung Pay – это совместимость со старыми аппаратами.
Еще есть PayPal с сервисом, проводящим платежи через QR-коды. Он разработана компанией Paydiant, которая была куплена PayPal. Для сканирования QR-кодов используется смартфон с операционной системой iOS или Android и установленной программой CurrentC, работающей по технологии Paydiant.
Минус налицо: временная задержка – надо аккуратно удерживать смартфон над QR-кодом для осуществления снимка.
Будущее Apple Pay

В ближайшем будущем, когда большее количество точек розничной торговли перейдут на Apple Pay, с помощью этой системы можно выдавать скидки и продавать таргетированную рекламу в соответствии с потребностями потребителя. Ведь смартфон знает о вас почти все.
Но есть в этом и другая сторона. Оплата упростилась, время ее осуществления уменьшилось, направленной рекламы стало больше. Соответственно, пользователи будут охотнее тратить свои деньги.
Со временем и распространением бесконтактных терминалов, Apple Pay может стать заменой для пластиковых карт Visa или MasterCard.
Ну а пока об этом говорить рано.
В закладки