Over provisioning.
Many of us fondly remember the traditional “15 squeres puzzle”. with just one empty square, shifting pieces to new locations requires a fair amount of effort because there is so little free sapce.
having the puzzle fifteen-sixthenths full makes for challenging and entertaining gameplay. But it’s certainly not the kind of performance limitation you want in your solid state drive(SSD).
Image if the same puzzle were only half-full with eight pieces. It could be solved almost instantly. More free space enables faster piece movement and task (game) completion.
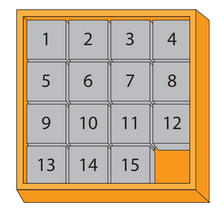
SSDs work on a very similar principle. visualize the NAND flash memory inside of an SSD as a puzzle. Except that the amount of free sapce in a drive is not fixed. Manufacturers utilize various tatics to improve performance. and one of these is to allocate moer free space. a process known as over-provisioning.
the miminum amount of over-provisioning for an SSD is set at the factory. but users can allocate more sapce for better performance. Either way, a moderate understading of over provisioning is necessary in order to make better SSD puchasing decisions and to configure drvices in the most advantageous way possible for each unique environment and use case.
Background : SSD writes.
SDDs work very differently from HDD. The fundamental unit of NAND flash memory is typically a 4 kilobyte (4KB) page. and there are usually 128 pages in a block. Writes can happen one page at a time. but only on blank(or erased) pages.
Pages cannot be directly overwritten. Rather, they must first be erased. however, erasing a page is complicated because of the fact that entire blocks of pages must be erase at one time.
When the host wants to rewrite to an address. the SSD actually writes to a different, black page and then updates the logical block address (LBA) table (much like the MFT of an HDD). Inside the LBA table, the original page is marked as ‘invalid’ and the new page is marked as the current location for the new data.
Of course, SSDs must erase these invalid pages of data at some point, or the usable space on the SSD would eventually fill up.
SSDs periodically go through a process called garbage collection to clear out invalid pages of data. During this process. the SSD controller, or flash controller, that manages NAND flash memory in an SSD, reads all the good pages of a block (skipping the invalid pages) and writes them to a new erased block.
Introduction

This is not a deep dive into SSD technology, however many of the high-level concepts related to performance and write endurance are summarized. Many aspects of SSD technology have been left out for brevity.
The goal of this article is to help you understand why SSD fail under heavy write workloads. And how I improved SSD write endurance of my on-premise Kubernetes cluster using etcd on SSD devices. At a high level etcd is the key value database used to store the configuration of the Kubernetes cluster, the actual state of the system and the desired state of the system. The etcd produces a steady steam 24x7x365 of disk writes to storage. This article can apply to any application dealing with heavy write workloads on SSD storage.
What Got me Here?
The abbreviated story is that I used a popular name-brand consumer grade SSD in a small on-premise Kubernetes cluster being used as a proof of concept (not enterprise grade servers) and experienced 100% failure rate of the six SSDs within 1 week of use. All of them had to be replaced.
This lead me look more carefully at the SSD brand and research how to improve write endurance. I won’t say which brand failed so quickly as my sample size was not large enough to bad-mouth the vendor, and they refunded me without issue. I will state that I switched to Samsung brand SSDs which I manually over-provisioned and these have been running great for several months.
I didn’t have access to devices well known for endurance like the Intel Optane or Kioxia SSDs. This experiment is still in progress and being monitored.
What is Over-Provisioning?
Over-Provisioning an SSD is just an inclusion of extra storage capacity used to increase the endurance of the SSD by distributing the number of writes and erases across a larger population of NAND flash memory blocks and pages over time. In addition it improves write performance by increasing the probability that a write operation will have immediate access to a pre-erased block.
All SSDs reserve some amount of space to support write operations (see How SSD are Written below). The reserved space can be used for the controller firmware, reserved space for failed block replacements, etc. The factory determines the minimum amount of space the SSD will have for over-provisioning. However, you can allocate more space for better performance and improved write endurance.
How SSD are Written
The smallest addressable unit of NAND flash memory is typically a 4KiB page. Then typically 64 of these pages are grouped into a block of 256KiB. While the SSD is able to write one 4KiB page at a time, it can only write to a empty (blank) page.
It is impossible with NAND flash to directly update an existing page which has data. To update an existing page it has to be erased. However, individual pages cannot be erased. Only an entire block of 64 4KiB pages can be erased at one time. Instead the SSD will write to a different blank page and then update the Logical Block Address (LBA) table. Inside the LBA table, the original page is marked as invalid and the new page is marked as the current location for the new data.
Garbage Collecting
While the old page is marked as invalid that space is not yet available for reuse. Based on some schedule the SSD will erase all pages marked as invalid . This scheduled process is called Garbage Collecting:
- STEP1 — The SSD controller which manages the NAND flash memory will locate block(s) which have page(s) marked as invalid .
- The controller will read all the valid pages of the block(s) (skipping the invalid pages) and re-write the valid pages to a new block.
- STEP2 —The original block of 64 pages is then erased allowing it to be used for new data.
Garbage Collecting does not improve performance within a single pass. It will take a number of writing data and garbage collecting cycles to consolidate the freed up spaces to improve performance.
Factory Over-Provisioning Basics
Most technical people are aware that one gigabyte of storage is not 1,000,000,000 bytes. They know it is some multiplication of 1024 bytes (which would be 1,048,576 * 1024 or more precisely 2³⁰ bytes which is 1,073,741,824 bytes). This is the difference in marketing terms between one gigabyte (GB) and one gibibyte (Gib). There is roughly about 7.37% difference between the two terms. That difference is typically the minimum reserved space for over-provisioning, sometimes called the “built-in” amount, but the actual amount could be higher especially with higher quality SSDs.
Typically the minimum reserved space for Over-Provisioning is just the difference between binary and decimal naming conventions used to describe how large an SSD is.
For example, a 128 GB SSD would have a minimum reserved space of 128 * 73,741,824 = 9,438,953,472 bytes of over-provisioning.
So in theory if you completely filled up the SSD, it will still have that 7.37% of disk space to support disk writes (disk write performance will suffer with such little space to work with).
To improve the write performance issue, some manufacture will simply reduce the capacity of the SSD. If you see a 100GB SSD, it is probably a native 128GB device with 28GB used for over-provisioning. That would be 28% over-provisioning in addition to the 7.37% minimum built-in.
Write Amplifications
The SSD writes often require writing data more than once. You have the initial write to save the data the first time and later when moving data during multiple garbage collection cycles. This results in more data being written to the SSD flash memory than was originally issued by the host system. This is known as a write amplification which is not desirable as it increases wear on the flash and reduces available bandwidth to flash memory.
Many factors contribute to write amplification such as if the data is written randomly vs. sequentially. As less space is available, and less contiguous blocks are available data becomes written to more randomly. Writing to non-sequential LBAs have the largest impact on write amplifications.
Data compression reduces the number of pages and blocks written and helps reduce write amplifications. Consider using a filesystem that supports compression.
The SSD usually is not aware of which blocks of data are invalid and available for reuse with new data. It is not until the Operating System tries to store new data in a previously used location that the SSD knows that a particular location contains invalid data. Otherwise the SSD can only track free space not consumed by user data, everything else the SSD considers “valid data”.
The TRIM command enables the Operating System to alert the SSD on file deletions about pages which contain unneeded data to be tagged as invalid . These invalid pages are not copied during the next garbage collection and wear leveling. This all helps to reduce write amplification and improve performance.
The larger the amount of over-provisioning, the better the SSD will perform over longer periods of time. Especially for workloads with lots of random writes.
NAND Cell Write Limits
NAND flash memory can only be written to and erased a limited number of times. You would expect this limit to get better with each generation of storage devices, however apparently the opposite has happened as manufactures try to make SSD storage cheaper:
- SLC (Single Level Cell) flash holds 1 bit of data per cell. Depending on brand had a lifetime of about 50,000 to 100,000 write/erase cycles.
- MLC (Multi Level Cell) flash holds 2 bits of data per cell. Lower cost, lower speed, lower lifetime of about 1,000 to 10,000 write/erase cycles.
- TLC (Triple Level Cell) flash holds 3 bits of data per cell with lifetimes between 3,000 and 5,000 write/erase cycles. Other variants of TLC sometimes called 3D NAND or V-NAND (Vertical NAND) the lifetimes dropped as low as 1,000 cycles.
- QLC (Quad Level Cell) flash holds 4 bits of data per cell….
- PLC (Penta Level Cell) flash holds 5 bits….
Wear-Leveling
This wearing out of cells is responsible for the physical limits on the lifetime of NAND flash memory. When data is repeatedly written in areas of the NAND the respective cells wear out quickly. Wear-leveling is a function of the SSD that helps prevent repeated writes to the same cells. It enables cells to be utilized more evenly by swapping the blocks exposed to high write cycles with free blocks.
How Much to Allocate to Over-Provisioning
While increasing the space allocated to Over-Provisioning has the advantage of improving the performance and lifetime of the SSD (write durability) it also decreases the available space for the host to use.
How much to allocate will depend on your storage requirements and types of applications used. I personally do not bother to adjust the over-provisioning area on my laptops or desktops. Nor on my servers where SSDs used for generic file storage which are part of larger storage pools. Once the SSDs are going to host database type applications, high-write transaction logs, then I will adjust the over-provisioned storage area.
In my case it was planning for the Kubernetes etcd key value database store. The etcd storage is not large. By default the storage limit size is 2GB and something significantly smaller than that is expected. Somewhere around 50MB to 500MB range is typical for small to medium clusters.
The etcd RAFT consensus protocol depends on persistently storing metadata to a log — the majority of etcd cluster members must write EVERY request to disk. The etcd stores multiple versions of keys, takes snapshots and merges them back with previous on-disk snapshots. It also performs inflight compaction to remove prior key revisions. This constant write, rewrite, and data shuffling 24x7x365 can wear out an SSD quicker than you would expect.
On my small three etcd master nodes proof of concept cluster at pretty much idle load, Prometheus shows on average 15kB/s sustained writes. That is about 54MB/hour which we can round to 40GB/month being written to a very small amount of SSD space. Excessive wear leveling and failed NAND cells is a valid concern.
I decided that 240GB of 1TB SSD was enough local storage for my needs. (I use 2 SSDs per node, over-provisioned identically configured as a mirror). That is roughly 760GB (75% of storage) being allocated to over-provisioning (per device). I expect this to provide a few years of service.
Determine Current Over-Provisioning
The smartctl utility is the Linux version of SmartMonTools used to interact with the Self-Monitoring, Analysis and Reporting Technology (SMART) system built into many disk devices. Before over-provisioning, I used smartctl to show the device information:
- The starting user capacity is 1,000,204,886,016 bytes [1.00 TB]
- Assuming actual capacity is 1,099,511,627,776 bytes [1 TiB]
- Built-in Over-Provisioning is 99,306,761,760 bytes [99.3 GB] (about 10% OP)
Calculate Sectors Needed
We need to convert the desired usable space into the number of sectors required to hold that space. As stated above, my requirement is about 240GB of disk space.
240 Gib = 257,698,037,760 bytes. As smartctl output above shows, the sector size of this device is 512 bytes. We then divide the desired byte count by 512 to get 503,316,480 sectors (if your device reports 4096 byte sectors then divide by that instead).
I now have my magic number of 503316480 sectors. Next we want to instruct the SSD device that this is now the total number of available sectors which can be used for User Storage. All remaining sectors are reserved in the Host Protected Area (HPA) to be used for Over-Provisioning.
How to Adjust Over-Provisioning?
Most SSD manufactures provide custom tool for this. However, the standard Linux hdparm disk management tool can be used with SATA based SSDs, and I will demonstrate it below.
I have seen conflicting information if this can be adjusted on an active working SSD. I personally wouldn’t do that. I suggest adjusting the Over-Provisioning area before creating partitions and formatting the device for use.
The hdparm utility might not be installed by default. Don’t be surprised if you need to install that manually from your package repository.
- The N parameter is used to set the maximum visible number of sectors.
- The p makes the change permanent (you can only issue one permanent change per session, if you need to change this, power off the computer first before attempting again)
- The — yes-i-know-what-i-am-doing is a required flag since this is a destructive operation. If you do not supply this flag you will get an error message about it.
- The /dev/sda is the device name to be updated. Your device name may be different.
Over-Provision Verification
At this point it is HIGHLY suggest you reboot the system and test the hdparm command again to make sure it is still reported correctly. It’s possible some Linux distributions have HPA disabled by default which will ignore the changed settings.
You should be able to use hdparm with -N to confirm the HPA has been unlocked:
Lastly you can confirm with smartctl that the new User Capacity is reported correctly:
The User Capacity is now reported as 257,698,037,760 bytes which is 240 Gib. Now the SSD device is ready to be partitioned and formatted to suit your needs.
Conclusion
Over-Provisioning is a proven technique that has been used for many years. I’m expecting this to last quiet a while.
Notes on NVMe Over-Provisioning
In my opinion, the need to over-provision is from the use of NAND flash. Changing the disk interface from SATA to NVMe doesn’t really change the need to over-provision if you expect to have a write heavy application.
The hdparm utility does not support NVMe devices and the instructions above will not work for NVMe storage devices. However, the utilities provides by the manufacture such as Samsung Magician does allow you to change the over-provisioning on their NVMe drives:
What Is SSD Over-Provisioning (OP)? How to Set up OP on SSDs?
SSDs originated in the 1950s and now go mainstream. Many users have a basic knowledge of this kind of drive but the concept of SSD over-provisioning is still confusing. This post from MiniTool is tailored to detail what SSD over-provisioning is and explains why it is necessary.
What Is SSD Over-provisioning (OP)?
To better understand what SSD over-provisioning is, let’s first learn how data is stored and erased on SSDs.
How Do SSDs Store Data?
As we know, SSDs store data relying on NAND flash memory. Due to this, the data on SSDs cannot be overwritten when new data is written in. Why? Keep reading.
Each NAND flash memory consists of several blocks and each block consists of around 128 pages. Data on SSDs is read and written at the page level but is erased at the block level. Existing data must be erased to write new data. Therefore, data won’t be overwritten on SSDs.

However, the first erasing process and then the writing process will decrease the overall write performance of SSDs. To maintain the write performance, a process called garbage collection (GC) is utilized. This process is to create free blocks within SSDs by collecting valid pages into a single location and erasing the blocks containing invalid pages.
However, the GC process also presents a new challenge—it interferes with the host write. To address the challenge, during firmware programming, manufacturers allocate a certain percentage of an SSD capacity for extra write operations and the extra capacity is called over-provisioning. The process creates a permanent swap space to SSD’s controller to manage all the data traffic and storage for SSDs.
What’s the difference between solid-state drive and hard drive? Which one to use for your PC? Read this post to learn more on SSD VS HDD now.
SSD Over Provisioning
SSD over-provisioning (OP), the inclusion of extra storage in SSDs, is inaccessible to users and is not displayed in the host operating system. The OP ratio formula is below:
OP (%) = ((Physical Capacity – User Capacity) / User Capacity) * 100
For instance, when 60GB of a 64GB SSD is used as the user capacity, 4GB is allocated to the OP and the OP (%) is about 7%.
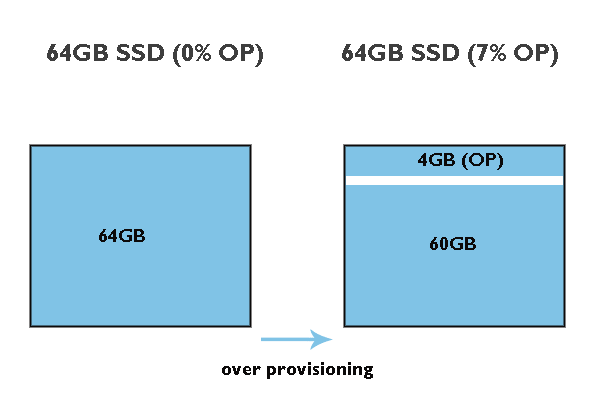
More benefits of SSD over-provisioning:
- Reduce time for Garbage Collection: As previously stated, GC creates free blocks to temporarily store data while erasing blocks of invalid data. In this case, OP gives controllers extra free space needed to move data and results in faster execution.
- Reduce power consumption: Thanks to OP, SSD controllers can operate quickly, resulting in less power from devices to complete tasks. : OP offers the flash controller extra buffer space for managing P/E cycles and ensuring a write operation will have immediate access to a pre-erased block. So, overprovisioning increases SSD performance and even maintains SSD performance over time.
- Increase SSD lifespan: OP can make SSDs work more smartly, so wear and tear will be minimized on SSDs.
Set up Over Proversioning on SSDs
OP can prolong SSD lifespan and boost SSD performance. Although SSD manufacturers have allocated a certain space of SSDs for OP, Samsung and Crucial allow you to adjust the size of the space if you require additional OP on their SSDs. If you are using SSDs of other brands, there is also a trick. Scroll down to see the details.
Set up Over Proversioning on Samsung SSDs
Samsung allows its users to use Samsung Magician to adjust the default OP (6.7%) of DC SSDs.
Let’s see how to set up provisioning on Samsung SSDs.
Step 1: Go to the official website to download Samsung Magician.
Step 2: When the downloading process finishes, uncompress the downloaded files and install them over-provisioning tool following the on-screen wizard.
Step 3: Once the tool launches, you can see your Samsung SSD is listed in the right panel. Then, navigate to the Over Provisioning option in the left panel.
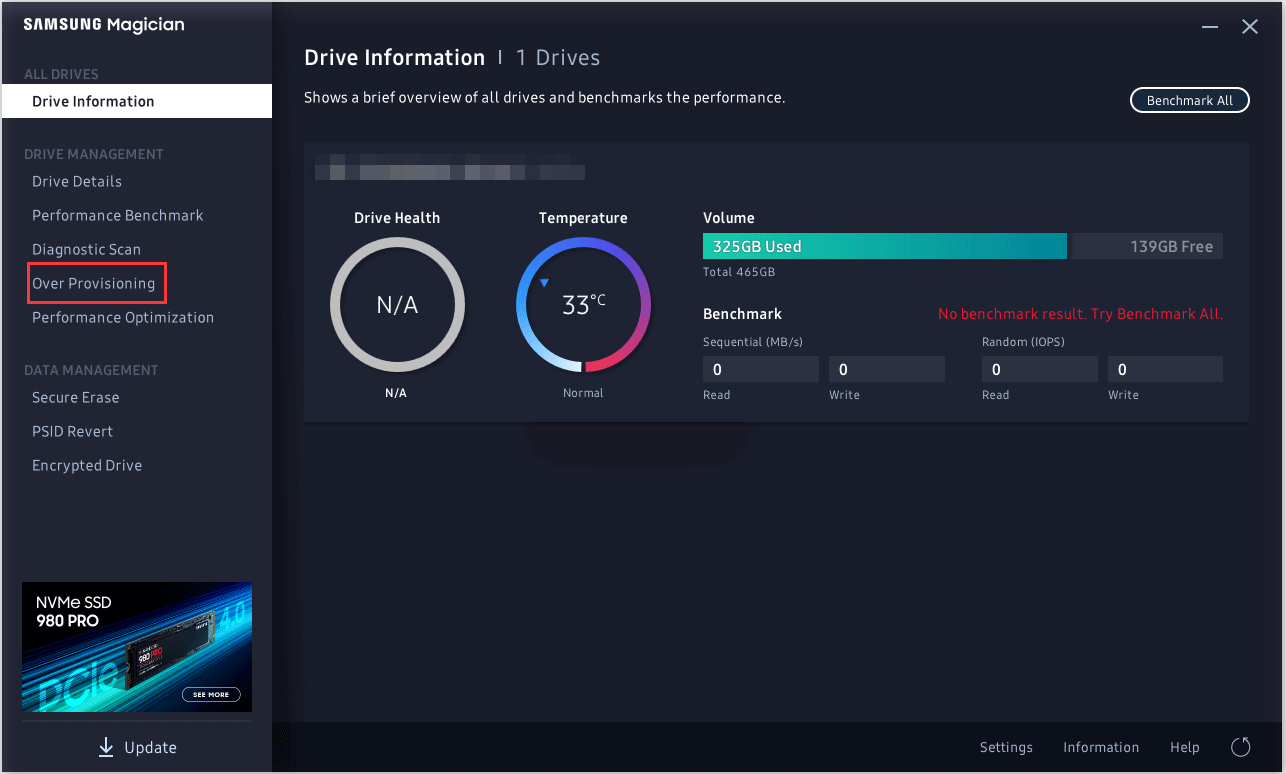
Step 4: Once the tool completes scanning, click the Set OP button at the bottom right corner to set the amount you want to allocate. Generally, the ideal OP (%) is 10% but the higher the better.
Wait for the task to finish. Once the task finishes, the over provisioning has enabled.
Set up Over Provisioning on Crucial SSDs
To set up over provisioning on Crucial SSDs, you should utilize the Crucial over provisioning tool called Storage Executive.
But before setting up over provisioning on Crucial SSDs using the tool, you should make sure your Crucial drive is supported by the Crucial over provisioning tool and is ready for over provisioning to be enabled—there should be a separate partition with a drive letter listed at the end of the SSD.
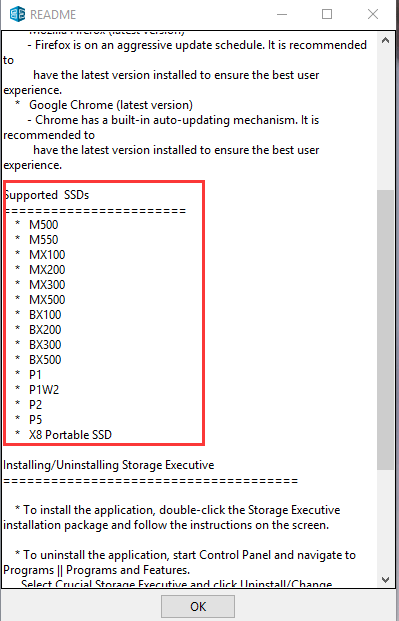
The supported SSDs include:
- M500
- M550
- MX100
- MX200
- MX300
- MX500
- BX100
- BX200
- BX300
- BX500
- P1
- P1W2
- P2
- P5
- X8 Portable SSD
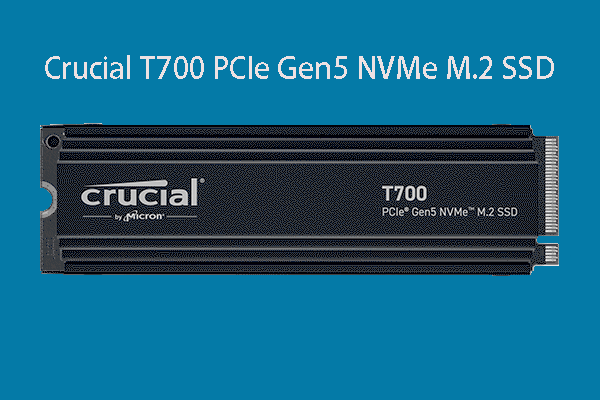
This is a Crucial T700 SSD overview, including the SSD release date, pros and cons, capacities, prices, performance, etc.
If your Crucial SSD is in the support list, now go to Disk Management and see if there is such partition available. If not, you can shrink the partition on your SSD and then create a partition for OP. You can shrink the partition and create a new partition using Disk Management. But there is a chance that the Windows tool can’t shrink volume. In this case, you can try other partition managers for Windows 10 like MiniTool Partition Wizard.
MiniTool Partition Wizard, a professional partition manager, comes with multiple functions of Disk Managements such as creating/deleting/shrinking/extending/formatting partitions as well as features other popular functions like recovering data and partition, backing up disk, testing drive speed, and health, upgrading an HDD to SSD, etc.
Here is the tutorial on shrinking a partition and creating a partition using MiniTool Partition Wizard.
Step 1: Download MiniTool Partition Wizard by clicking the following button.
Step 2: When the downloading process ends, click the executable file to install the software.
Step 3: Once the software gets installed, launch the software to access its main interface.
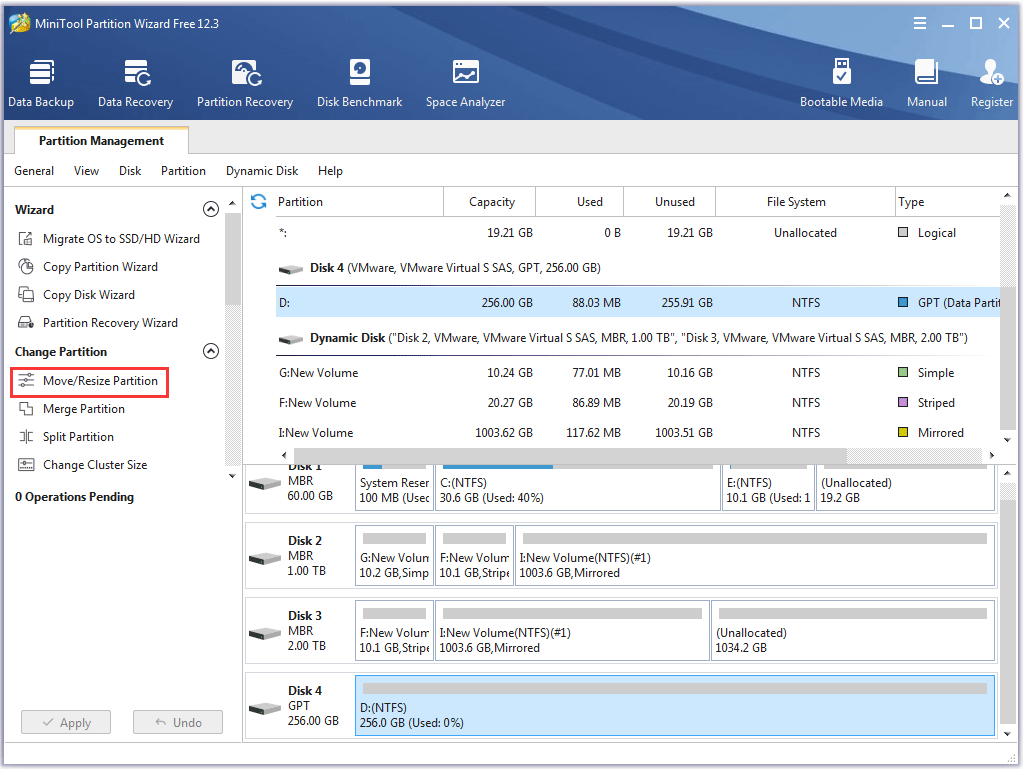
Step 4: Highlight the partition you need to shrink on the software interface and then choose the Move/Resize Partition feature from the left panel.
Step 5: On the Move/Resize Partition window, shorten the blue handle by dragging the right triangle to left.
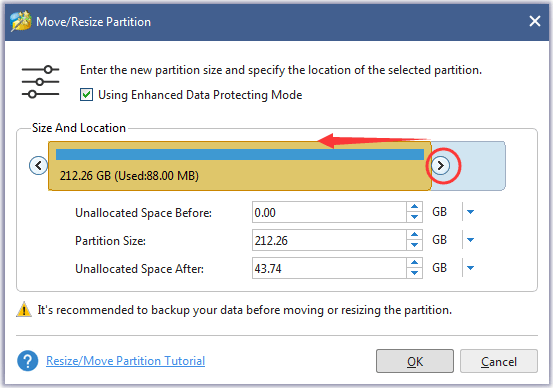
Step 6: Click the OK button to confirm the changes.
Step 7: Continue to create a partition for OP.
- Highlight the unallocated space and then choose the Create Partition option from the left panel.
- MiniTool Partition Wizard will automatically assign a drive letter to the partition. Click the OK button.
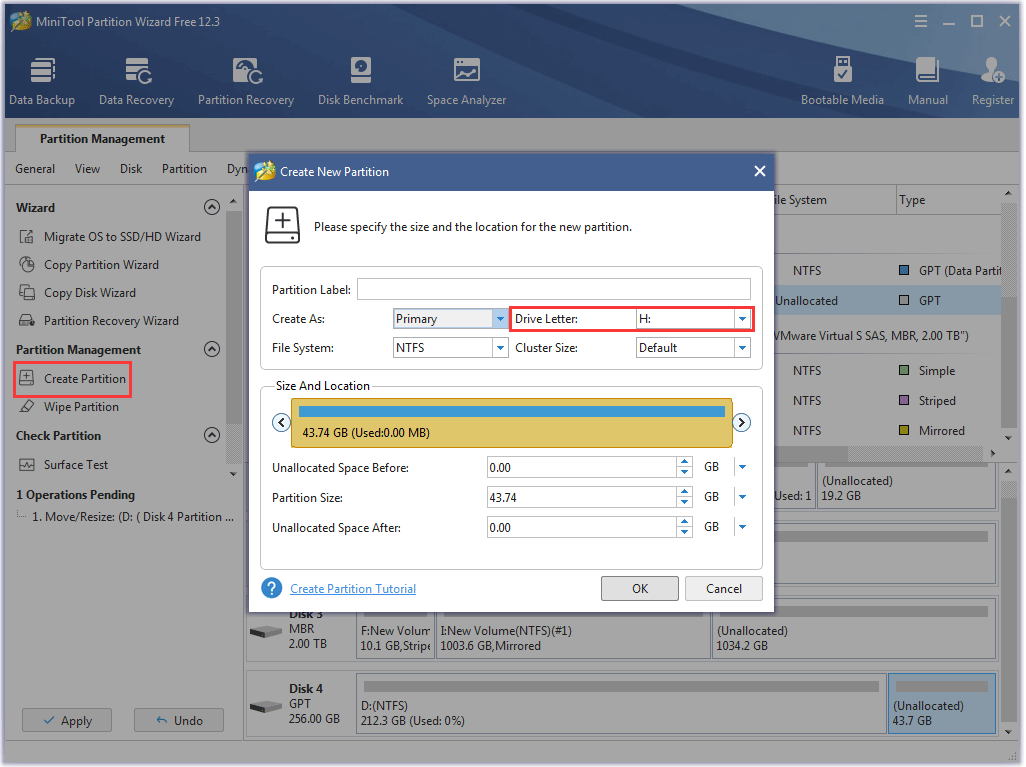
Step 8: Click the Apply button on the main interface. MiniTool Partition Wizard will start executing the pending operations.
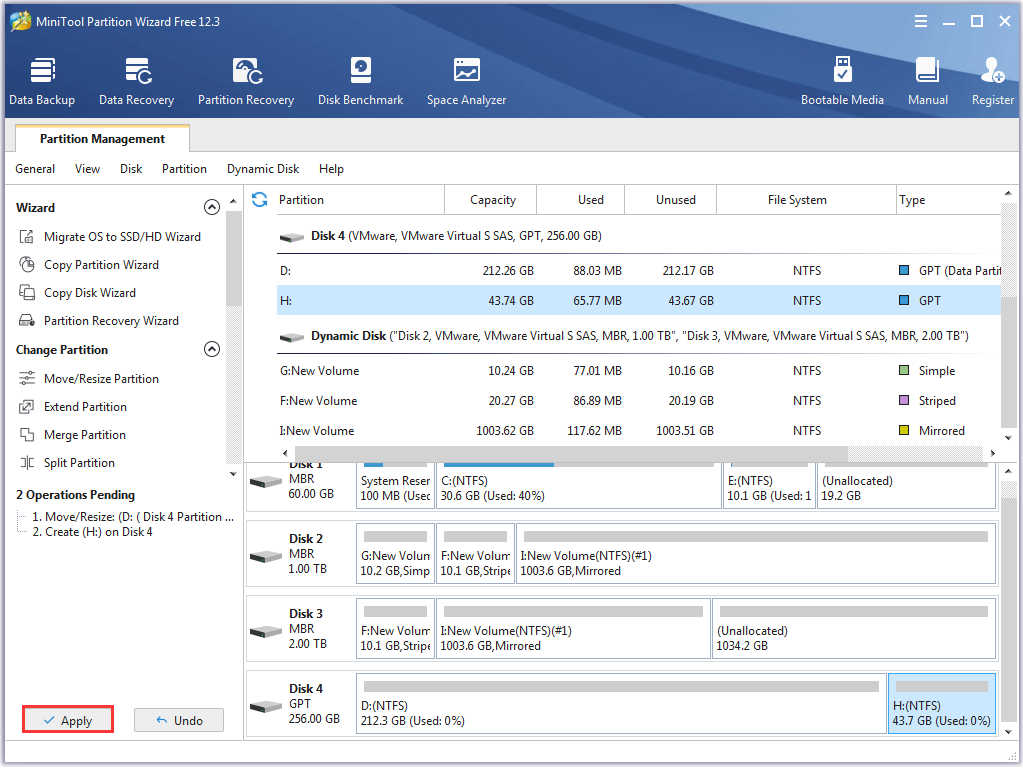
Now, your SSD drive is ready for over-provisioning to be enabled and you can use Crucial Storage Executive to set up over-provisioning on your Crucial SSD.
Step 1: Go to the official website to download Crucial Storage Executive.
Step 2: Once the downloading process ends, install the software.
Step 3: Once the software opens, switch to the Over Provisioning option.
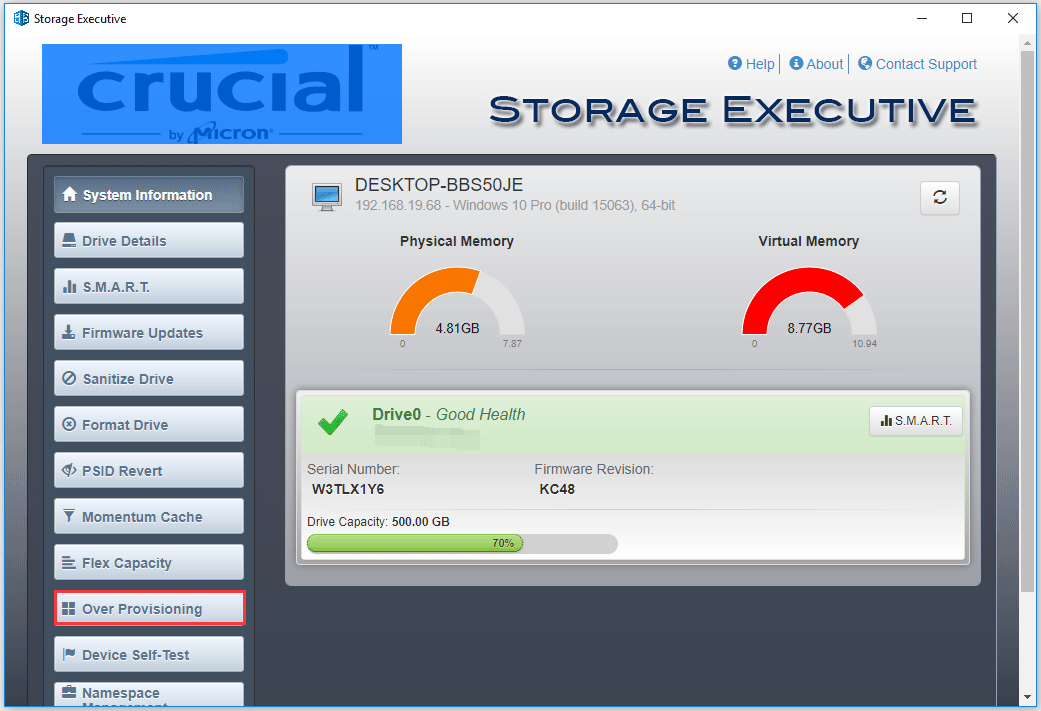
Step 4: set the OP ratio and click the Set OP button.
Now, you should have set up over-provisioning on your Crucial SSD.
Set up Over Provisioning on SSDs of Other Brands
If you are using SSDs of other brands, you can also set up over-provisioning on these SSDs even there is no software like Samsung Magician or Crucial Storage Executive.
The whole process is quite easy. You just need to use the Shrink Volume/Partition feature of Disk Management or MiniTool Partition Wizard to make 15 to 20% of the entire SSD space unallocated. The unallocated space will be automatically assigned by the SSD firmware for overprovisioning.
SSD prices continue to fall, and now it is your chance to upgrade your hard drive to SSD for good performance.
Bottom Line
This is all about SSD over provisioning. Do you have any doubts after reading? Please leave your doubts in the following comment zone and we will make them clear as soon as possible.
Do you have any problems when using MiniTool Partition Wizard? If yes, please contact us via [email protected] and we will get back to you soon enough.
SSD Over-Provisioning FAQ
When an SSD is full, this can result in lots of issues.
The first one is that some programs may not work properly.
The second one is that the computer will run slow and even crash.
So, when your SSD is nearly full, please free up it soon enough. To free up it, you can refer to 10 Ways to Free up Disk Space in Windows 10 [2021 Update].
About The Author
Vicky is a website editor who has been writing tech articles since she was graduated from university. Most of her articles talk about Windows PC and hard disk issues. Some of her articles also touch on YouTube usage and issues. During her spare time, she likes to spend time reading, watching videos, and sitting on her Yoga mat to relax.
How To Prolong Ssd Lifespan With Over Provisioning
Over-provisioning serves to maintain tip-top performance and enhance endurance of your SSD for the long haul. We are going to touch on the inner working of SSDs and the benefits of Over-provisioning below without diving too deep.
Understanding NAND Flash Memory Write/Erase limits#
The NAND flash memory used in SSDs has a finite number of erase cycles after which some sectors will start failing. An SSD controller mitigates this by spreading out the write operations to various sectors which in turn lengthens the SSD’s lifespan ergo over-provisioning. The inevitable does take years and years, though, before a consumer grade SSD gives up its ghost, so it’s not usually something to even worry about. The number of times a sector can be written to and erased depends on what NAND flash memory type is in use and there are a few of these to choose from. One of these is SLC (Single Level Cell) NAND flash memory which is built using high-grade volatile flash storage and holds just 1 bit of data per cell. This reduces the risk of data loss unlike other memory types, but it’s also expensive and not often reserved for high level performance of industrial devices that require reliability and data integrity. It has a lifetime of between 50,000 to 100,000 write/erase cycles. Next is MLC (Multi Level Cell) and TLC (Triple Level Cell) flash which hold 2 bits of data and 3 bits of data respectively. Of the two, MLC offers more write/erase cycles ranging between 1,000
10,000 compared to between 3,000
5,000 for TLC. As is the case with SLC, MLC is pricier than TLC for smaller capacities although it is indeed more durable. That said, TLC is actually the most popular NAND flash memory due to its affordability and capacity. When paired with 3D NAND, TLC offers an even better balance between performance, durability and cost. A newer NAND flash memory making inroads is QLC (Quad Level Cell). QLC holds 4 bits of data per cell and offers more storage capacity at a lower price. This matches and perhaps rivals TLC write/erases at roughly 1,000. Durability is still a concern in the long run, although it’s still a viable SSD for home use. Over-provisioning of these memory types boosts SSD performance and ensures a longer lifespan. Now let’s break down the benefits of over-provisioning below; Read more
What is 3D V-NAND technology used in Solid State Drives?All About The Samsung 970 EVO Plus V-NAND SSDChoosing the best Laptop Solid State Drives (SSDs) of 2022
Benefits of Over-provisioning in SSDs#
Storage device manufacturers usually assign an additional percentage of the total capacity to over-provisioning for a reason. This storage is inaccessible by users but is instead utilized by the SSD controller’s firmware, unique manufacture features and used as a reserve to replace failing SSD sectors. Here is why; One of the major benefits of over-provisioning is a process called wear-levelling. Think of it as walking in such a way that the sole of your shoe wears down evenly as opposed to a slant. Wear-levelling is achieved with over-provisioning by preventing repeated writes/erases of the same sectors of the SSD by swapping them out with free blocks. This technique prevents some sectors from becoming unreliable due to repeated writes/erases. Secondly, over provisioning gives the SSD controller free unused space to temporarily store data during another process known as ‘garbage collection.’ Garbage collection is an automatically triggered process where the SSD erases storage space and makes it reusable. The way NAND flash memory works is that free space can only be created by erasing previously occupied data in a sector. Due to their nature, SSD writes are generally performed more than once in a process called write amplification. The initial phase is when the data is being saved for the first time on the drive and subsequent writes are when Garbage Collection is taking place. A TRIM command enables the SSD to perform garbage collection and free up storage space occupied by invalid data. Over-provisioning provides the free space needed to temporarily move data while erasing blocks with invalid data. This process can multiply the space occupied by data, if only temporarily. Over-provisioning subsequently increases SSD lifespan and maintains stable performance over time without slowing down due to the free space that is always available for garbage collection, wear levelling and write amplification. The higher the percentage of over-provisioning, the more robust the SSD performance will be.
In summary#
SSDs used to have a bad rap for having a short lifespan compared to the trusty HDDs. In truth, SSDs do have technological advancements that ensure that they last for years and one of those is over-provisioning. Over-provisioning commandeers a section of your SDD that you won’t be able to access but in turn, it facilitates the performance tweaks and a longer lifespan of your SSD.