Что такое TLS
Данный текст является вольным переводом вот этой главы замечательной книги «High Performance Browser Networking» авторства Ильи Григорика. Перевод выполнялся в рамках написания курсовой работы, потому очень вольный, но тем не менее будет полезен тем, кто слабо представляет что такое TLS, и с чем его едят.
Общие сведения о TLS
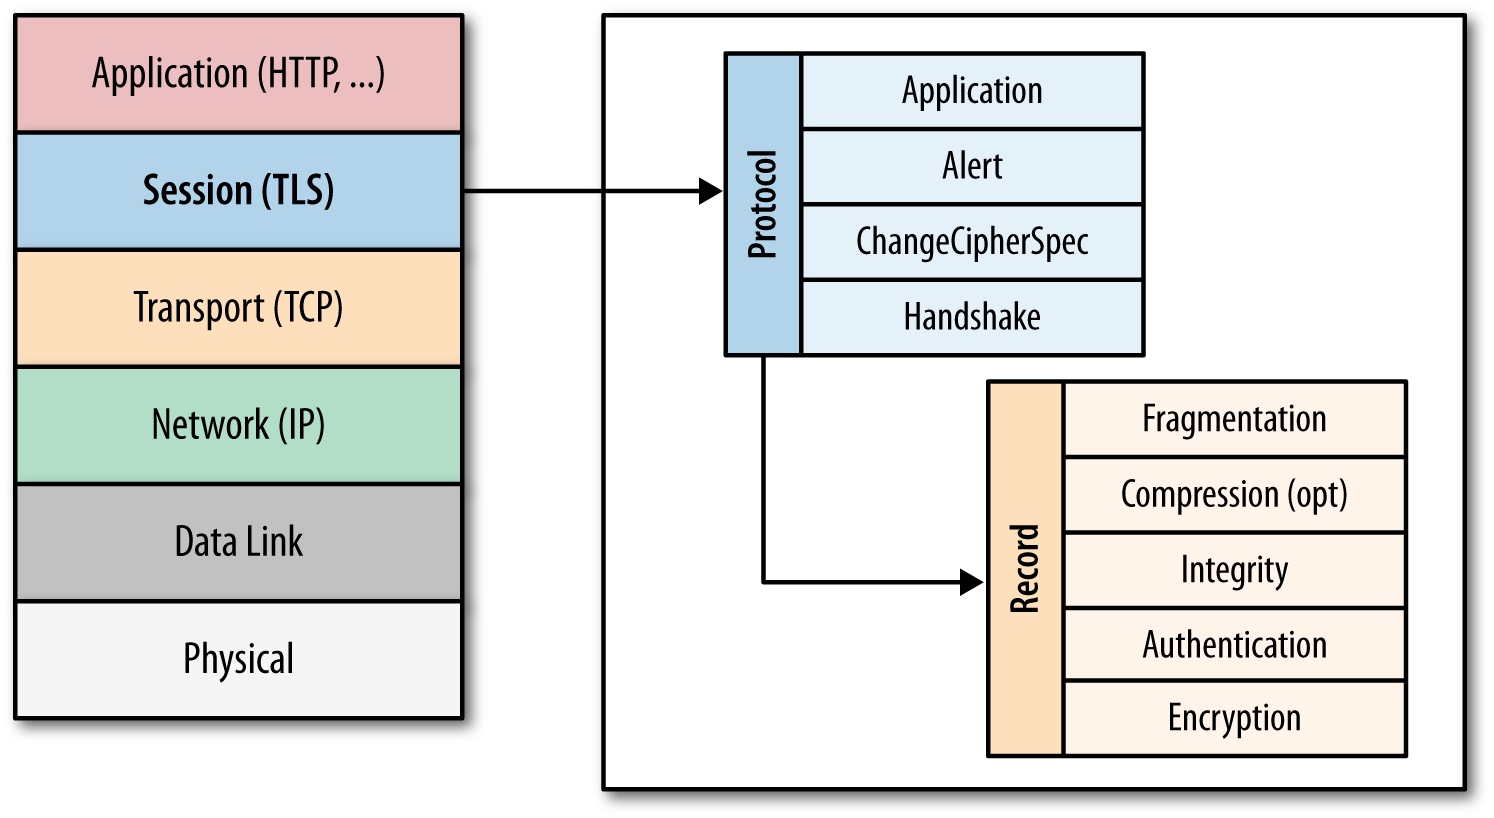
Протокол TLS (transport layer security) основан на протоколе SSL (Secure Sockets Layer), изначально разработанном в Netscape для повышения безопасности электронной коммерции в Интернете. Протокол SSL был реализован на application-уровне, непосредственно над TCP (Transmission Control Protocol), что позволяет более высокоуровневым протоколам (таким как HTTP или протоколу электронной почты) работать без изменений. Если SSL сконфигурирован корректно, то сторонний наблюдатель может узнать лишь параметры соединения (например, тип используемого шифрования), а также частоту пересылки и примерное количество данных, но не может читать и изменять их.
Конкретное место TLS (SSL) в стеке протоколов Интернета показано на схеме:
После того, как протокол SSL был стандартизирован IETF (Internet Engineering Task Force), он был переименован в TLS. Поэтому хотя имена SSL и TLS взаимозаменяемы, они всё-таки отличаются, так как каждое описывает другую версию протокола.
Первая выпущенная версия протокола имела название SSL 2.0, но была довольно быстра заменена на SSL 3.0 из-за обнаруженных уязвимостей. Как уже упоминалось, SSL был разработан компанией Netscape, так что в январе 1999 года IETF открыто стандартизирует его под именем TLS 1.0. Затем в апреле 2006 года была опубликована версия TLS 1.1, которая расширяла первоначальные возможности протокола и закрывала известные уязвимости. Актуальная версия протокола на данный момент – TLS 1.2, выпущенная в августе 2008 года.
Как уже говорилось, TLS был разработан для работы над TCP, однако для работы с протоколами дейтаграмм, такими как UDP (User Datagram Protocol), была разработана специальная версия TLS, получившая название DTLS (Datagram Transport Layer Security).
Шифрование, аутентификация и целостность
- Шифрование – сокрытие информации, передаваемой от одного компьютера к другому;
- Аутентификация – проверка авторства передаваемой информации;
- Целостность – обнаружение подмены информации подделкой.
Также в рамках процедуры TLS Handshake имеется возможность установить подлинность личности и клиента, и сервера. Например, клиент может быть уверен, что сервер, который предоставляет ему информацию о банковском счёте, действительно банковский сервер. И наоборот: сервер компании может быть уверен, что клиент, подключившийся к нему – именно сотрудник компании, а не стороннее лицо (данный механизм называется Chain of Trust и будет рассмотрен в соответствующем разделе).
Наконец, TLS обеспечивает отправку каждого сообщения с кодом MAC (Message Authentication Code), алгоритм создания которого – односторонняя криптографическая функция хеширования (фактически – контрольная сумма), ключи которой известны обоим участникам связи. Всякий раз при отправке сообщения, генерируется его MAC-значение, которое может сгенерировать и приёмник, это обеспечивает целостность информации и защиту от её подмены.
Таким образом, кратко рассмотрены все три механизма, лежащие в основе криптобезопасности протокола TLS.
TLS Handshake
Перед тем, как начать обмен данными через TLS, клиент и сервер должны согласовать параметры соединения, а именно: версия используемого протокола, способ шифрования данных, а также проверить сертификаты, если это необходимо. Схема начала соединения называется TLS Handshake и показана на рисунке: 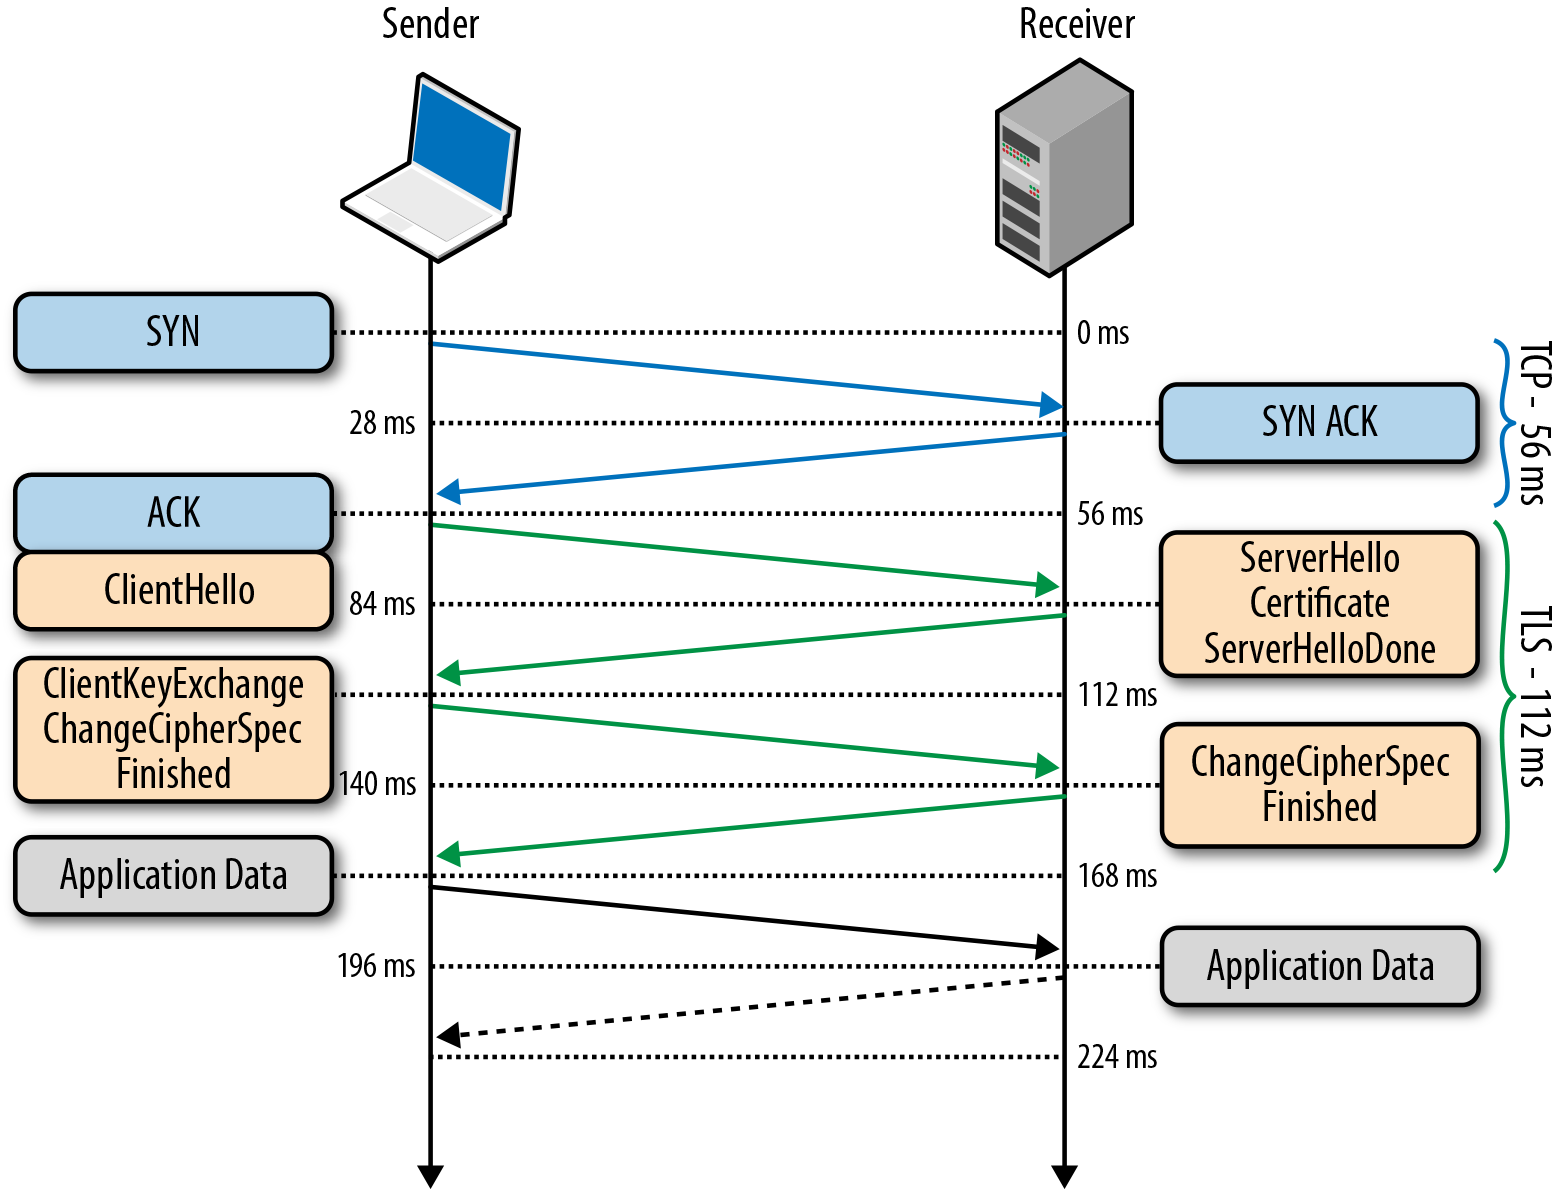
- Так как TLS работает над TCP, для начала между клиентом и сервером устанавливается TCP-соединение.
- После установки TCP, клиент посылает на сервер спецификацию в виде обычного текста (а именно версию протокола, которую он хочет использовать, поддерживаемые методы шифрования, etc).
- Сервер утверждает версию используемого протокола, выбирает способ шифрования из предоставленного списка, прикрепляет свой сертификат и отправляет ответ клиенту (при желании сервер может так же запросить клиентский сертификат).
- Версия протокола и способ шифрования на данном моменте считаются утверждёнными, клиент проверяет присланный сертификат и инициирует либо RSA, либо обмен ключами по Диффи-Хеллману, в зависимости от установленных параметров.
- Сервер обрабатывает присланное клиентом сообщение, сверяет MAC, и отправляет клиенту заключительное (‘Finished’) сообщение в зашифрованном виде.
- Клиент расшифровывает полученное сообщение, сверяет MAC, и если всё хорошо, то соединение считается установленным и начинается обмен данными приложений.
Также имеется дополнительное расширение процедуры Handshake, которое имеет название TLS False Start. Это расширение позволяет клиенту и серверу начать обмен зашифрованными данными сразу после установления метода шифрования, что сокращает установление соединения на одну итерацию сообщений. Об этом подробнее рассказано в пункте “TLS False Start”.
Обмен ключами в протоколе TLS
По различным историческим и коммерческим причинам чаще всего в TLS используется обмен ключами по алгоритму RSA: клиент генерирует симметричный ключ, подписывает его с помощью открытого ключа сервера и отправляет его на сервер. В свою очередь, на сервере ключ клиента расшифровывается с помощью закрытого ключа. После этого обмен ключами объявляется завершённым. Данный алгоритм имеет один недостаток: эта же пара отрытого и закрытого ключей используется и для аутентификации сервера. Соответственно, если злоумышленник получает доступ к закрытому ключу сервера, он может расшифровать весь сеанс связи. Более того, злоумышленник может попросту записать весь сеанс связи в зашифрованном варианте и занять расшифровкой потом, когда удастся получить закрытый ключ сервера. В то же время, обмен ключами Диффи-Хеллмана представляется более защищённым, так как установленный симметричный ключ никогда не покидает клиента или сервера и, соответственно, не может быть перехвачен злоумышленником, даже если тот знает закрытый ключ сервера. На этом основана служба снижения риска компрометации прошлых сеансов связи: для каждого нового сеанса связи создаётся новый, так называемый «временный» симметричный ключ. Соответственно, даже в худшем случае (если злоумышленнику известен закрытый ключ сервера), злоумышленник может лишь получить ключи от будущих сессий, но не расшифровать ранее записанные.
На текущий момент, все браузеры при установке соединения TLS отдают предпочтение именно сочетанию алгоритма Диффи-Хеллмана и использованию временных ключей для повышения безопасности соединения.
Следует ещё раз отметить, что шифрование с открытым ключом используется только в процедуре TLS Handshake во время первоначальной настройки соединения. После настройки туннеля в дело вступает симметричная криптография, и общение в пределах текущей сессии зашифровано именно установленными симметричными ключами. Это необходимо для увеличения быстродействия, так как криптография с открытым ключом требует значительно больше вычислительной мощности.
Возобновление сессии TLS
Как уже отмечалось ранее, полная процедура TLS Handshake является довольно длительной и дорогой с точки зрения вычислительных затрат. Поэтому была разработана процедура, которая позволяет возобновить ранее прерванное соединение на основе уже сконфигурированных данных.
Начиная с первой публичной версии протокола (SSL 2.0) сервер в рамках TLS Handshake (а именно первоначального сообщения ServerHello) может сгенерировать и отправить 32-байтный идентификатор сессии. Естественно, в таком случае у сервера хранится кэш сгенерированных идентификаторов и параметров сеанса для каждого клиента. В свою очередь клиент хранит у себя присланный идентификатор и включает его (конечно, если он есть) в первоначальное сообщение ClientHello. Если и клиент, и сервер имеют идентичные идентификаторы сессии, то установка общего соединения происходит по упрощённому алгоритму, показанному на рисунке. Если нет, то требуется полная версия TLS Handshake.
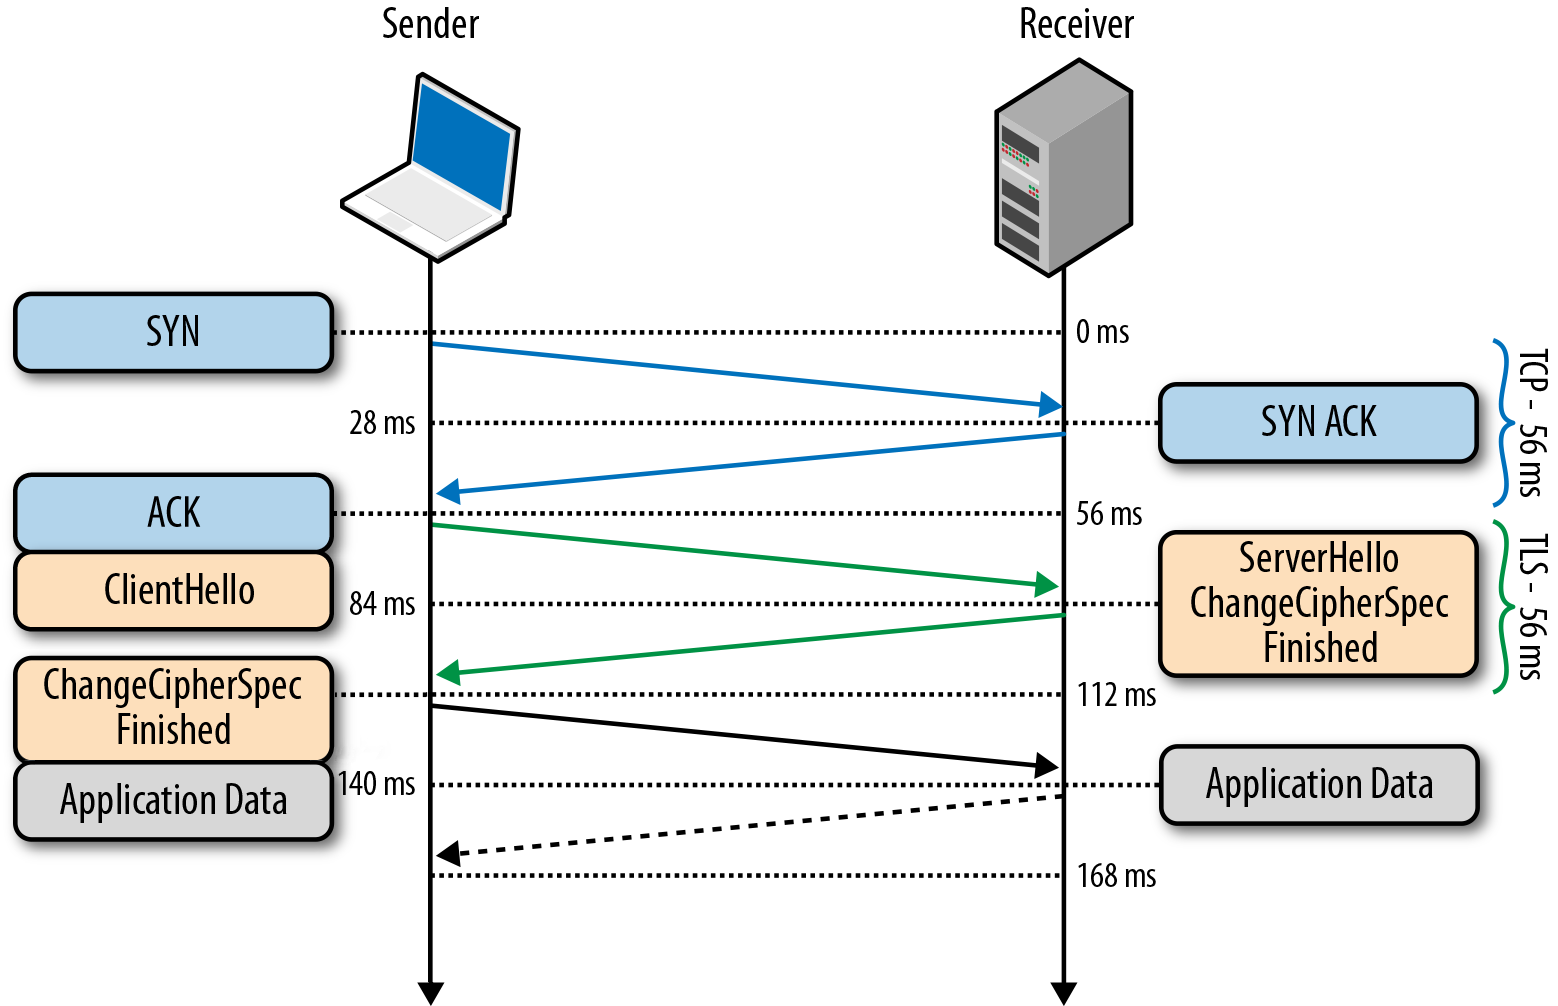
Процедура возобновления сессии позволяет пропустить этап генерации симметричного ключа, что существенно повышает время установки соединения, но не влияет на его безопасность, так как используются ранее нескомпрометированные данные предыдущей сессии.
Однако здесь имеется практическое ограничение: так как сервер должен хранить данные обо всех открытых сессиях, это приводит к проблеме с популярными ресурсами, которые одновременно запрашиваются тысячами и миллионами клиентов.
Для обхода данной проблемы был разработан механизм «Session Ticket», который устраняет необходимость сохранять данные каждого клиента на сервере. Если клиент при первоначальной установке соединения указал, что он поддерживает эту технологию, то в сервер в ходе TLS Handshake отправляет клиенту так называемый Session Ticket – параметры сессии, зашифрованные закрытым ключом сервера. При следующем возобновлении сессии, клиент вместе с ClientHello отправляет имеющийся у него Session Ticket. Таким образом, сервер избавлен от необходимости хранить данные о каждом соединении, но соединение по-прежнему безопасно, так как Session Ticket зашифрован ключом, известным только на сервере.
TLS False Start
Технология возобновления сессии бесспорно повышает производительность протокола и снижает вычислительные затраты, однако она не применима в первоначальном соединении с сервером, или в случае, когда предыдущая сессия уже истекла.
Для получения ещё большего быстродействия была разработана технология TLS False Start, являющаяся опциональным расширением протокола и позволяющая отправлять данные, когда TLS Handshake завершён лишь частично. Подробная схема TLS False Start представлена на рисунке:
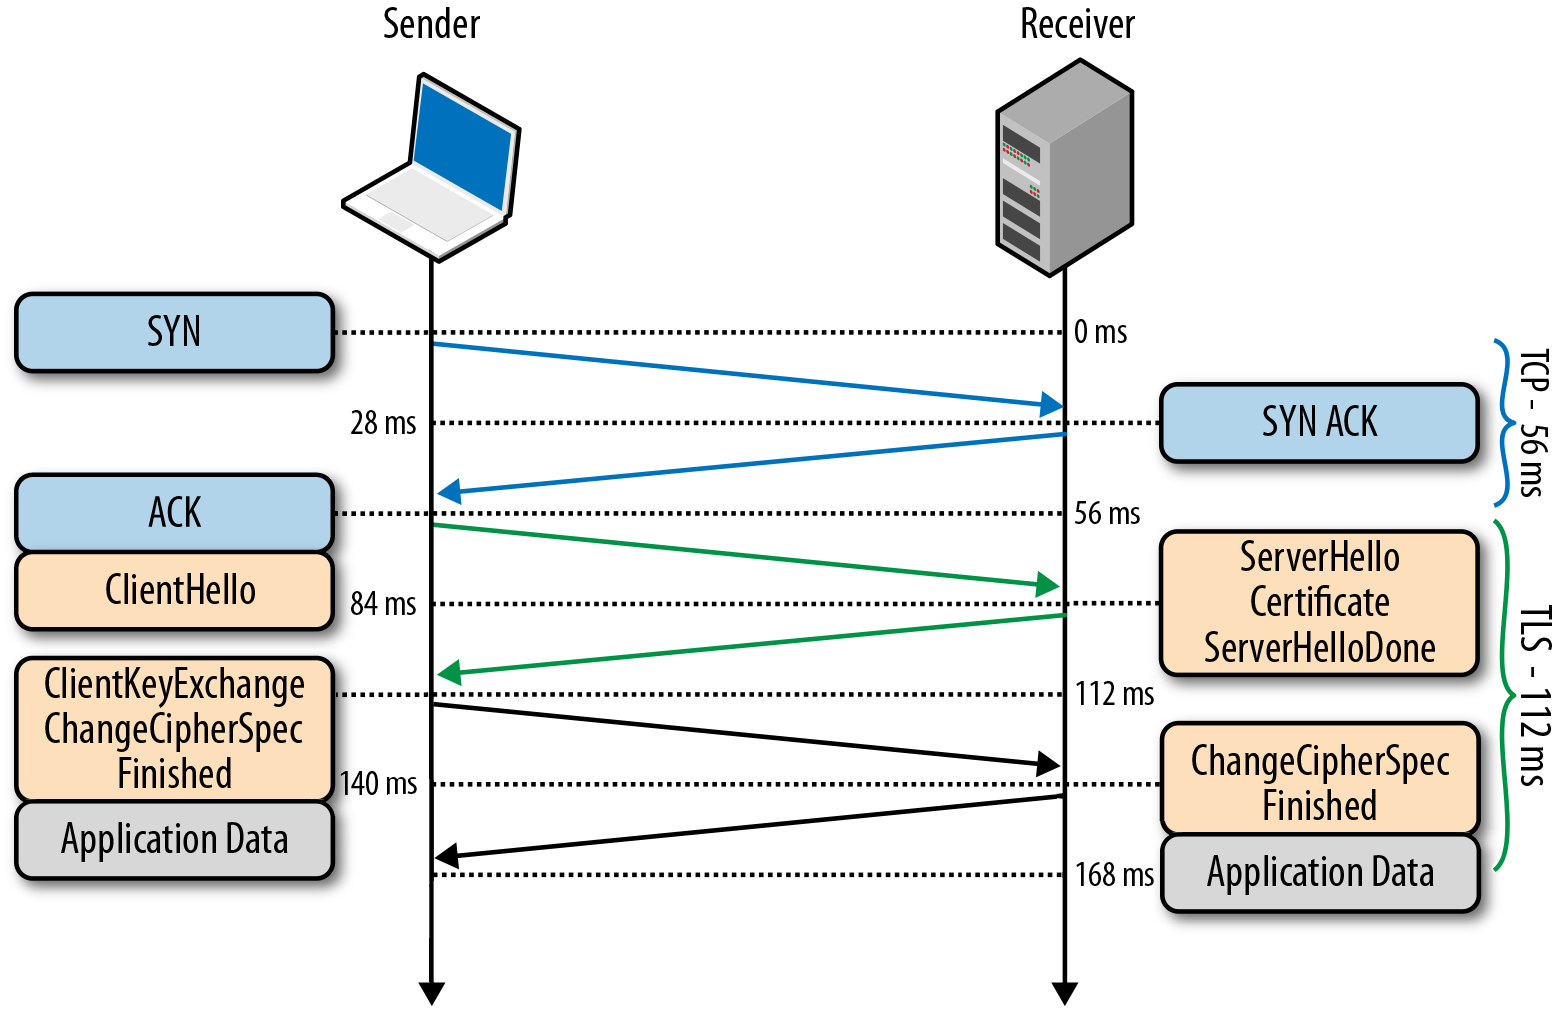
Важно отметить, что TLS False Start никак не изменяет процедуру TLS Handshake. Он основан на предположении, что в тот момент, когда клиент и сервер уже знают о параметрах соединения и симметричных ключах, данные приложений уже могут быть отправлены, а все необходимые проверки можно провести параллельно. В результате соединение готово к использованию на одну итерацию обмена сообщениями раньше.
TLS Chain of trust
- И Алиса, и Боб генерируют собственные открытые и закрытые ключи.
- Алиса и Боб обмениваются открытыми ключами.
- Алиса генерирует сообщение, шифрует его своим закрытым ключом и отправляет Бобу.
- Боб использует полученный от Алисы ключ, чтобы расшифровать сообщение и таким образом проверяет подлинность полученного сообщения.
Пусть теперь Алиса получает сообщение от Чарли, с которым она не знакома, но который утверждает, что дружит с Бобом. Чтобы это доказать, Чарли заранее попросил подписать собственный открытый ключ закрытым ключом Боба, и прикрепляет эту подпись к сообщению Алисе. Алиса же сначала проверяет подпись Боба на ключе Чарли (это она в состоянии сделать, ведь открытый ключ Боба ей уже известен), убеждается, что Чарли действительно друг Боба, принимает его сообщение и выполняет уже известную проверку целостности, убеждаясь, что сообщение действительно от Чарли:

Описанное в предыдущем абзаце и есть создание «цепочки доверия» (или «Chain of trust», если по-английски).
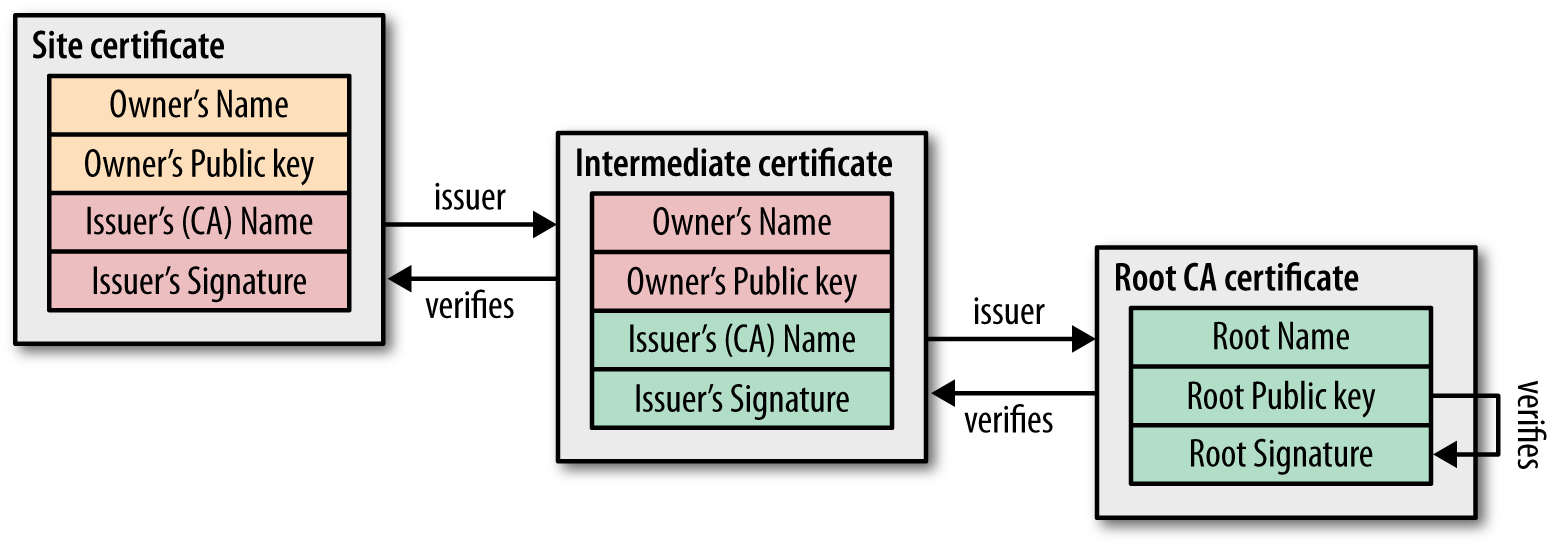
В протоколе TLS данные цепи доверия основаны на сертификатах подлинности, предоставляемых специальными органами, называемыми центрами сертификации (CA – certificate authorities). Центры сертификации производят проверки и, если выданный сертификат скомпрометирован, то данный сертификат отзывается.
Из выданных сертификатов складывается уже рассмотренная цепочка доверия. Корнем её является так называемый “Root CA certificate” – сертификат, подписанный крупным центром, доверие к которому неоспоримо. В общем виде цепочка доверия выглядит примерно таким образом:
Естественно, возникают случаи, когда уже выданный сертификат необходимо отозвать или аннулировать (например, был скомпрометирован закрытый ключ сертификата, или была скомпрометирована вся процедура сертификации). Для этого сертификаты подлинности содержат специальные инструкции о проверке их актуальности. Следовательно, при построении цепочки доверия, необходимо проверять актуальность каждого доверительного узла.
Механизм этой проверки прост и в его основе лежит т.н. «Список отозванных сертификатов» (CRL – «Certificate Revocation List»). У каждого из центров сертификации имеется данный список, представляющий простой перечень серийных номеров отозванных сертификатов. Соответственно любой, кто хочет проверить подлинность сертификата, попросту загружает данный список и ищет в нём номер проверяемого сертификата. Если номер обнаружится – это значит, что сертификат отозван.
- Центры сертификации должны справляться с нагрузкой в режиме реального времени;
- Центры сертификации должны гарантировать свою доступность в любое время;
- Из-за запросов реального времени центры сертификации получают информацию о том, какие сайты посещал каждый конкретный пользователь.
Таким образом, в данной статье рассмотрены все ключевые средства, предоставляемые протоколом TLS для защиты информации. За некоторую отсебятину в статье прошу прощения, это издержки изначальной цели выполнения перевода.
Saved searches
Use saved searches to filter your results more quickly
You signed in with another tab or window. Reload to refresh your session. You signed out in another tab or window. Reload to refresh your session. You switched accounts on another tab or window. Reload to refresh your session.
trinodb / trino Public
Have a question about this project? Sign up for a free GitHub account to open an issue and contact its maintainers and the community.
By clicking “Sign up for GitHub”, you agree to our terms of service and privacy statement. We’ll occasionally send you account related emails.
Already on GitHub? Sign in to your account
Support SSL/TLS for Hive Metastore #2658
Support SSL/TLS for Hive Metastore #2658
Comments
It is a desired feature to support SSL connection to a custom hive metastore in the Hive connector. Some foundation work has already been done, but the feature is not yet complete:
A new flag will need to be added to ThriftMetastoreConfig, which turns on/off SSL:
If the flag is on, a new SSLContext should be constructed and passed into ThriftMetastoreClientFactory.
SSL configuration in Hive
Right after the installation of the Hive Platform WebUI is available only on HTTP.
You can configure SSL by one of the following methods:
- upload your SSL certificates to the Platform and configure HTTP/HTTPs;
- configure HTTP or TCP Reverse proxy with SSL termination.
Upload SSL certificates to Hive
Upload SSL certificates in the PEM format to the directory /opt/hw-bw/ssl . Please note that uploaded files will not be overwritten when upgrading to the next version, so feel free to store them in this directory.
You can change default directory if it does not suit you:
-
Open the file /opt/hw-bw/config/user.ini (root privileges required);
Add the b.ssl.dir option to the [main] section and indicate new path:
To apply changes, run the command:
Configure HTTP/HTTPs
To configure HTTP to HTTPs redirect add the following properties to the [main] section of /opt/hw-bw/config/user.ini file (root privileges required):
b.ssl.enabled — option, which enables SSL. Possible values:
- no_ssl — only insecure HTTP-connection is used (default value);
- ssl_both — both insecure HTTP-connection and secure HTTPs-connection are used;
- ssl_redirect — redirection from insecure connection HTTP-connection to secure HTTPs-connection;
- ssl_only — only secure HTTPs-connection is used.
b.deck.ip.expose — IP address for insecure HTTP-connection ( 0.0.0.0 — public IP address, 127.0.0.1 — local IP address). Required for no_ssl , ssl_both and ssl_redirect .
To apply changes, run the command:
Configure HTTP or TCP Reverse proxy with SSL termination
If necessary, you can run Hive behind your own reverse proxy. For example, configure nginx , which will proxy all requests for Hive.
To use your proxy server on the same machine, change the following parameters in /opt/hw-bw/config/user.ini :
To apply changes, run the command (root privileges required):
Example of nginx configuration as HTTP Reverse proxy
Example of nginx configuration:
- 10001 — port number you set to b.deck.port.expose in user.ini file;
- yourhive.example.com — hostname or IP address of your virtual machine.
Example of Let’s Encrypt with certbot configuration. You should set this configuration before you issue certificates using certbot .
- 10001 — port number you set to b.deck.port.expose in user.ini file;
- yourhive.example.com — hostname or IP address of your virtual machine.
Convert CA-certificate from .PFX
You may need to convert CA from .pfx if: * it is necessary to transfer issues between Hive and Apiary via secure channel; * it is impossible to use global valid certificates; * it is necessary to use local Certificate Authority to issue certificates.
Create SSL certificate:
Note: remove the -out option from the commands and the key with other information will be displayed on the screen. In this case, copy everything from the lines BEGIN PRIVATE KEY / BEGIN CERTIFICATE to END PRIVATE KEY / END CERTIFICATE and save it to a file.
Create a root certificate:
Note: you will get a chain of root certificates. You will need only last one certificate in this chain. For example, you can open file for editing and delete everything except the last one.
Concatenate files into one certificate:
Copy SSL certificates to a virtual machine with installed Platform to a directory with SSL certificates:
TeamRedMiner: Команды и Параметры для майнинга
Аргументы командной строки — это аргументы, которые указываются после имени программы в системной командной строке, и значения этих аргументов передаются вашей программе во время выполнения.
Использование: teamredminer.exe -команда1 -команда2 -команда3
Пример для Ravencoin:
teamredminer.exe -a kawpow -o stratum+tcp://rvn.2miners.com:6060 -u RKAeArXkWLNERjWo5YF3R1xFnYCwKf11sX.worker_name -p x
Полный список параметров:
Алгоритм
—algo или краткий синоним этой команды -a — выбирает алгоритм майнинга.
Важно! Используйте либо длинный синоним, —algo= либо короткий -a . Вам не нужно использовать вместе два варианта одной и той же команды.
Дальнейшие команды будут разделены запятыми. Сначала короткий синоним, а затем длинный. Не забудьте использовать только один вариант.
Доступные на данный момент алгоритмы:
teamredminer.exe -a ethash
URL пула
-o — устанавливает URL пула и ПОРТ пула. В настоящее время поддерживаются протоколы stratum+tcp и stratum+ssl URL-адреса.
В этом примере URL-адрес ethash.poolbinance.com и порт 8888 . Значения должны быть разделены знаком :
Каждый раз, когда указывается эта опция, будет запускаться новая конфигурация пула.
Параметры для каждого пула (например -u , -p ) необходимо будет снова явно указывать для каждого нового пула. (См. пример файла start_multipool.sh/bat ).
Стратегия нескольких пулов для майнера устанавливается с —pool_strategy опцией.
SSL/TLS (для продвинутых пользователей)
Также имеется специальная поддержка расширенных настроек SSL/TLS, когда вам нужно передать имя хоста SNI конечной точке SSL. Например, это необходимо для конечных точек SSL, которые действуют как интерфейсы для нескольких хостов и должны знать, для какого из них предоставить сертификат. В таких случаях используйте следующий формат:
Это подключится к pool.tunnel.com:3333 , но передаст pool.realhostname.com в качестве имени хоста SNI на этапе подтверждения SSL. Разумеется, два имени хоста также могут быть идентичными.
Имя пользователя (логин пула) или адрес кошелька
-u , —user=USERNAME — устанавливает имя пользователя или адрес кошелька для авторизации майнинг-пула.
Если на пуле нет регистрации, то вместо логина нужно указать адрес кошелька.
Пароль (необязательно)
-p, —pass=PASSWORD — устанавливает пароль для авторизации пула.
Имя воркера (worker name)
Воркер — это название вашего виртуального “рабочего”. Это название указывается для простоты отслеживания статистики.
.worker — установите простое имя воркера для отслеживания вашего рига (фермы) в пуле. Имя работника указывается после знака wallet_address и перед ним ставится точка.
Минимальная настройка для запуска должна обеспечить только:
- адрес пула,
- адрес кошелька и
- имя воркера.
Просто скопируйте и измените адрес кошелька на адрес вашего кошелька. Это пример для Ethermine:
teamredminer.exe -a ethash -o stratum+tcp://eu1.ethermine.org:4444 -u 0x360d6f9efea21c82d341504366fd1c2eeea8fa9d.worker_name -p x
Список аргументов командной строки
-h , —help Display help message and exit.
—debug Enables debug log output.
—disable_colors Disables console output colors.
—force_colors Forces console color output even if the terminal does not seem to support them.
—api_listen=IP:PORT Enables the sgminer compatible api. IP:PORT is optional. If present, the IP:PORT combo decides the interface(s) and port to listen to. Default is 127.0.0.1:4028 . For external access, use e.g. 0.0.0.0:4028 . It’s also valid to only specify the port, e.g. 4029 .
—cm_api_listen=IP:PORT Enables the claymore compatible api. IP:PORT is optional. If present, the IP:PORT combo decides the interface(s) and port to listen to. Default is 127.0.0.1:3333 . For external access, use e.g. 0.0.0.0:3333 . It’s also valid to only specify the port, e.g. 3334 .
—cm_api_password=PSW Sets the required password for the CM compatible api interface.
Журнал (Logs)

—log_file(=FILENAME) Enables logging of miner output into the file specified by FILENAME . If no filename is provided, the miner will log to trm_<algo>_<yyyymmdd_hhmmss> .log in the current working directory. If the log file already exists, the miner will append.
-l, —log_interval=SEC Set the time interval in seconds for averaging and printing GPU hashrates. SEC sets the interval in seconds, and must be > 0.
—log_rotate=SZ[,CNT] Enables log rotation. The SZ value sets the log size after which a new log file will be created. The SZ value supports the suffixes ‘k’, ‘M’, and ‘G’ and will multiply the value by 1024 , 1048576 , and 1073741824 respectively.
The optional CNT value sets the maximum number of old log files to keep. For example the option —log_rotate=4M,16 will cause the miner to switch to a new log file once the current log file exceeds 4194304 bytes in size, and the miner will keep the last 16 such files and delete older ones.
—short_stats Disables the full gpu state output in each hashrate output, like it was before 0.7.10.
—long_timestamps Enables microsec timestamps in the logs instead of seconds only.
—high_score Enables printouts of the top 15 shares found since miner start in the stats output.
—pool_debug Logs all pool traffic.
Комиссия (DevFee)
—dev_location=LOC Selects a specific location for the dev fee connection. Only use this if you see continuous dev fee connection issues reported by the miner. The connection management normally works well in all locations.
Available options are:
- world — Anywhere in the world except for mainland China.
- cn — Mainland China.
- non-gcp — Countries with blocked access to Google Services (e.g. Iran, Cuba).
Производительность
—enable_compute (Windows only) Enables compute mode and disables crossfire on necessary gpus.
—restart_gpus (Windows only) Restarts all configured gpus before mining, i.e. disable+enable PCI device.
—uac (Windows only) Enable privilege escalation when the miner runs tasks like restarting gpus.
You can always avoid this by running the miner directly as Administrator. This will trigger the standard Windows escalation prompt, so you have to be available to click ‘Yes’.
If this is not enabled, tasks that require Administrator privileges will fail when the miner is running under a basic user account.
Note: this might not be enabled for all algos.
—allow_dup_bus_ids Allows multiple gpus using the same pci bus id. This should only be used for Radeon Pro Duo cards and similar hardware, it’s normally an indication of a broken OpenCL environment.
Подключение к пулу
-o, —url=URL Sets the pool URL. Currently stratum+tcp and stratum+ssl URLs are supported.
- Each additional time this option is specified will start a new pool config.
- Per-pool options (such as -u, -p) will need to be explicitly specified again for each new pool. (See the example start_multipool.sh/bat file)
- The multi-pool strategy for the miner is set with the –pool_strategy option.
There is also special support for advanced SSL/TLS setups where you need to pass a SNI hostname to the SSL endpoint. For example, this is necessary for SSL endpoints that act as frontends for multiple hosts and need to know which one to provide a certificate for. In such cases, use the following format:
This will connect to pool.tunnel.com:3333 but pass pool.realhostname.com as the SNI hostname in the SSL handshake phase. The two hostnames can of course be identical as well.
-u , —user=USERNAME Sets the username for pool authorization.
-p , —pass=PASSWORD Sets the password for pool authorization.
—pool_force_ensub Forces an extranonce subscribe request for supported pools unknown to the miner.
—pool_no_ensub Prevent miner from sending extranonce subscribe request to the pool.
—pool_broken_rpc Tells the miner to only allow a single outstanding rpc request on the pool connection. This is a work-around for pools that violate the json rpc specification regarding rpc IDs.
—pool_ratio=RATIO Sets the hashrate ratio between pools when using multiple pools with the the load_balance or quota pool strategies (see —pool_strategy ). By default all pools use the ratio value 1. For example, using this option with a value of 2 on just one pool will make that pool receive twice the hashrate as the other pools since their ratio will still be the default value of 1.
Глобальные опции пула
—pool_connect_TO=SEC Set the time-out for attempting to connect to a pool. SEC is the time to wait in seconds. Default is 10.
—pool_rpc_TO=SEC Set how long the miner will wait for an unanswered RPC to the pool. After this time, the miner will reconnect to the pool. SEC is the time to wait in seconds.
Default is 60.
—pool_max_rejects=N If a pool rejects N shares in a row, the pool connection is reset. This is to prevent against pools that invalidates mining sessions without disconnecting the user.
Default value is 5.
—pool_share_limit_ms=N If a pool takes longer than N ms to accept or reject a share, kill the current connection and reconnect. This is intended for pools that often get issues with some of their servers, but reconnecting means being load-balanced to a different and hopefully better server. Default value is no timeout.
—pool_strategy=STRAT Sets the strategy for selecting pools when running with multiple pools.
The available values are:
- priority,
- load_balance,
- quota, and
- min_epoch.
The default is priority.
- priority : The miner will use pools in the order they are listed, only moving on to the next pool if the previous cannot establish a connection.
- load_balance : The miner will evenly balance the hashrate across all currentlyconnected pools. The ratio of hashrate between pools can be set with —pool_ratio .
- quota : The miner will evenly balance the total hashes completed across all pools. If a pool disconnects and later reconnects, the miner will move hashrate to the pool until the total hashes for each pool is balanced.
The ratio of hashrate between pools can be set with —pool_ratio .
- min_epoch : ETH + ZIL switching strategy. The miner will always mine the lowest epoch among all connected pools, and in case of a tie, the first connected pool.
Therefore, specify your ETH mining pool as the first/primary pool, then the ZIL pool as the second pool. You can also use ‘eth_zil’ as the name for this strategy.
—no_ntime_roll Prevents the miner from rolling ntime in the block header, only using the value provided by the pool. This needs to be enabled for some pools when mining x16rt .
—no_stale_submit Prevents the miner from submitting shares that are not for the most current pool job.
Опция выбора видеокарт
—platform=INDEX Sets the index of the OpenCL platform to use. If not specified, platform will be auto-detected. Linux with multiple platforms is only supported using no —platform arg but instead adding —bus_reorder .
-d , —devices=DEVLIST Sets gpu devices to use from detected list. DEVLIST should be a comma-separated list of device indices, e.g. -d 0,1,2,4. If not specified, alldevices on the platform(s) will be used. NOTE: by default the devices are orderedby pcie bus ordering. Use —list_devices to show indices.
—init_style=1/2/3 Specified the init style (1 is default):
- One gpu at the time, complete all before mining.
- Three gpus at the time, complete all before mining.
- All gpus in parallel, start mining immediately.
—pcie_fmt=FORMAT Sets print format for pcie bus numbers. The accepted values for FORMAT are either hex or dec . The default is dec for windows and hex for linux.
—bus_reorder Reorders the detected or specified devices after their pcie bus id. If noplatform is specified, devices will be collected from all detected AMD OpenCLplatforms. Note: As of version v0.7.0 this is the default behavior.
—opencl_order Orders the detected or specified devices in the order OpenCL presents them.
—list_devices Lists the available devices for the detected or specified platform and exits immediately. Bus reordering will be implemented in the displayed order.
—nr_cu_override=X,Y. Overrides the nr compute units per gpu as presented by the OpenCL API. This is primarily useful for Vega 64s flashed with 56 biosed and where the driver is reporting 56 CU instead of the true count. Provide a comma-separated list of the override CU count per gpu as value for the argument.
You can skip gpus and do not need to provide values for all gpus in the rig. Example for a mixed rig of two Vegas at index 1 and 3 and two other gpus: –nr_cu_override=,64,,64. You can verify your argument by also adding —list_devices before mining.
Варианты управления разгоном / напряжением (только для Windows, BETA функциональность)
The miner has basic functionality for setting core and mem clks and their respective voltage, as well as selecting between the win driver’s built-in timings. For each available argument below, you enumerate values for gpu(s) in the rig in a comma-separated list.
Some arguments are not used for certain gpus. You can skip gpus in the list.
The miner always sets and uses the highest p-state for both core and mem for GCN gpus (Polaris, Vega). Please note that Rx Vega gpus must have a powerplay table modification of the mem p2 state before being able to run a voltage lower than 900mV. Moreover, Big Navi gpus also still need to use e.g. MorePowerTool to make powerplay table modifications, for example for enabling setting a lower voltage. The miner might add support for powerplay table-related functionality in the future.
—clk_debug Enable start-up log printouts related to setting clocks/voltages/timings.
—clk_core_mhz=MHZ1,MHZ2. Sets the core clk per gpu in MHz.
—clk_core_mv=MV1,MV2. Sets the core voltage per gpu in mV.
—clk_mem_mhz=MHZ1,MHZ2. Sets the mem clk per gpu in MHz.
—clk_mem_mv=MV1,MV2. Sets the mem voltage per gpu in mV. Not used for Navi or Big Navi gpus.
—clk_timing=V1,V2. Selects between the driver’s available mem timing sets. Not available on all gpus and drivers.
Example of a partial command line for a four gpu system where with a Rx Vega 64, 580, 5700XT and 6800 mining ethash or similar. We only specify mem voltage for the Vega and 580, and only select a driver timing value for the Big Navi:
teamredminer.exe . —clk_core_mhz=1100,1000,1275,1000 —clk_core_mv=875,850,725,675 —clk_mem_mhz=1107,2100,1820,2130 —clk_mem_mv=875,850,, —clk_timing=. 1
Варианты управления вентилятором
—fan_control(=CFG1,CFG2. ) This argument enables gpu fan control by the miner. TRM supports auto-adjusting the gpu fan speed(s) based on core, junction and/or mem temp.
We also support setting a static fan speed in percent.
Each gpu type has a fan configuration that will be used by default. We support both overriding the default configuration per gpu type as well as setting a specific config per gpu in the rig.
A fan config consists of (max) six values, separate by the ‘:’ (colon) char. The values are: core target temp, junction target temp, mem target temp, initial fan speed in percent, min fan speed in percent, max fan speed in percent. Any value can be left empty.
These are a few examples:
- ::70:50:25 Target mem temp to 70C, start fan at 50% speed, min fan speed 25%.
- 55. 20:80 Target core temp to 55C, start fan at default configuration’s speed, always keep fan between 20% and 80%.
- 55::75:80 Adjust fan so that core temp is <= 55C and mem temp is <= 75C, start fan at 80%.
- . 100 Set static fan speed to 100%, never adjust based on temps.
The fan configuration used for a gpu is derived in the following precedence order:
- The —fan_control argument was passed a list of configurations and included an entry for gpu X.
- The default fan configuration for this gpu type was overridden with a —fan_default_<type>=. parameter.
- Use the built-in default fan configuration for this gpu type.
In the list above, if the chosen configuration is missing the start value for the fan the setting from the next configuration is used.
NOTE: fan support is a beta feature and will not work better than the support the drivers provide. For example, many times the drivers under linux don’t allow forcing a fan to 100% using the sysfs pwm support.
—fan_default_polaris=CFG Set the default config used for all Polaris gpus (450/460/550/560/470/480/570/580/590).
The built-in default is 55. 50 for 55C core temp and fan starting at 50%.
Note: this setting is also reused for Tonga gpus.
—fan_default_vega=CFG Set the default config used for all Vega gpus (Vega 56/Vega 64).
The built-in default is 55::70:50 for 55C core temp, 70C mem temp and fan at 50%.
—fan_default_vega2=CFG Set the default config used for all Radeon VII gpus.
The built-in default is 70::75:80 for 70C core temp, 75C mem temp and fan at 80%.
—fan_default_navi=CFG Set the default config used for all Navi (Navi10).
The built-in default is 60::80:70 for 60C core temp, 80C mem temp and fan at 70%.
—fan_default_big_navi=CFG Set the default config used for all Big Navi (Navi21).
The built-in default is 50. 70 for 50C core temp and fan at 70%. The reason for not including mem temp is a missing sensor in the Windows ADL library.
—fan_debug Enable log printouts related to adjustments.
Параметры сторожевого таймера
—no_gpu_monitor Disables the ADL (Windows) or sysfs (Linux) GPU monitor for temperature and fan speed.
—temp_limit=TEMP Sets the core temperature at which the miner will stop GPUs that are too hot.
Default is 85C. Gpu-specific values can be provided using a comma-separated list, one value per gpu. If a gpu doesn’t have a defined value, the first value in the listis used.
—temp_resume=TEMP Sets the core temperature below which the miner will resume GPUs that were previously stopped due to the core temperature exceeding limit.
Default is 60C. Gpu-specific values can be provided using a comma-separated list, one value per gpu. If a gpu doesn’t have a defined value, the first value in the list is used.
—mem_temp_limit=TEMP Sets the mem temperature at which the miner will stop GPUs that are too hot.
Default is not enabled. Only used if the gpu provides a mem temperature sensor.
Gpu-specific values can be provided using a comma-separated list, one value per gpu.
If a gpu doesn’t have a defined value, the first value in the list is used.
—mem_temp_resume=TEMP Sets the mem temperature below which the miner will resume GPUs that were previously stopped due to mem temperature exceeding limit.
Default is not enabled. Only used if the gpu provides a mem temperature sensor. Gpu-specific values can be provided using a comma-separated list, one value per gpu. If a gpu doesn’t have a defined value, the first value in the list is used.
—watchdog_script(=X) Configures the gpu watchdog to shut down the miner and run the specified platform and exits immediately. The default script is watchdog.bat/watchdog.sh in the current directory, but a different script can be provided as an optional argument, potentially with a absolute or relative path as well.
—watchdog_test Tests the configured watchdog script by triggering the same action as a dead gpu after
20 secs of mining.
—watchdog_disabled Forces the watchdog to not execute. Can be used to disable the watchdog in mining os that always run with the watchdog enabled.
Ethash опции
—eth_config=CONFIG Manual ethash configuration for the miner. CONFIG must be in the form [X][M][L] .
- The [M] value selects the mode which can be ‘A’,’B’, or ‘C’.
- The B mode uses additional memory and will only work on 8+GB cards.
- The C mode uses additional memory and will only work on 16+GB cards, such as the VII, with a correctly configured system. See the ETHASH_TUNING_GUIDE.txt for more details.
- The [L] value selects the intensity and it’s range will depend on the GPU architecture.
- The [X] prefix is optional and is Navi/Big Navi only, it enables more mem operations and leads to a lower tuning [L] value. It can be beneficial whenever the auto-tuner repeatedly hits a value close to the max possible tuning value for the gpu.
Both values are optional, but if [L] is specified, [M] must also be specified.
- —eth_config=A
- —eth_config=B750
- —eth_config=XB
CONFIG can also be a comma separated list of config values where each is applied to each GPU.
Any gpu that does not have a specific config in the list will use the first config in the list.
—eth_variant_mode=X This argument controls activation of the ethash changes for ETC from epoch 390 as described in ecip-1099.
The following modes are available:
pool — Default mode. Only activates if the pool sends an algo flag containing etchash.
Once this flag is seen, all pool jobs will be assumed to be etchash unless another.
algo flag containing ethash is received.
etchash — Etchash mode. Epoch >= 390 will be assumed to be etchash, lower epochs ethash. Pool algo flags are not used.
deduce — Ignore pool algo flags and only apply a heuristics based on the current system time and known heights and times for ETC and ETH. This mode should work as a generic approach when ETH reaches epoch 390 in Jan 2021. The system clock needs to be correct.
It should also handle any profit switching setups that switch freely between ethash and etchash jobs by proxying underlying pools.
auto — As long as the pool hasn’t passed an algo flag, use deduce mode. When an algo flag is seen, switch to pool mode.
ethash — Forced ethash mode. Never apply ecip-1099.
force_etc — Forced etchash mode. Always apply ecip-1099 rules. Use for ETC testnet mining.
—eth_aggr_mode Enables automatic use of the ‘B’ mode for all Polaris 8GB cards, unless they have a different config provided by the —eth_config argument. This is the same thing as manually setting all Polaris 8GB gpus in the rig to ‘B’ mode using —eth_config .
For most gpus, this adds 0.1-0.2 MH/s of hashrate.
NOTE: 20-25% of rigs becomes less stable in this mode which is the reason it isn’t the default mode. If you experience dead gpus, you should remove this argument and run the gpus in the ‘A’ mode.
—eth_stratum_mode=MODE Sets a fixed stratum mode for ethash pools.
By default the miner will attempt to automatically determine the type of stratum the pool supports and use that mode. This automatic detection can be overriden by specifying this option. The MODE can be set to one of the following options: stratum, nicehash, ethproxy.
—eth_worker Set the worker id that will be sent to pool. This only applies to pools with ethproxy stratum mode.
—eth_hash_report=X Controls hashrate reports to the configure pools. This value is applied for all pools.
- default — let the miner decide based on stratum protocol used for each pool.
- force — always send hashrate reports, even if the pool rejects them.
- on — send a first hashrate report, disable for any pool that rejects the message.
- off — never send hashrate reports.
—eth_epoch Tests a specific ethash epoch. NOTE: you still need to provide a pool as if you were mining, but no shares will be submitted. Simulated mining only.
—eth_alloc_epoch=N Allocates enough memory for the given epoch from the start. The miner will try to allocate more if it needs to later during mining. It’s recommended for rigs with one or more 4GB cards to test and set this to the max possible value to avoid reallocations at epoch switches. Optimal Linux rigs should be able to handle epoch 380, Windows rigs a little less (373-374).
—eth_dag_buf=X,Y. The miner can allocate a single or dual buffers for the DAG. For now, the default is DUAL buffers, which matches the behavior in all recent TRM releases. However, a single buffer is slightly better, leading to a small power save for all gpu types. Only recent drivers support single large allocations larger than 4GiB, typically from Adrenalin 20.9.1 and amdgpu-pro 20.x. The miner can automatically use single buffer mode when possible using this argument, as well a force single or dual buffers per gpu.
Supported values are
- A(uto),
- S(ingle),
- D(ual).
You can enumerate a comma-separated list for all gpus in the rig, or a single value for all gpus. A gpu that does not have a value in the comma-separated list will use the first value. Hence, to enable auto mode for all gpus, pass —eth_dag_buf=A NOTE: 4GB gpus will be forced to use dual buffers.
—eth_big_mode_adjust=X,Y. When using B- or C-modes, the miner runs better the more vram it can allocate. Unfortunately the drivers aren’t accurate reporting how much memory it’s possible to allocate, especially on Windows.
The miner will use a safe conservative number of 256MiB (Linux) and 512MiB (Windows) as an offset from the available vram size. If you want change this number, you can do so using this argument by providing.
a comma-separated list with values for one or more gpus. Values for gpus not running B/C-mode will be ignored. If a gpu doesn’t have a value in the list, the first provided value is used instead.
The allowed interval is [-64, 2048]. The higher number, the less vram is allocated on the gpu.
—eth_4g_max_alloc=X,Y. This argument allows mining on 4GB gpus after they no longer can store the full DAG in vram.
You pass either the max epoch to allocate memory for, or the raw nr of MB to allocate. You can provide a single value that applies to all 4GB gpus in the rig, or use a comma-separated list for specifying different values per gpu. Values for non-4GB gpus are ignored.
—eth_dag_slowdown=N Slows down the DAG generation. Pass a single digit 0-9. 0 means no slowdown (<= 0.7.9 behavior), 1 means minimal slowdown, 9 means max. Default value: 4 for a slight slowdown.
—eth_stagger Enables staggering of gpus when building a new DAG. This is more lean on PSUs that don’t like going from 0-100% load on all gpus at the same time.
—eth_no_stagger Disables –eth_stagger. Already the default behavior from 0.7.18. Argument kept for backwards compatibility only.
—eth_ramp_up Adds ramping up the intensity on all gpus after a DAG build, gpu disable/enable or network outage. Can help rigs with crashes right between the DAG build and starting mining.
—eth_no_ramp_up Disables —eth_ramp_up . Already the default behavior from 0.7.18. Argument kept for backwards compatibility only.
—eth_direct_abort Uses a different mechanism to abort ongoing gpu jobs. Recommended for Vegas in ROCm environments to minimize stale shares. Will apply to Vega and Polaris gpus in the rig only.
—eth_dag_alloc_patch Some motherboards with outdated bios can see hw errs typically on the first or last gpu in the system.
Use this argument to force a patched dag allocation strategy that most often solves the issue.
Upgrading your bios often solves the issue as well.
—eth_hashwatch(=M,M) Defines a min/max watchdog hashrate in MH/s expected when gpus are hashing. If a GPU falls outside of this range for too long it will be considered faulty and the watchdog will be triggered. The default min/max values are 2 MH/s and 150 MH/s.
To activate with default values, use —eth_hashwatch . To set your own values, use e.g. —eth_hashwatch=1.25,60 . The same range is used for all gpus in the rig. A negative value for one side disables it, e.g. use —eth_hashwatch=-1,1000 to handle gpu resets that result in huge fake hashrates but no minimum check.
—eth_dag_cache(=EPOCH) Enables saving eth DAGs from jobs with different epochs to prevent having to rebuild them in the future if jobs with the old epochs are received again. At most one DAG will be saved if GPU memory space allows. This is useful for switching pools such as eth+zil mining.
If you want to prebuild a certain epoch immediately at startup, add the optional value. Eth+zil switching miners should use —eth_dag_cache=0 . Only ethash (and not etchash) epochs can be prebuilt at this time.
—eth_dag_cache_resv=MEM Sets the amount of GPU memory the miner will attempt to leave unused when running with DAG caching enabled (see –eth_dag_cache). The argument MEM is the amount of memory to leave unused in mebibytes. The default value is 256.
—eth_dag_cache_verify Enable dag cache read and verification after a finished dag build. This will detect situations where the dag cache had bit errors and the resulting dag is partially broken.
We have seen this happen increasingly on Vegas as the dag has grown bigger. When detected, a new buffer will be allocated for the dag cache and the dag build restarted.
—eth_no_4gb_kernels Disable the ethash 4GB kernels and always use the regular kernels that assume the DAG will always fit in available vram on all gpus.
This is useful when mining ETC or ethash coins at lower epochs than ETH since the regular kernels have a better performance profile.
—eth_micro_delay=VAL Navi gpus only: adds a delay (measured in microseconds) when reenqueueing work on the gpu(s).
Weaker PSUs driving many gpus can sometimes not handle the “slew rate” when multiple gpus happen to reenqueue work at exactly the same time. Setting this to e.g. 32 will smoothen out the transition from no load to 100% load enough to lower the slew rate on such rigs.
The typical indication of this issue is hard hangs where the rig becomes unresponsive requiring a power cycle to reboot, but it can also be regular gpu crashes. Valid values are 1-128. Not using this argument means no delay, value zero.
Progpow опции (kawpow, firopow)
—prog_config=CONFIG Manual progpow configuration for the miner. CONFIG must be in the form [M][L].
- The [M] value selects the mode which can be either ‘A’ or ‘B’.
- The ‘B’ mode typically results in better performance but is only available for
- Vega on linux and Navi (linux or windows).
- The [L] value selects the intensity and it’s range will depend on the GPU architecture.
Both values are optional, but if [L] is specified, [M] must also be specified.
- —prog_config=A
- —prog_config=B750
CONFIG can also be a comma separated list of config values where each is applied to each GPU. For example: —prog_config=A,B750,,A288
Any gpu that does not have a specific config in the list will use the first.
—prog_height=VALUE Sets a fixed block height for progpow algorithms for benchmarking purposes.
Note that using this option needs a pool connection but will not submit shares.
—prog_strict Forces miner to always generate strictly accurate kernels. By default the miner will generate relaxed kernels that use less computation power but can result in occasional invalid shares.
—prog_dag_slowdown=N Slows down the DAG generation. Pass a single digit 0-9. 0 means no slowdown (<= 0.7.9 behavior), 1 means minimal slowdown, 9 means max. Default value: 4 for a slight slowdown.
—prog_stagger See `–eth_stagger.
—prog_ramp_up See `–eth_ramp_up.
—prog_no_stagger See `–eth_no_stagger.
—prog_no_ramp_up See `–eth_no_ramp_up.
—prog_micro_tune=X,Y. This option enables a small retuning session for every new random code block. This is important for Polaris gpus to run at their max speed. For Vegas and Navis it usually does not improve performance. The default AUTO mode enables it for all Polaris gpus but disables it otherwise.
The only reason to disable it would be for stability purposes. The argument value is a comma-separated list of values, one per gpu. If a gpu is missing a value, the value for the first gpu is used. Please note that setting a manual prog_config will effectively disable the micro-tuner as well. Available values are:
-
- turn OFF progpow micro-tuning for this gpu.
-
- turn ON progpow micro-tuning for this gpu.
-
- let the miner decide if micro-tuning should be enabled (AUTO).
Cryptonight опции
—rig_id Set the rig identifier that will be sent to the pool. This is only used for cryptonight pools.
—cn_config=CONFIG Manual cryptonight configuration for the miner. CONFIG must be in the form [P][I0][M][I1][:xyz], where [P] is an optional prefix and [:xyz] is an optional suffix.
For [P], only the value of ‘L’ is supported for low-end GPUs like Lexa/Baffin. [I0] and [I1] are the thread intensity values normally ranging from 1 to 16, but larger values are possible for 16GB gpus.
[M] is the mode which can be either ‘.’, -‘, ‘+’ or ‘*’. Mode ‘.’ means that the miner should choose or scan for the best mode.
Mode ‘*’ both a good default more and should be used if you mine on a Vega 56/64 with modded mem timings.
The exceptions to this rule are small pad variants (cnv8_trtl and cnv8_upx2), they should still use ‘+’. For Polaris gpus, only the ‘-‘ and ‘+’ modes are available.
NOTE: in TRM 0.5.0 auto-tuning functionality was added, making manual configuration of the CN config modes unnecessary except for rare corner cases. For more info, see the tuning docs and how-to documents bundled with the release.
- —cn_config=15*15:AAA
- —cn_config=14-14
- —cn_config=L4+3
CONFIG can also be a comma separated list of config values where each is applied to each GPU.
Any gpu that does not have a specific config in the list will use the first config in the list.
—no_cpu_check Disables cpu verification of found shares before they are submitted to the pool.
Note: only CN algos currently supports cpu verification.
—no_lean Disables the CN lean mode where ramp up threads slowly on start or restart after network issues or gpu temp throttling.
—no_interleave=DEVS Lists gpu devices where CN thread interleave logic should be not be used.
The argument is a comma-separated list of devices like for the -d option.
Use this argument if some device(s) get a worse hashrate together with a lot of interleave adjust log messages.
—alloc_patch=DEVS Lists gpu devices that loses hashrate between TRM v0.4.5 and later versions. With this argument a simpler mem allocation strategy is used, and the old (higher) hashrate should be restored. Auto-tuning mode can still be used.
—auto_tune=MODE Enable the auto-tune mode upon startup. Only available for CN variants. MODE must be either NONE, QUICK or SCAN. The QUICK mode checks a few known good configurations and completes within 1 min. The SCAN mode will check all possible combos and will run for 20-30 mins. Setting MODE to NONE disable the auto-tune feature. The default mode is QUICK.
—auto_tune_runs(=N) Executes multiple runs for the auto tune, each time decreasing the unit of pads used -1 in one of the threads (15+15 -> 15+14 -> 14+14 -> 14+13 -> …). You can specify the explicit nr of runs or let the miner choose a default value per gpu type (typically 3-4).
—auto_tune_exit If present, the miner will exit after completing the auto-tuning process. This is helpful when you want to scan for optimal settings and then use the resulting command line arg printed by the miner.
—allow_large_alloc If present, and when the driver indicates there is enough GPU vram available, the miner will be more aggressive with the initial memory allocation. In practice, this option means that Vega GPUs under Linux will start the auto-tuning process at 1615 rather than 1614 or 15*15.
MTP опции
—allow_all_devices Some algos can’t be mined on e.g. 4GB gpus. Those gpus will be disabled automatically by the miner. This argument overrides this logic and allows mining on all specified or detected devices.
X16* опции
—hash_order=VALUE Sets a fixed hash order for algorithms like x16r for benchmarking purposes.
Note that using this option needs a pool connection but will not submit shares.
The standard benchmark hash order for x16r is —hash_order=0123456789abcdef .
Nimiq опции
—nimiq_worker=VALUE Sets the worker/device name for nimiq to pass to the pool(s).
—nimiq_no_proxy Disables the automatic Nimiq proxy executed as a separate process. This means that the host and port passed to the miner must be pointing to a proxy.
—nimiq_proxy=VALUE Overrides the default path to the Nimiq proxy. The default is trm_nimiq_proxy-win.exe. and trm_nimiq_proxy-linux in the current miner director.
—nimiq_port=VALUE Overrides the default local port (4444) used for the Nimiq proxy. This can be used if your system is already using port 4444 for some other tcp/ip service.
Verthash опции
—verthash_file=FILE Sets the filename to be used to load/store the verthash data file. If this option is specified when the verthash algo is used, the miner will attempt to load the verthash data from the file. If the file does not exist, the miner will generate the verthash data and then save it in the file for future use.
If this option is not specified the miner will generate the verthash data in system memory on every start.
—verthash_max_uploads=N Some motherboards have issues with all gpus in the rig uploading the verthash table at the same time. This argument limits the number of concurrent gpus that are uploading the table at the same time at startup. Allowed values are 1-32. The default value is 4.
Autolykos2 опции
—autolykos_mem_adjust=N Sets the amount of memory in MiB that the miner should leave unused when allocating GPU buffers for autolykos. The default value is 384 on linux and 512 on windows.
For GPUs with displays attached, the default is increased by 512. If dual mining with ZIL, the default value is increased by 1024. The option can also be provided with a comma separated list of values where each value is applied to each GPU. If an empty value is specified in the list, the default will be used for that GPU. If a value is not specified for a GPU it will use the first value in the list.
—autolykos_slowdown=N Adds a slowdown of the pad build process. Valid values are 0-100. The default is 0, no slowdown.
—autolykos_ignore_diff Ignores the difficulty sent by the pool and only uses the 256-bit target provided in jobs.
Some pools don’t follow the ERGO reference miner pool implementation, in which case this argument might help. NOTE: this will be applied to all pools.
ZIL dual mining опции
—zil_start or —zil Starts the ZIL dual mining config. Between this and the —zil_end marker , all arguments are applied to the ZIL mining rather than the primary algo. It’s expected that the primary algo has been set up in earlier arguments. The intention is that you can add a —zil . —zil_end configuration to any working TRM configuration algo and things will work out of the box.
This argument automatically sets a range of default settings you want to use for ZIL:
- Cached copy of the ZIL epoch 0 DAG.
- Adjustment of memory allocated for the primary algo to fit the ZIL DAG.
- Choose ethash A-mode for the ZIL mining.
- Use the standard faster kernels for 4GB gpus since the DAG is max 1GB.
The minimal working setup is to only provide a ZIL pool that is ok with the miner ignoring the primary coin jobs and only mines during the ZIL windows. This is an example for ezil.me:
—zil -o stratum+tcp://eu.ezil.me:5555 -u <eth wallet>.<zil wallet>.<worker name> -p x —zil_end
For more info, read the ZIL dual mining guide packaged with the TRM release.
—zil_end Marks that we’re done with the ZIL mining config and all following arguments are for the primary algo. This argument isn’t strictly necessary, but should be included for mining distros since the user has no guarantee what arguments will be added automatically at the end of the command line by the distro.
—stats_mode=single/dual When adding ZIL dual mining, the stats output will by default be duplicated to add info for the ZIL mining. Some contexts might get confused by this if they are parsing the TRM outut or log files. To switch to the default output, add —stats_mode=single .