Тестирование RAID0 из пары SSD с интерфейсом SATA
Недавно мы попробовали «поиграть» с массивами RAID0 из пары NVMe-накопителей и пришли к выводу, что это лишено практического смысла. Точнее, смысл может быть лишь в том случае, когда массив создается из двух одинаковых топовых устройств, а возможность просто купить аналогичное устройство соответствующей емкости физически отсутствует. Да и то речь, скорее всего, будет идти только о «набивании попугаев», поскольку для прикладного программного обеспечения скоростные возможности даже бюджетных твердотельных накопителей избыточны. И даже если вдруг окажется, что старого маленького медленного SSD уже как-то не хватает, его проще заменить на новый большой и быстрый, а не пытаться докупить второй старый маленький медленный, дабы объединить их в RAID-массив.
С другой стороны, такой подход не всегда реализуем. Возьмем, например, старый SATA SSD: очевидным путем его модернизации является переход на NVMe, но в старой системе он не всегда возможен. Кроме того, менять, например, полтерабайта MLC с SATA-интерфейсом на терабайт TLC под PCIe не всем понравится, а вот покупка еще одного SSD, аналогичного имеющемуся, может оказаться куда менее затратным и более простым мероприятием. Да и никакой пугающей новизны в данном случае нет, о проблемах пропускной способности PCIe при использовании нескольких устройств можно не думать, да и вообще — подобный массив можно собирать на очень многих платформах, в то время как NVMe RAID без серьезных плясок с бубном создается только на самых «свежих», и то не на всех.
В общем, смысл вроде бы прослеживается. Но что получится на практике? Во всяком случае, интересно посмотреть — чем мы сегодня и займемся.
Методика и объекты тестирования
Методика подробно описана в отдельной статье, там же можно познакомиться с используемым аппаратным и программным обеспечением.
Основным рабочим телом нам послужит Silicon Power Velox V85 480 ГБ: уже пожилое устройство на базе контроллера Phison PS3110-S10 и 15-нанометровой MLC-памяти Toshiba. Второго в точности такого не нашлось, но такой же емкости и построенный на идентичной платформе — без проблем. Это еще один плюс идеи SATA RAID0: симметричность обеспечить очень легко.
Из прошлого материала мы взяли также результаты Intel SSD 600p и WD Black первого поколения по 512 ГБ — поодиночке и в массиве. Пусть массив получился бестолковым с практической точки зрения, но для сравнения он нам подойдет. Также возьмем Intel Optane SSD 800P 118 ГБ и два Optane SSD 800P в массиве RAID0, благо в свое время мы такой массив собирали. Три немножко разных массива RAID0 дадут нам в сумме немного больше информации о собственно RAID0 на современных платформах. И это важно, поскольку основная наша задача сегодня — все-таки исследовательская, а не практическая 🙂
Поскольку сегодняшнее тестирование достаточно специфично, мы не стали заносить результаты тестов в общую таблицу: они доступны в отдельном файле в формате Microsoft Excel. Так что желающие покопаться в цифрах (тем более, что не все они попадают на диаграммы) могут скачать его и удовлетворить любопытство.
Производительность в приложениях
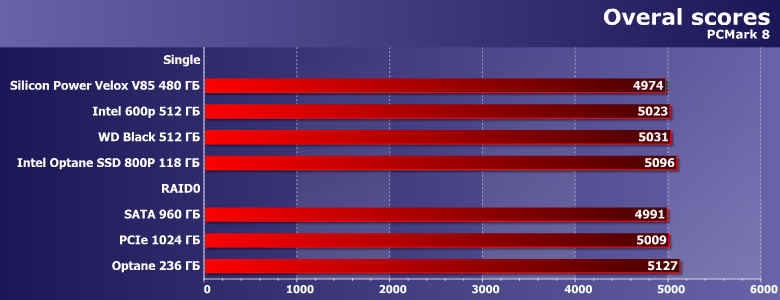
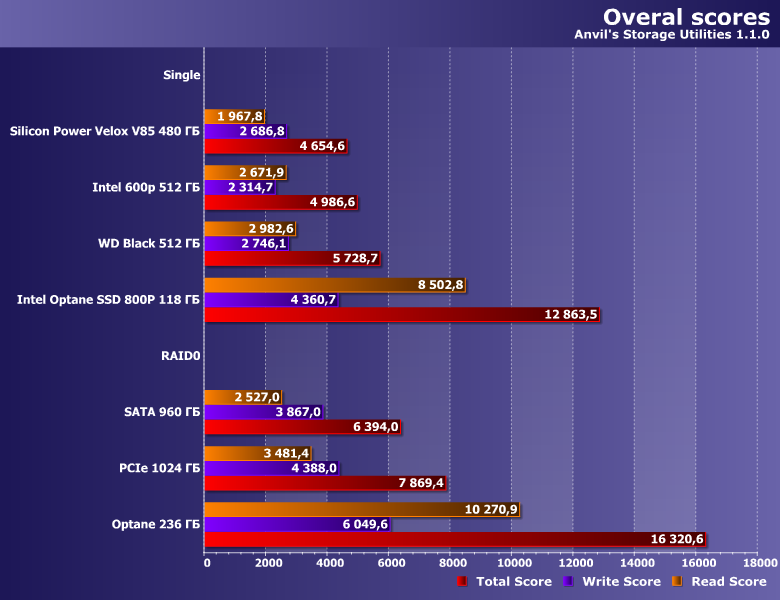
Два симметричных массива работают чуть быстрее, чем накопители, из которых они построены — асимметричный наоборот. С другой стороны, разброс производительности здесь настолько не велик, чтобы об этом вообще стоило задумываться. Причина озвучена неоднократно — и самого медленного из испытуемых уже достаточно для того, чтобы производительность определялась не им.
Да и потенциальный выигрыш не так уж велик — даже когда он есть. Это для Optane 800p фактическое удвоение ширины интерфейса и степени чередования полезно, но в случае SATA и протокола AHCI (а другой тут неприменим) много уже не наработаешь. Даже Intel SSD 600p (один из самых медленных накопителей в своем классе) и то заметно быстрее в этом тесте, а попытка использовать его в паре с еще одним «неторопливым» SSD результат только уменьшает — но все равно не до уровня «увеличенного» SATA RAID0.
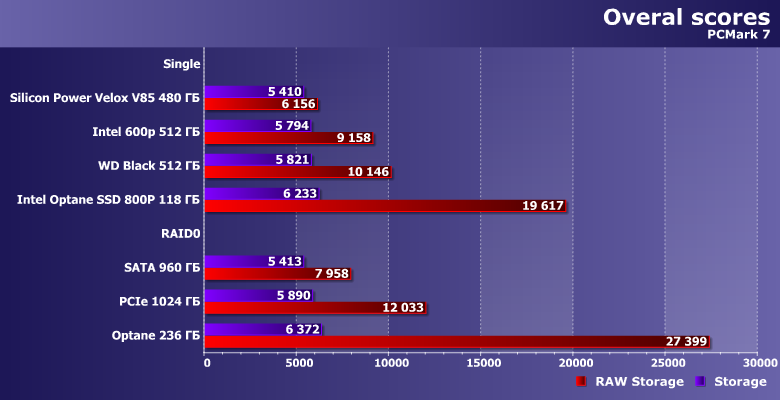
Предыдущая версия пакета, оперирующая более «легкими» нагрузками, более благосклонна к любым массивам. Однако не менее очевидно, что какой-то внятный прирост можно увидеть только на паре маленьких, но шустреньких «опташ», да и то — в синтетическом режиме. SATA RAID же медленнее одиночного (и медленного же) NVMe-накопителя. Такие дела.
Последовательные операции
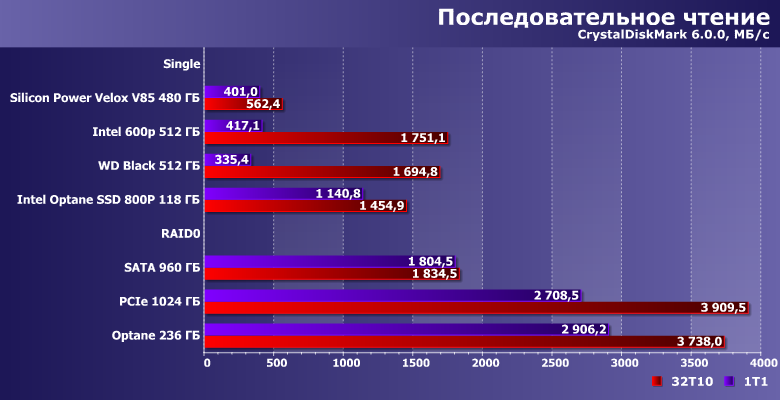
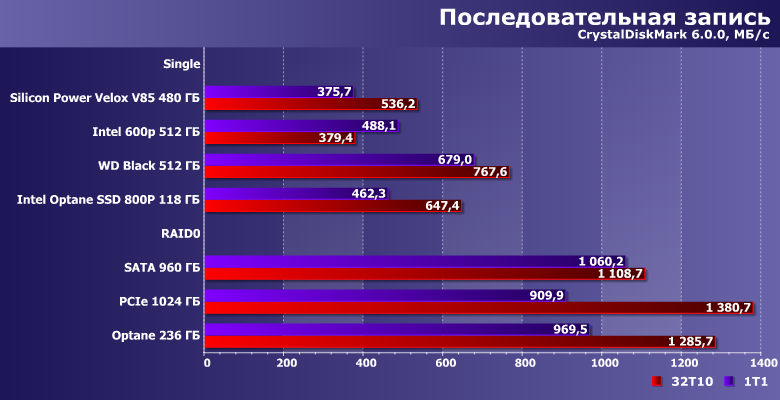
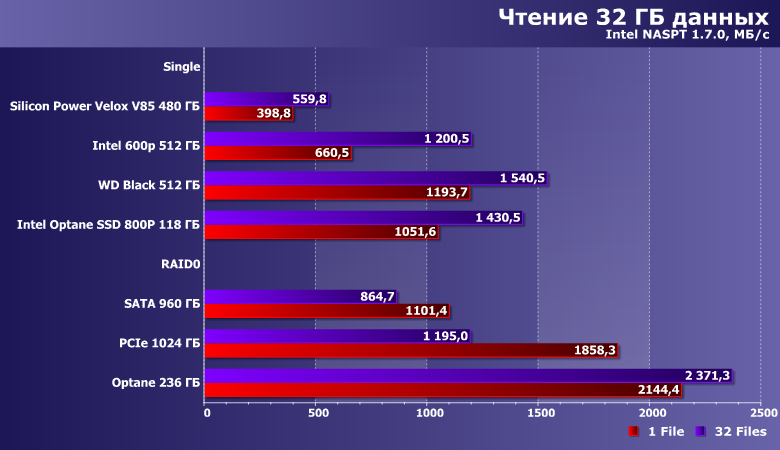
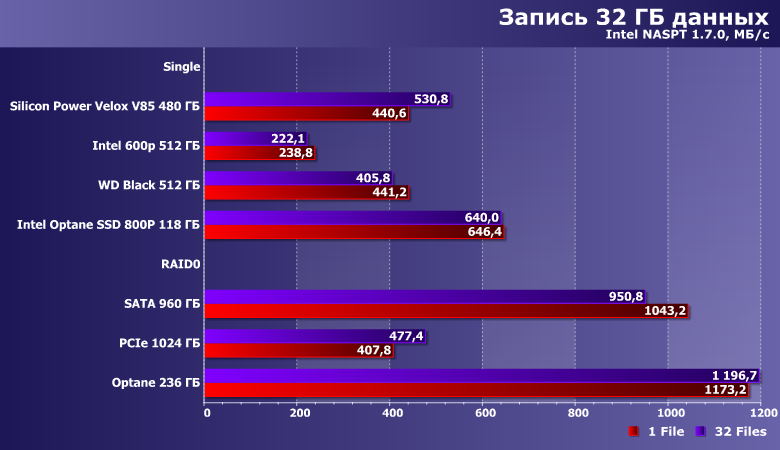
Окончательно убеждаемся в том, что этой программе «сносит крышу» дополнительное кэширование силами драйвера при использовании RAID-массивов. Во всяком случае, на операциях чтения — запись-то выглядит правдоподобно. И показывает нам, что пропускную способность интерфейса действительно можно удвоить при помощи создания массива RAID0. Но сейчас этим уже заниматься не нужно (чаще всего), поскольку появилась уже возможность мигрировать на еще более быстрый интерфейс.
Случайный доступ

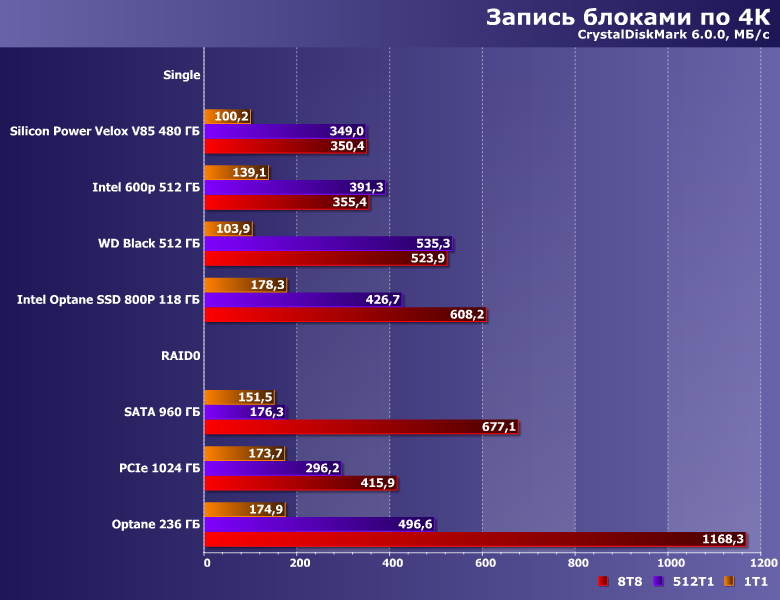
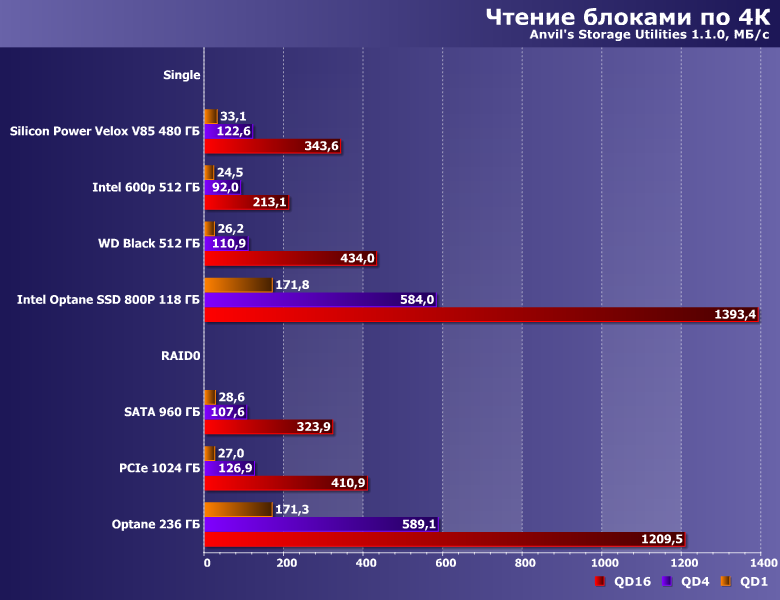
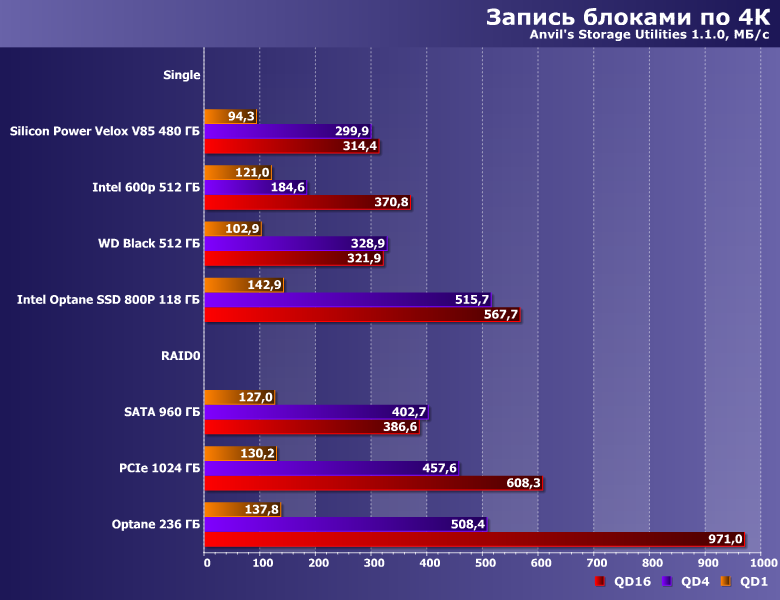
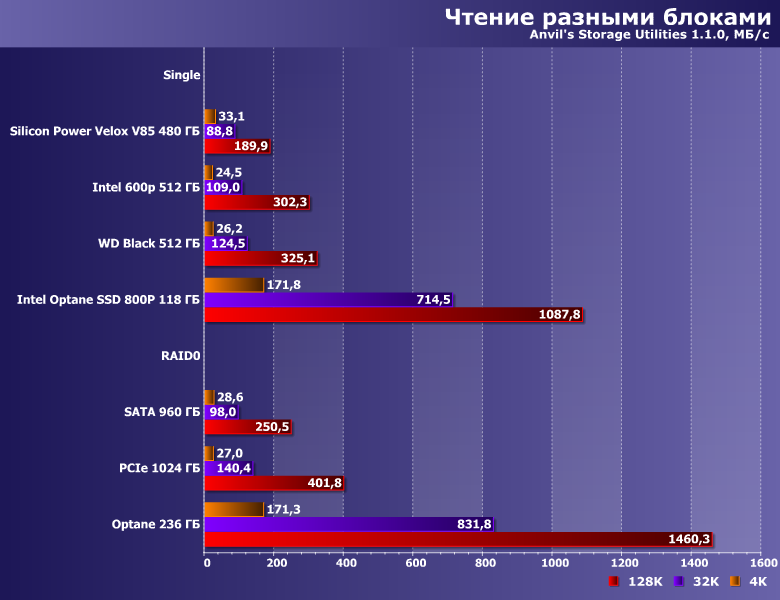
Как видим, все сценарии ведут себя по-разному — это тот случай, когда на производительность могут влиять любые факторы. Объединение накопителей в массив с чередованием — еще один дополнительный. Который может скорость как повысить (например, если при исходных данных немного «не хватает» пропускной способности интерфейса и/или степени внутреннего параллелизма), так и наоборот. В любом случае, «сменить класс» устройства этим способом не выйдет. Т. е., например, скорость чтения с единичной длиной очереди команд (что как раз и наиболее значимо на практике) зависит только от задержек самой памяти — и поэтому любые Optane здесь вне конкуренции. А никакой сменой протоколов или интерфейсов это не изменить. Тем более, объединением устройств в массив RAID0.
Работа с большими файлами
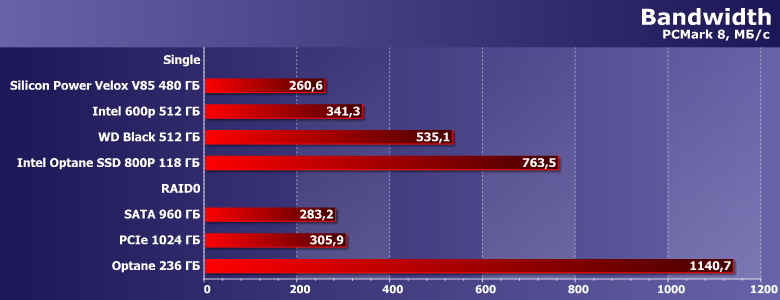
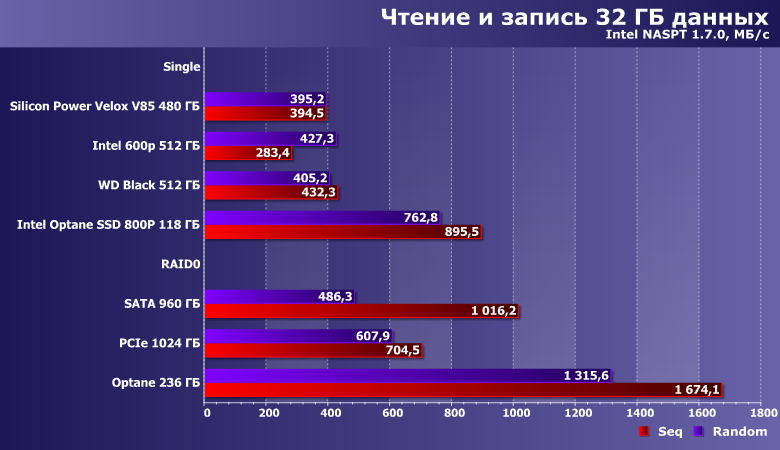
В принципе, это в первую очередь задача на интерфейс — а он в настоящее время может быть и куда более быстрым, нежели «дабл сата». В итоге прирост производительности в массиве-то «сверхлинейный», но на фоне других устройств (в т. ч. и медленных в своем классе) эффект просто теряется.
Очень многое зависит от памяти, так что SATA-накопитель на «быстрой» MLC может с легкостью обгонять PCIe на медленной TLC, а в массиве удвоить свою производительность. Но, опять же, на сегодняшний день это уже не имеет особого значения, поскольку быстрые NVMe-устройства уходят далеко за гигабайт в секунду и в одиночестве.
Аналогичный случай. Хотя и это «удобный сценарий» для массивов, но, фактически, они чем-то «помогают» лишь тем накопителям, производительность которых искусственно ограничена интерфейсом (не только SATA600 — у Optane 800p аналогичная проблема из-за всего двух линий PCIe). Но после внедрения PCIe 3.0 x4 в этот сегмент подобное случается крайне редко.
Рейтинги
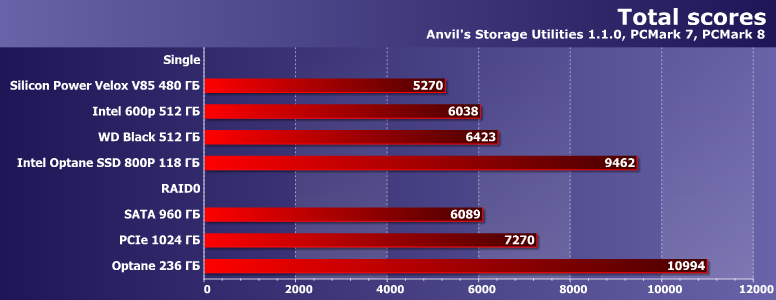
Жизненное наблюдение: ранее к нам на тестирование регулярно привозили ноутбуки с RAID0 из пары SATA SSD, причем часто такие модели предназначались специально для тестовых лабораторий, а в розницу эти же модели, как правило, поступали с одиночным твердотельным накопителем либо с одним SSD и одним винчестером, а иногда и вовсе с одним только винчестером. После внедрения NVMe подобная практика прекратилась мгновенно, и причина хорошо видна на диаграммах: массив из пары SATA-накопителей способен побороться с одиночным «медленным» NVMe-устройством, но вот быстрый NVMe SSD в любых «попугаях» длиннее. Поэтому в случае современных платформ незачем и возиться. Владельцы же «старых» платформ (без поддержки NVMe) могут извлечь какую-то практическую пользу из SATA RAID0 и сейчас — но небольшую и не всегда.
Итого
На этом, как нам кажется, тему RAID-массивов в применении к массовым конфигурациям можно закрывать, благо мы рассмотрели уже почти все основные варианты. За кадром остались только связки из пары одинаковых топовых устройств (Optane SSD 800P все-таки на такое не совсем тянет), но и с ними тоже все уже ясно: где-то производительность увеличится, где-то — нет, но за пределы синтетики все эти отличия не выйдут. Во времена винчестеров, когда не хватало иногда даже последовательных скоростей, никаким способом хоть что-то ускорить пренебрегать было нельзя. Сейчас же есть более простые способы, иногда оказывающиеся и более дешевыми (можно сэкономить на платформе, да и цена твердотельных накопителей с ростом емкости увеличивается не линейно). Со всеми вытекающими.
Нужно ли создавать RAID-массив из SSD и какие контроллеры для этого нужны
Привет Хабр! В этом материале мы расскажем, стоит ли организовывать RAID-массивы на базе твердотельных решений SATA SSD и NVMe SSD, и будет ли от этого серьезный профит? Мы решили разобраться в этом вопросе, рассмотрев виды и типы контроллеров, которые позволяют это сделать, а также сферы применения таких конфигураций.

Так или иначе, каждый из нас хоть раз в жизни слышал такие определения, как “RAID”, “RAID-массив”, “RAID-контроллер”, но вряд ли придавал этому серьезное значение, потому что рядовому ПК-боярину все это вряд ли интересно. А вот высоких скоростей от внутренних накопителей и безотказности их работы хочется всем и каждому. Ведь, какой бы мощной ни была начинка компьютера, скорость работы накопителя становится узким местом, если говорить о совокупном быстродействии ПК и сервера.
Так было ровно до того момента, пока на смену традиционным HDD не пришли современные NVMe SSD со сравнимой емкостью в 1 Тбайт и более. И если раньше в ПК чаще встречались связки SATA SSD + парочка емких HDD, то сегодня их начинает сменять другое решение — NVMe SSD + парочка емких SATA SSD. Если говорить о корпоративных серверах и “облаках”, многие уже успешно переехали на SATA SSD, просто потому что они быстрее обычных “жестянок” и способны обрабатывать большее количество операций ввода/вывода одновременно.

Однако отказоустойчивость системы все равно находится на достаточно низком уровне: мы не можем как в “Битве экстрасенсов” предугадать с точностью даже до недели, когда тот или иной твердотельный накопитель прикажет долго жить. И если HDD “умирают” постепенно, позволяя уловить симптомы и принять меры, то SSD “мрут” сразу и без предупреждений. И вот теперь самое время разобраться, зачем все это вообще нужно? Стоит ли организовывать RAID-массивы на базе твердотельных решений SATA SSD и NVMe SSD, и будет ли от этого серьезный профит?
Зачем нужен RAID-массив?
Само слово “массив” уже подразумевает то, что для его создания используется несколько накопителей (HDD и SSD), которые объединяются с помощью RAID-контроллера и распознаются ОС, как единое хранилище данных. Глобальная задача, которую позволяют решить RAID-массивы — минимизация времени доступа к данным, повышение скорости чтения/записи и надежности, которая достигается благодаря возможности быстрого восстановления в случае сбоя. К слову, для домашних бэкапов использовать RAID совсем не обязательно. А вот если у вас есть свой домашний сервер, к которому необходим постоянный доступ 24/7 — тут уже другое дело.
Существует свыше десятка уровней RAID-массивов, каждый из которых отличается количеством используемых в нем накопителей и имеет свои плюсы и минусы: например, RAID 0 позволяет получить высокую производительность без отказоустойчивости, RAID 1 — наладить автоматическое зеркалирование данных без прироста скорости, а RAID 10 объединяет в себе возможности вышеперечисленных. RAID 0 и 1 — самые простые (поскольку не требуют произведения программных вычислений) и, как следствие, — самые популярные. В конечном счете выбор в пользу того или иного уровня RAID зависит от возлагаемых на дисковый массив задач и возможностей RAID-контроллера.
Домашний и корпоративный RAID: в чем разница?
Основа любого современного бизнеса — большие объемы данных, которые должны надежно храниться на серверах компаний. А еще, как мы уже отмечали выше, к ним должен обеспечиваться постоянный доступ 24/7. Понятное дело, что наравне с “железом” важна и софтверная часть, но в данном случае мы говорим все-таки об оборудовании, которое обеспечивает надежное хранение и обработку информации. Никакой софт не спасет компанию от разорения, если “железное” оснащение не соответствует возложенным на него задачам.
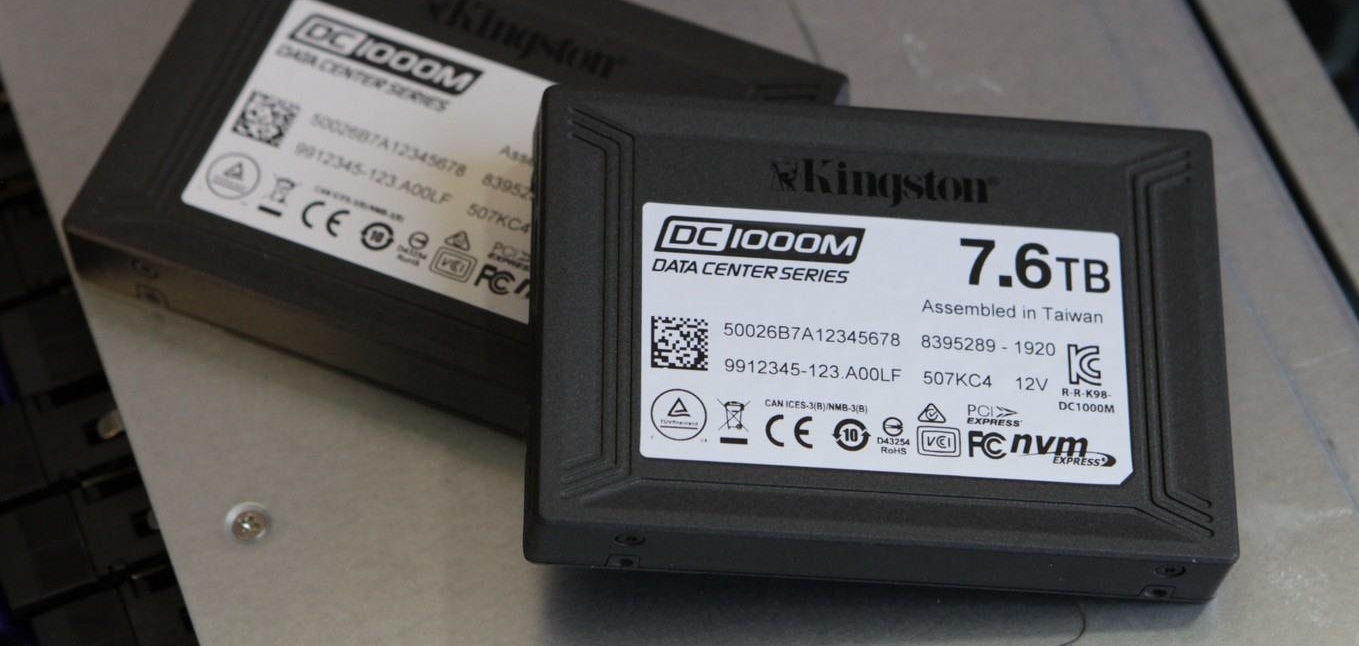
Для этих задач любой производитель “железа” предлагает так называемые корпоративные устройства. У Kingston — это мощные твердотельные решения в лице SATA-моделей Kingston 450R (DC450R) и серии DC500, а также NVMe-моделей DC1000M U.2 NVMe, DCU1000 U.2 NVMe и DCP-1000 PCI-e, предназначенных для использования в ЦОД (центрах обработки данных) и суперкомпьютерах. Массивы из таких накопителей, как правило, используются в связке с аппаратными контроллерами.

Для потребительского же рынка (то есть для домашних ПК и NAS-серверов) доступны такие накопители как Kingston KC2000 NVMe PCIe, но в этом случае необязательно покупать аппаратный контроллер. Можно ограничиться встроенным в материнскую плату ПК или NAS-сервера, если вы конечно не планируете самостоятельно собрать домашний сервер для нетипичных задач (завести маленький домашний хостинг для друзей, к примеру). К тому же, домашние RAID-массивы, как правило, не предполагают наличие сотен и тысяч накопителей, ограничиваясь двумя, четырьмя и восемью устройствами (чаще SATA).
Виды и типы RAID-контроллеров
Существует три вида RAID-контроллеров, основанные на принципах реализации RAID-массивов:
1. Программные, в которых управление массивом ложится на CPU и DRAM (то есть исполнение программного кода происходит на процессоре).
2. Интегрированные, то бишь встроенные в материнские платы ПК или NAS-сервера.
3. Аппаратные (модульные), представляющие собой дискретные платы расширения для разъемов PCI/PCIe системных плат.
В чем их принципиальное отличие друг от друга? Программные RAID-контроллеры уступают интегрированным и аппаратным по производительности и отказоустойчивости, но при этом не требуют специального оборудования для работы. Однако важно убедиться, что процессор хост-системы является достаточно мощным для запуска программного обеспечения RAID, не оказывая негативного влияния на производительность приложений, которые также работают на хосте. Интегрированные контроллеры, как правило, оснащаются собственной кэш-памятью и задействуют некоторое кол-во ресурсов CPU.
А вот аппаратные обладают и собственной кэш-памятью, и встроенным процессором для выполнения программных алгоритмов. Обычно они позволяют реализовать все виды уровней RAID-массивов и поддерживают сразу несколько видов накопителей. Например, к современным аппаратным контроллерам компании Broadcom можно одновременно подключать SATA-, SAS- и NVMe-устройства, что позволяет не менять контроллер при апгрейде серверов: в частности, при переезде с SATA SSD на NVMe SSD контроллеры менять не придется.
Собственно, на этой ноте мы подошли к типологизации самих контроллеров. Если есть трехрежимные, должны быть и какие-то еще? В данном случае ответ на этот вопрос будет утвердительным. В зависимости от функций и возможностей RAID-контроллеры можно поделить на несколько типов:
1. Обыкновенные контроллеры с функцией RAID
Во всей иерархии это самый просто контроллер, который позволяет объединять HDD и SSD в RAID-массивы уровней “0”, “1” или “0+1”. Программно это реализовано на уровне прошивки. Однако, такие устройства вряд ли можно рекомендовать для использования в корпоративном сегменте, ведь у них отсутствует кэш и не поддерживаются массивы уровней “5”, “3” и т.п. А вот для домашнего сервера начального уровня они вполне подойдут.
2. Контроллеры, работающие в паре с другими RAID-контроллерами
Этот тип контроллеров может работать в паре с интегрированными контроллерами материнских плат. Реализовано это по следующему принципу: дискретный RAID-контроллер берет на себя решение “логических” задач, а встроенный — функции обмена данными между накопителями. Но есть нюанс: параллельная работа таких контроллеров возможна только на совместимых системных платах, а значит область их применения серьезно сужается.
3. Самостоятельные RAID-контроллеры
Эти дискретные решения содержат на борту все необходимые чипы для работы с серверами корпоративного класса, обладая собственным BIOS’ом, кэш-памятью и процессором для быстрой коррекции ошибок и вычисления контрольных сумм. К тому же они отвечают высоким стандартам надежности в плане изготовления и обладают высококачественными модулями памяти.
4. Внешние RAID-контроллеры
Нетрудно догадаться, что все перечисленные выше контроллеры являются внутренними и получают питание через разъем PCIe материнской платы. О чем это говорит? А о том, что выход из строя системной платы может привести к ошибкам в работе RAID-массива и потере данных. Внешние же контроллеры избавлены от этого недоразумения, так как размещаются в отдельном корпусе с независимым блоком питания. В плане надежности такие контроллеры обеспечивают самый высокий уровень хранения данных.
Broadcom, Microsemi Adaptec, Intel, IBM, Dell и Cisco — это лишь некоторые из компаний, которые предлагают аппаратные RAID-контроллеры в настоящее время.
Режимы работы RAID контроллеров SAS/SATA/NVMe
Основной задачей трехрежимных HBA- и RAID-контроллеров (или контроллеров с функцией Tri-Mode) является создание аппаратного RAID на базе NVMe. У компании Broadcom это умеют делать контроллеры 9400 серии: например, MegaRAID 9460-16i. Он относится к самостоятельному типу RAID-контроллеров, оснащен четырьмя разъемами SFF-8643 и, благодаря поддержке Tri-Mode, позволяет коннектить к себе SATA/SAS- и NVMe-накопители одновременно. К тому же это еще и один из самых энергоэффективных контроллеров на рынке (потребляет всего 17 Ватт энергии, при этом менее 1,1 Ватт на каждый из 16 портов).

Интерфейсом подключения служит PCI Express x8 версии 3.1, что позволяет реализовать пропускную способность на уровне 64 Гбит/с (в 2020 году ожидается появление контроллеров для PCI Express 4.0). В основе 16-портового контроллера лежит 2-ядерный чип SAS3516 и 72-битная DDR4-2133 SDRAM (4 Гбайт), а также реализована возможность подключения до 240 накопителей SATA/SAS-, либо до 24 NVMe-устройств. По части организации RAID-массивов поддерживаются уровни “0”, “1”, “5” и “6”, а также “10”, “50” и “60”. К слову, кэш-память MegaRAID 9460-16i и других контроллеров в серии 9400 защищена от сбоев напряжения дополнительным модулем CacheVault CVPM05.
В основе трехрежимной технологии лежит функция преобразования данных SerDes: преобразование последовательного представления данных в интерфейсах SAS/SATA в параллельную форму в PCIe NVMe и наоборот. То есть контроллер согласовывает скорости и протоколы, чтобы беспрепятственно работать с любым из трех типов устройств хранения. Это обеспечивает бесперебойный способ масштабирования инфраструктур центров обработки данных: пользователи могут использовать NVMe без существенных изменений в других конфигурациях системы.

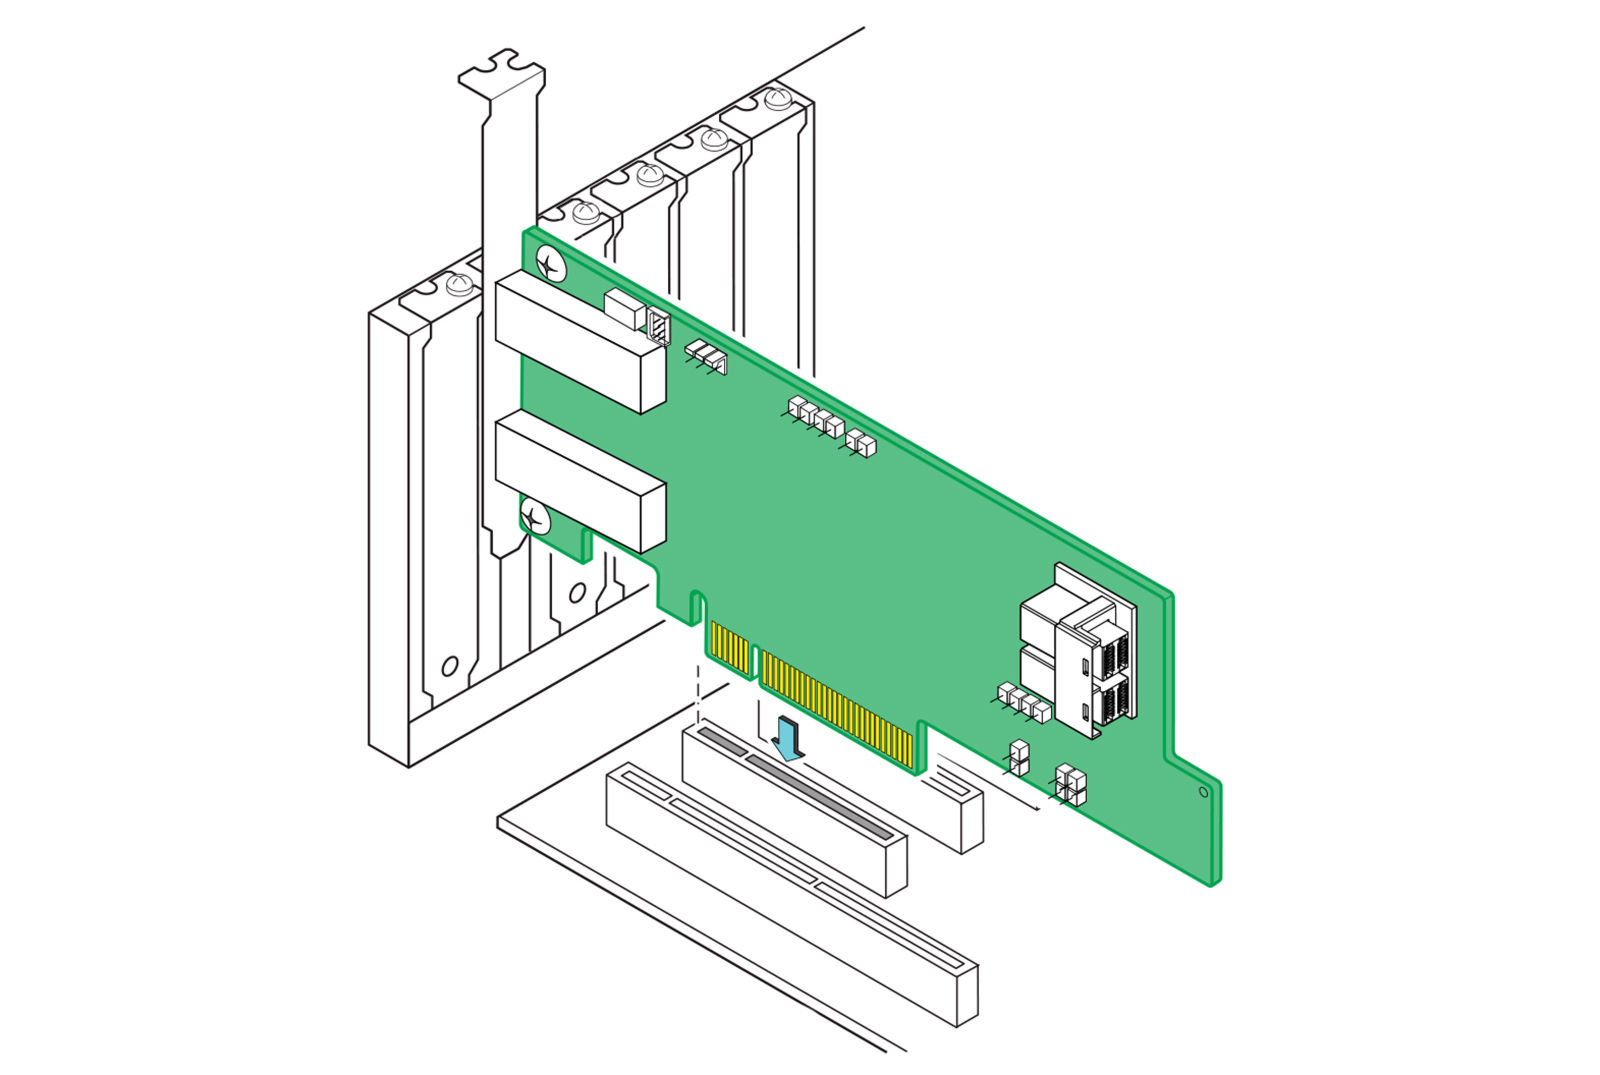
Однако при планировании конфигураций с NVMe-накопителями, стоит учитывать, что NVMe-решения используют для подключения 4 линии PCIe, а значит каждый накопитель задействует все линии портов SFF-8643. Выходит, что напрямую к контроллеру MegaRAID 9460-16i можно подключить только четыре накопителя NVMe. Либо ограничиться двумя NVMe-решениями при одновременном подключении восьми SAS-накопителей (см. схему подключения ниже).
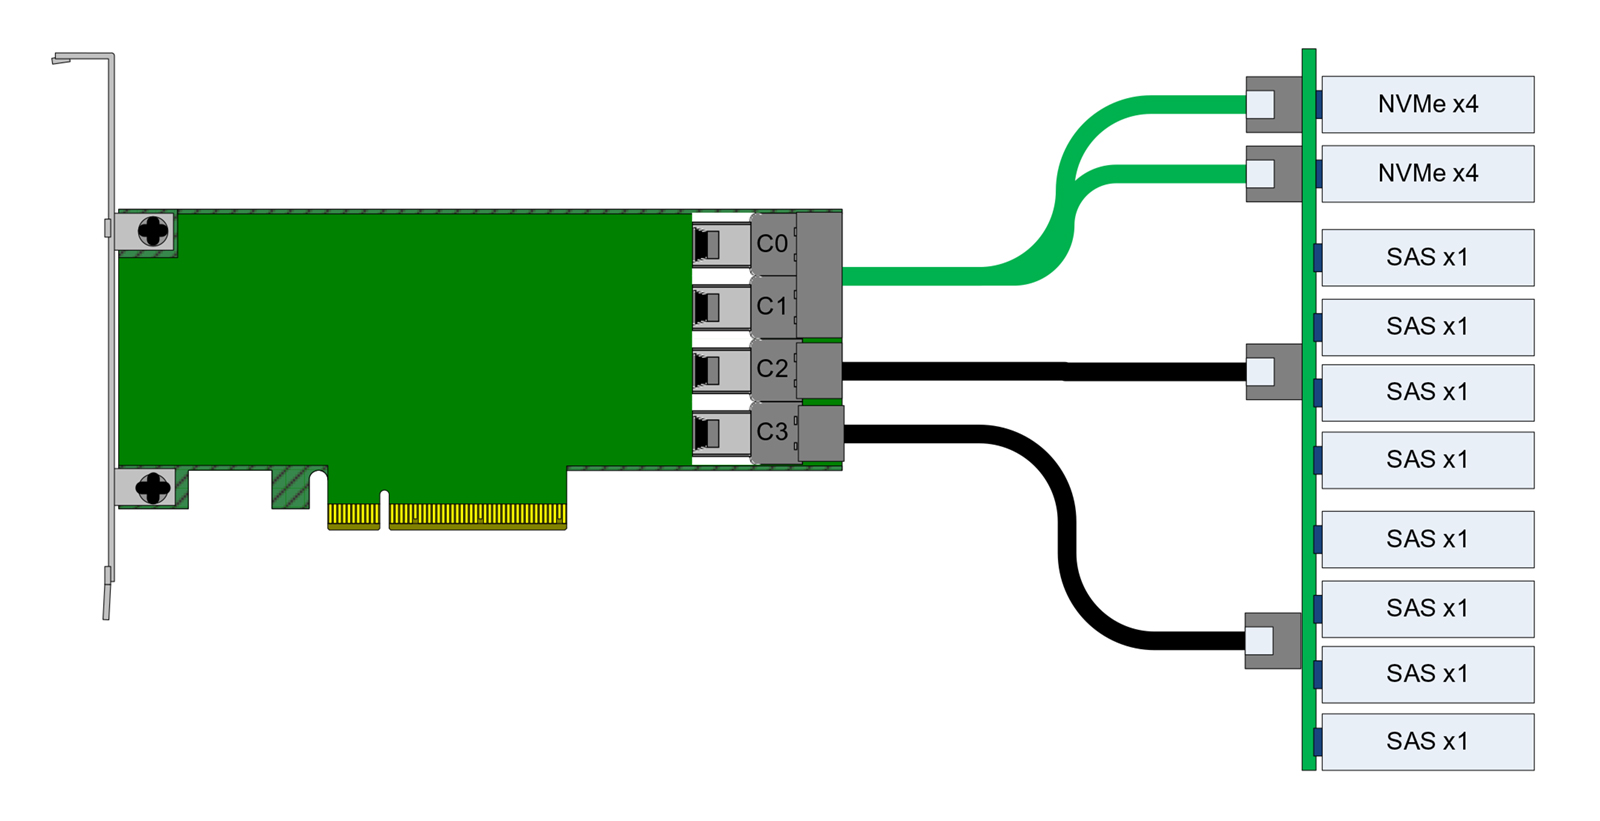
На рисунке показано использование разъема «0» (С0 / Connector 0) и разъема «1» для подключений NVMe, а также разъемов «2» и «3» для подключений SAS. Это расположение может быть изменено на обратное, но каждый накопитель x4 NVMe должен быть подключен с использованием соседних линий. Режимы работы контроллера устанавливается через конфигурационные утилиты StorCLI или Human Interface Infrastructure (HII), которая работает в среде UEFI.
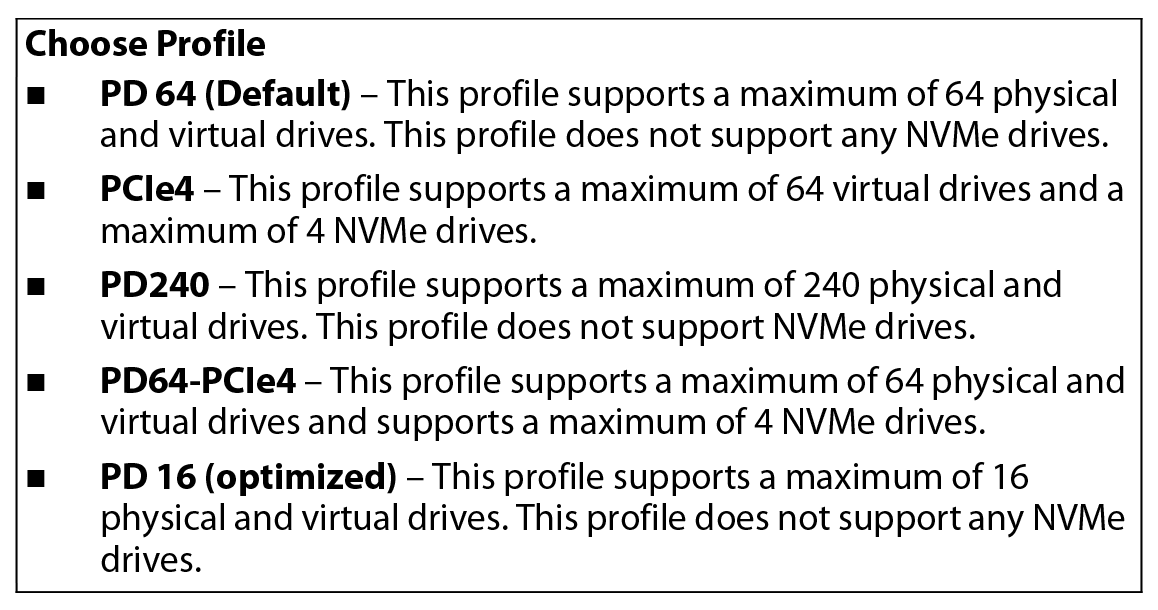
Режим по умолчанию — профиль «PD64» (поддержка только SAS / SATA). Как мы уже говорили выше, всего профилей три: режим «SAS/SATA only mode» (PD240 / PD64 / PD 16), режим «NVMe only mode» (PCIe4) и смешанный режим, в котором могут работать все типы накопителей: «PD64-PCIe4» (поддержка 64 физических и виртуальных дисков с 4 NVMe-накопителями). В смешанном режиме значение задаваемого профиля должно быть таким – «ProfileID=13». К слову, выбранный профиль сохраняется в качестве ведущего и не сбрасывается даже при откате к заводским настройкам через команду Set Factory Defaults. Сменить его можно будет только вручную.
Стоит ли создавать RAID-массив на SSD?
Итак, мы уже поняли, что RAID-массивы – это залог высокого быстродействия. Но стоит ли собирать RAID из твердотельных накопителей для домашнего и корпоративного использования? Многие скептики говорят о том, что прирост в скорости получается не столь существенным, чтобы разоряться на NVMe-накопители. Но так ли это на самом деле? Вряд ли. Самым большим ограничением для использования SSD в RAID (как в домашних условиях, так и на корпоративном уровне) может стать только цена. Как ни крути, а стоимость гигабайта пространства у HDD значительно дешевле.
Подключение нескольких твердотельных “дисков” к контроллеру RAID для создания массива из SSD в определенных конфигурациях может оказать огромное влияние на производительность. Не стоит, однако, забывать, что максимальная производительность ограничена пропускной способностью самого контроллера RAID. Уровнем RAID, который предлагает лучшую скорость работы, является RAID 0.

Организация обычного RAID 0 с двумя SSD-накопителями, в которой используется метод разбиения данных на фиксированные блоки и их чередования между твердотельными хранилищами, приведет к удвоению производительности (если сравнивать со скоростями, которые выдает один SSD). При этом массив RAID 0 с четырьмя твердотельными накопителями будет уже в четыре раза быстрее, чем самый медленный SSD в массиве (в зависимости от ограничения пропускной способности на уровне контроллера RAID SSD).
Если исходить из простой арифметики, SATA SSD примерно в 3 раза быстрее традиционного SATA HDD. NVMe-решения еще эффективнее — в 10 раз и более. При условии, что два жестких диска в RAID’е нулевого уровня покажут удвоенную производительность, увеличив ее на 50%, два SATA SSD окажутся в 6 раз быстрее, а два NVMe SSD — в 20 раз быстрее. В частности, один накопитель Kingston KC2000 NVMe PCIe может достигать скорости последовательного чтения и записи до 3200 Мбайт/с, что в формате RAID 0 достигнет внушительных 6 Гбайт/с. А скорость чтения/записи случайных блоков размером 4 Кбайт превратится из 350 000 IOPS в 700 000 IOPS. Но… в то же время “нулевой” RAID не обеспечивает нам избыточности.
Можно сказать, что в домашних условиях избыточность хранилища обычно и не требуется, поэтому самой подходящей конфигурацией RAID для SSD действительно становится RAID 0. Это надежный способ получить значительное повышение производительности в качестве альтернативы использованию таких технологий, как твердотельные накопители на базе Intel Optane. А вот как поведут себя SSD-решения в самых популярных типах RAID (“1”, “5”, “10”, “50”) — мы поговорим в нашем следующем материале.
Данная статья подготовлена при поддержке наших коллег из Broadcom, которые предоставляют свои контроллеры инженерам Kingston для тестирования с накопителями SATA/SAS/NVMe корпоративного класса. Благодаря этому дружескому симбиозу, клиентам не приходится сомневаться в надежности и стабильности работы накопителей Kingston c HBA- и RAID-контроллерами производства Broadcom.
Дополнительную информацию о продуктах Kingston можно найти на официальном сайте компании.
Ребята вопрос по созданию RAID 0 из двух разных SSD.
Если вы хотите объединить два разных SSD в один RAID 0 массив для увеличения скорости чтения и записи данных, то вам следует учесть несколько важных моментов.
Как создать RAID 0?
Для создания RAID 0 массива из двух SSD вам нужно выполнить следующие шаги:
- Подключите оба SSD к материнской плате.
- Зайдите в BIOS и настройте RAID.
- Включите компьютер и загрузитесь с загрузочного диска с помощью инструмента, поддерживающего создание RAID, например, Windows Setup или Intel Rapid Storage Technology.
- Создайте RAID 0 массив из двух SSD и отформатируйте его.
Как учесть различия между SSD?
Однако, если у вас два разных SSD, то есть несколько моментов, которые вам стоит учесть:
- Размер SSD должен быть одинаковым или близким к размеру наименьшего SSD. Например, если у вас есть SSD 500 ГБ и SSD 1 ТБ, то вы должны создать RAID 0 массив размером 2 x 500 ГБ = 1 ТБ.
- Совместимость SSD с RAID может быть разной в зависимости от физических параметров, таких как интерфейс (SATA, NVMe), плата управления контроллером и т.д. Поэтому, перед созданием RAID, убедитесь, что ваши SSD совместимы с RAID и что компьютер сможет оптимально использовать их производительность.
- Скорость чтения и записи данных может различаться между двумя SSD. Это может влиять на общую производительность RAID 0. Однако, как правило, производительность RAID 0 будет выше, чем у каждого SSD по отдельности.
Резюме
RAID 0 — это один из способов увеличения производительности хранения данных на компьютере. Если вы хотите создать RAID 0 массив из двух разных SSD, то убедитесь, что их размеры и совместимость с RAID учитываются перед созданием массива. Также стоит понимать, что скорость чтения и записи данных может различаться между SSD, что может влиять на производительность RAID 0.
How To Raid 0 Nvme Ssd? A Step-by-Step Guide!
RAID 0 works by dividing the data into blocks and then writing those blocks across all the drives in the array.
This configuration is often referred to as ‘striping’. Because the data is written to all drives simultaneously, the speed of data transfers can be significantly increased.
However, since there is no data redundancy in this RAID configuration, if one drive fails, all data in the array will be lost.
Please enable JavaScript
Implementing RAID 0 NVMe SSD configuration can dramatically boost system performance, primarily if it involves data-intensive tasks.
However, due to its lack of data redundancy, this configuration might not be suitable for systems where data security is vital. Always ensure regular backups to protect data.
Table of Contents
10 Steps: Setting Up RAID 0 with NVMe SSDs
| Steps | Description |
|---|---|
| 1. | Identify Compatible NVMe SSDs |
| 2. | Purchase Required SSDs |
| 3. | Install SSDs into Your System |
| 4. | Access Your BIOS or UEFI Firmware |
| 5. | Enable RAID in Your System BIOS |
| 6. | Configure RAID 0 Array |
| 7. | Select RAID 0 Array as Boot Device |
| 8. | Install Operating System |
| 9. | Install Necessary Drivers |
| 10. | Verify RAID 0 Setup is Working Properly |
10 Steps: Setting Up RAID 0 with NVMe SSDs
Key Takeaway
Five Facts About: RAID 0 Configuration with NVMe SSDs
Why Use Raid 0 For Nvme Ssds
RAID 0 for NVMe SSDs provides a powerful solution for maximizing speed and storage capacity. By combining multiple SSDs into a single logical unit, RAID 0 improves performance and enhances data access.
Unlock the full potential of NVMe SSDs through RAID 0 for a seamless and efficient storage experience.
If you’re looking to turbocharge your system’s storage performance, RAID 0 for NVMe SSDs is an excellent choice.
By combining multiple NVMe SSDs in a RAID 0 configuration, you can unlock remarkable benefits that will elevate your computing experience.
Let’s delve into the reasons why RAID 0 is a game-changer for NVMe SSDs.
Benefits Of Raid 0 For Nvme Ssds:
Faster data transfer speeds with RAID 0:
Harnessing the power of RAID 0 brings a significant boost in data transfer speeds.By striping data across multiple NVMe SSDs, this configuration enables simultaneous read and write operations, enhancing overall throughput.
With RAID 0, you can experience lightning-fast data access, ensuring near-instantaneous loading times for applications, games, and large multimedia files. Say goodbye to frustrating wait times!
Increased storage capacity with RAID 0:
One of the primary advantages of RAID 0 is its ability to combine the storage capacity of multiple NVMe SSDs into a single logical volume.
By pooling the drives together, you enjoy an increased overall storage capacity. This means you can store more data, including large files, high-resolution videos, and resource-intensive applications. With RAID 0, space constraints become a thing of the past.
Enhanced performance for demanding tasks:
RAID 0’s stellar performance capabilities make it the perfect solution for resource-intensive tasks. Whether you’re a video editor, graphic designer, or gamer seeking seamless gameplay, RAID 0 provides the speed and efficiency required to handle these demanding workloads with ease.
Render times are reduced, allowing for quicker project completion, while games load rapidly, ensuring you have a competitive edge.
Redundancy considerations:
While RAID 0 offers undeniable performance benefits, it’s important to note that it does not provide any data redundancy.
Unlike other RAID configurations, if one NVMe SSD in a RAID 0 array fails, you may lose all the data stored across all drives.
Therefore, it is essential to conduct regular backups to safeguard your valuable data.
With the benefits RAID 0 brings to NVMe SSDs, it’s clear why it is favored by enthusiasts and professionals looking to elevate their storage performance.
Harness the power of RAID 0 to experience unmatched speed, increased storage capacity, and enhanced performance for your demanding tasks.
Just remember to keep data redundancy in mind and regularly back up your files to ensure peace of mind.
Understanding Raid 0 Configuration
Raid 0 Nvme Ssd configuration enhances speed and performance by distributing data across multiple drives.
This guide explains how to set up Raid 0 for Nvme Ssd, optimizing storage capabilities for efficient data management.
What Is Raid 0?
RAID 0, also known as disk striping, is a configuration that combines multiple NVMe SSDs into a single logical unit, resulting in improved performance and increased storage capacity. Unlike other RAID levels, RAID 0 does not offer redundancy or fault tolerance.
Instead, it focuses solely on enhancing speed by distributing data across multiple drives.
Key points about RAID 0 include:
- Data is divided into smaller segments, or stripes, and written across the drives simultaneously.
- Each drive in the array contributes its portion to the overall read and write operations, effectively increasing the data transfer speed.
- RAID 0 does not provide data redundancy. If one drive fails, all data stored on the array can be lost.
- The overall storage capacity is the total sum of all the drives in the RAID 0 array.
How Raid 0 Works For Nvme Ssds
RAID 0 configuration for NVMe SSDs operates similarly to traditional RAID 0, but takes advantage of the high-speed capabilities of NVMe technology.
Here’s how it works:
- Multiple NVMe SSDs are combined to form an array, usually connected through a RAID controller or motherboard’s built-in RAID capability.
- The data is divided into stripes, with each stripe consisting of small segments.
- These stripes are then distributed across all the SSDs in the array, allowing for parallel data access and significantly improving the overall performance.
- When reading or writing data, requests are distributed among the SSDs, allowing for simultaneous operations and faster transfers.
- The speed increase achieved with NVMe SSDs in a RAID 0 configuration is even more substantial than with traditional SSDs or HDDs, owing to the faster data access times and high bandwidth offered by NVMe technology.
Configuring Raid 0 On Nvme Ssds
To configure RAID 0 using NVMe SSDs, follow these steps:
- Ensure that your motherboard or RAID controller supports RAID functionality for NVMe SSDs.
- Depending on your system’s configuration, enter the BIOS/UEFI settings by pressing the designated key during startup (typically Del or F2).
- Navigate to the storage or SATA/RAID configuration section.
- Enable RAID mode and save the changes before exiting the BIOS/UEFI.
- Connect all the NVMe SSDs you want to include in the RAID 0 array to the appropriate motherboard connectors.
- Boot into your operating system and install the necessary RAID drivers provided by the motherboard manufacturer.
- Open the RAID management software included with your motherboard or RAID controller.
- Create a new RAID 0 array and select the NVMe SSDs you wish to use. Customize any optional settings according to your requirements.
- Initialize and format the RAID 0 array within your operating system.
- You can now take advantage of the increased speed and expanded storage capacity of your RAID 0 NVMe SSD array.
Remember that RAID 0 does not offer fault tolerance, so it’s crucial to regularly backup your data to avoid potential loss in case of drive failure.
Preparing For Raid 0 Configuration
Learn how to prepare for RAID 0 configuration with NVMe SSDs. Follow these steps to optimize your storage system for enhanced performance and data scalability.
If you’re considering RAID 0 configuration for your NVMe SSDs, there are a few important steps to undertake to ensure everything runs smoothly.
In this section, we’ll discuss how to choose compatible NVMe SSDs for RAID 0, check motherboard compatibility, and update BIOS and firmware accordingly.
Choosing Compatible Nvme Ssds For Raid 0:
To successfully configure RAID 0 with NVMe SSDs, it’s crucial to select compatible drives that work seamlessly together.
Here are some points to consider:
- Brand and model compatibility: Ensure that the NVMe SSDs you choose come from the same manufacturer and are of the same model to avoid potential compatibility issues.
- Capacity and speed: Match the storage capacity and speed of the NVMe SSDs as closely as possible, as any disparities might affect the overall performance of your RAID 0 setup.
- Quality and reliability: Opt for reputable brands known for their reliability and durability. Checking customer reviews and professional opinions can help in making an informed decision.
Checking Motherboard Compatibility For Nvme Ssd Raid:
Before embarking on the RAID 0 configuration, it’s essential to verify that your motherboard supports NVMe SSD RAID.
Here’s what you should do:
Consult the motherboard manual:
Look for information about NVMe SSD RAID support in the motherboard’s user manual or online documentation. This will help you identify whether RAID 0 is a viable option for your specific motherboard.
Check the motherboard specifications:
Visit the manufacturer’s website to confirm compatibility. Look for motherboard specifications, paying close attention to RAID support and available PCIe lanes for NVMe SSDs.
Updating Bios And Firmware For Raid 0:
To avoid potential issues and take full advantage of your NVMe SSD RAID setup, it’s important to update the BIOS and firmware of your motherboard and NVMe SSDs.
Here’s what you need to do:
Visit the manufacturer’s website:
Check the manufacturer’s website for the latest BIOS and firmware updates for your motherboard and NVMe SSDs. Download the appropriate files following the provided instructions.
Follow the update procedures:
Every manufacturer has a specific process for updating BIOS and firmware, so make sure to carefully follow their instructions.
This typically involves booting into the motherboard’s BIOS interface and using a USB drive to perform the update.
Double-check compatibility:
Before updating, ensure that the BIOS and firmware updates are compatible with your specific motherboard model and NVMe SSDs. Installing an incompatible update can lead to system instability.
By adhering to these crucial steps in preparing for RAID 0 configuration, you’ll ensure that your NVMe SSDs are compatible, your motherboard supports the configuration, and your BIOS and firmware are up to date.
With these preparations complete, you’ll be well on your way to maximizing the performance of your RAID 0 setup.
Configuring Raid 0 On Nvme Ssds
Learn how to configure RAID 0 on NVMe SSDs for enhanced storage performance.Gain faster data transfer speeds and improved overall system efficiency with this step-by-step guide.
If you want to improve the performance of your storage system, configuring RAID 0 can be a great way to achieve that. RAID 0, also known as striping, combines multiple NVMe SSDs into a single logical drive, boosting data transfer speeds and enhancing overall efficiency.
In this step-by-step guide, we will walk you through the process of configuring RAID 0 on NVMe SSDs, from installing the SSDs in your motherboard to accessing the BIOS settings for RAID configuration.
Step-By-Step Guide To Configuring Raid 0:
Installing NVMe SSDs in the motherboard:
- Ensure your motherboard supports NVMe SSDs and has multiple M.2 slots available.
- Carefully insert the NVMe SSDs into the M.2 slots, making sure they are firmly seated.
- Secure the SSDs using the provided screws to ensure they do not come loose.
Accessing BIOS settings for RAID configuration:
- Power on your computer and press the designated key to enter the BIOS setup.
- Navigate through the BIOS menus and locate the RAID configuration section.
- Enable RAID mode or change the SATA configuration to RAID.
- Save the changes and exit the BIOS setup. Your computer will restart.
Configuring RAID 0:
- Now that your computer has restarted, enter the BIOS setup again.
- Navigate to the RAID configuration section and select the option to create a new RAID volume.
- Choose the NVMe SSDs you want to include in the RAID 0 configuration.
- Select RAID 0 as the RAID level and choose the desired strip size.
- Save the changes and exit the BIOS setup.
Congratulations! You have successfully configured RAID 0 on your NVMe SSDs.
With the increased data transfer speeds of RAID 0, you can now enjoy improved performance for your storage system.
Remember that RAID 0 does not provide any redundancy, so it is essential to maintain regular backups to prevent data loss.
Setting Up Raid 0 In Bios
Setting up RAID 0 for NVMe SSDs in the BIOS allows for faster data transfer and improved performance. Learn how to configure RAID 0 efficiently for your NVMe SSD setup in this step-by-step guide.
Setting up RAID 0 in BIOS can significantly boost your PC’s speed and performance by combining multiple NVMe SSDs into a single logical drive.
If you’re ready to take advantage of this advanced storage configuration, let’s dive into the steps of setting up RAID 0 in BIOS.
Navigating RAID configuration options in BIOS:
- Access BIOS by restarting your computer and pressing the designated key (such as Delete, F2, or F10) during the boot process.
- Once inside BIOS, navigate to the “Storage” or “Advanced” tab, where you’ll find the RAID configuration options.
Creating a new RAID volume:
- Locate the RAID configuration menu and select “Create RAID Volume” or a similar option.
- Choose RAID 0 as the RAID level for optimal performance and speed.
- Name your RAID volume to easily identify it in the future.
Selecting NVMe SSDs for RAID 0:
- Depending on your motherboard, you may have different slots for NVMe SSDs. Ensure that each SSD is correctly inserted into the appropriate slot.
- In the RAID configuration menu, select the NVMe SSDs you want to include in the RAID 0 array.
- Specify the strip size, which determines the size of data chunks that will be distributed across the SSDs. Generally, a smaller strip size can enhance random performance.
- Confirm the selection and save the changes in BIOS.
By following these steps, you can harness the power of RAID 0 in BIOS to maximize the performance of your NVMe SSDs.
Remember to back up your data before setting up RAID 0, as it combines multiple drives into one and any failure could result in data loss.
Configuring Raid 0 Parameters
Learn how to easily configure RAID 0 parameters for NVMe SSDs, optimizing their performance and maximizing data storage capabilities efficiently. Increase your storage capacity and enhance read and write speeds with this step-by-step guide.
If you want to optimize the performance of your RAID 0 NVMe SSD setup, there are several key parameters you need to configure.
By carefully adjusting these settings, you can ensure that your RAID 0 array operates at its full potential.
Let’s take a closer look at the important factors that can influence the performance of your RAID 0 configuration.
Setting Raid Strip Size For Optimal Performance:
To achieve the best performance with RAID 0, it is crucial to configure the strip size appropriately.
The strip size determines the amount of data that is written to each disk in the array before moving on to the next drive.
A larger strip size can improve the performance of large sequential read and write operations, while a smaller strip size may enhance small random I/O performance.
Consider the nature of your workload and the type of data you will be handling when selecting the strip size.
- Large strip size: Suitable for applications that perform large sequential read and write operations. It allows for faster data transfer and can significantly enhance overall performance.
- Small strip size: Ideal for workloads that involve small random I/O operations. It helps to reduce latency and improve response times.
Choosing Raid 0 Block Size:
The block size refers to the unit of data that is written to or read from the RAID 0 array. Selecting an appropriate block size is essential to maximize the performance of your NVMe SSDs in RAID 0.
Consider the following factors when determining the optimal block size for your setup:
- Larger block size: Provides better performance for large sequential transfers, such as video editing or data-intensive tasks.
- Smaller block size: Offers improved performance for small random read or write operations, such as database applications or virtualization workloads.
Enabling Write Caching For Raid 0:
Enabling write caching can significantly enhance the performance of your RAID 0 NVMe SSD configuration.
Write caching allows the array to store write data temporarily in cache memory before writing it to the disks.
This improves write performance by allowing the system to acknowledge writes immediately and delay the physical write operation to a more opportune time.
Consider the following benefits of enabling write caching:
- Improved write performance: Write caching speeds up data write operations, resulting in faster overall performance for your RAID 0 array.
- Reduced latency: By buffering write operations in cache memory, write caching reduces the latency associated with physical disk writes.
- Increased longevity: Write caching minimizes the number of write operations directly to the disks, extending their lifespan.
By carefully configuring the RAID strip size, selecting the appropriate block size, and enabling write caching, you can optimize the performance of your RAID 0 NVMe SSD setup.
Remember to consider your specific workload requirements to ensure you achieve the best possible performance for your configuration.
Migrating And Cloning Data On Raid 0
Migrate and clone your data effortlessly on RAID 0 and make the most of your NVMe SSD with this comprehensive guide. Boost your storage performance and ensure efficient data storage and retrieval.
Transferring Data To Raid 0 From Existing Drives
Transferring data from your existing drives to RAID 0 involves a few simple steps.
Here’s how you can seamlessly migrate your data:
- Backup your data: Before starting the migration process, it’s crucial to create a backup of your existing data. This ensures that you have a safety net in case anything goes wrong during the transfer.
- Disconnect the existing drives: To begin with, disconnect your existing drives from your system. This will prevent any conflicts or interference during the migration process.
- Install the NVMe SSDs: Next, install the NVMe SSDs that you intend to set up in RAID 0. Make sure they are properly connected and detected by your system.
- Initialize the RAID array: Access your system’s BIOS settings and configure the RAID 0 array using the NVMe SSDs. Consult your motherboard or system documentation for specific instructions on configuring RAID.
- Format the RAID array: Once the RAID array is configured, format it to make it usable. This will erase any existing data on the SSDs, so ensure that you have a backup before proceeding.
- Restore data from backup: Finally, restore the data from your backup to the newly created RAID 0 array. This can be done by copying the files and folders from the backup location to the RAID array.
By following these steps, you can transfer your data smoothly to your RAID 0 setup, ensuring a seamless transition and improved storage performance.
Using Cloning Software For Data Migration
Cloning software can simplify the data migration process, making it quick and efficient.
Here are the steps to use cloning software for migrating data to RAID 0:
- Select a cloning software: Choose a reliable cloning software that supports RAID configurations and NVMe SSDs. There are various options available in the market, so pick one that suits your requirements.
- Install and launch the software: After downloading the cloning software, install it on your system. Launch the software to begin the data migration process.
- Select the source and destination drives: In the cloning software, choose the source drive, which is your existing drive, and the destination drive, which is your RAID 0 array.
- Configure cloning settings: Adjust the cloning settings as per your needs. You can choose options like sector-by-sector cloning or automatic resizing of partitions.
- Start the cloning process: Begin the cloning process by clicking the appropriate button in the software. The software will then start copying the data from the source drive to the destination RAID 0 array.
- Monitor the progress: Keep an eye on the cloning progress to ensure that it completes successfully. Some cloning software provides a visual representation or a progress bar to track the migration.
- Verify the cloned data: Once the cloning process finishes, verify the data on the RAID 0 array to ensure that everything has been transferred accurately. Check for any discrepancies or missing files.
- Disconnect the source drive: After verifying the data on the RAID 0 array, disconnect the source drive to avoid conflicts or duplicate data.
Using cloning software can save you time and effort when migrating data to RAID 0. It streamlines the process and reduces the chances of errors or data loss.
Verifying Data Integrity On Raid 0
Ensuring data integrity is crucial when setting up RAID 0.
Here are some steps to verify the integrity of your data on RAID 0:
- Perform a thorough data check: Run a data check utility or software that is specifically designed for RAID arrays. These tools scan the RAID 0 array for any inconsistencies or errors in the stored data.
- Monitor SMART attributes: Check the Self-Monitoring, Analysis, and Reporting Technology (SMART) attributes of your RAID 0 array. SMART can provide valuable insights into the health and performance of your drives.
- Regularly check for bad sectors: Conduct routine checks for bad sectors on your RAID 0 array. Bad sectors can lead to data corruption, so identifying and fixing them promptly is crucial.
- Monitor RAID controller status: Keep an eye on the status of your RAID controller to ensure that it is functioning optimally. Faulty or malfunctioning controllers can impact data integrity.
- Implement RAID management software: Utilize RAID management software that provides real-time monitoring and alerts for any potential issues with your array. This helps in proactive troubleshooting and maintaining data integrity.
- Regularly backup your data: Despite RAID 0 providing improved performance, it does not offer redundancy or protection against drive failures. Therefore, it is essential to regularly backup your data to safeguard it from potential loss or corruption.
By following these steps, you can verify the data integrity on your RAID 0 array and ensure that your valuable information remains safe and secure.
Monitoring And Maintaining Raid 0
Monitoring and maintaining RAID 0 for NVMe SSDs is crucial for optimal performance and data protection.
Regularly check disk health, update firmware, and keep backups to ensure the reliability and stability of your RAID 0 array.
Monitoring Raid 0 Performance
Monitoring the performance of your RAID 0 configuration is crucial to ensure optimal functioning and identify any possible issues.
Here are some key aspects to consider when monitoring RAID 0 performance:
- RAID management software: Utilize dedicated RAID management software tools provided by the manufacturer. These tools offer real-time monitoring and help track the health of your RAID array.
- Performance metrics: Regularly check performance metrics such as read and write speeds, IOPS (Input/Output Operations Per Second), and latency. Monitoring these metrics will help you identify any potential bottlenecks or performance issues.
- Disk usage and space: Monitor the disk usage on your RAID 0 array to ensure that it does not exceed its capacity. Also, keep an eye on available space to prevent data loss due to a lack of storage.
- SMART monitoring: Use SMART (Self-Monitoring, Analysis, and Reporting Technology) to monitor the health of individual SSDs in the RAID array. SMART can provide early warnings of potential disk failures.
- Alerts and notifications: Set up alerts and notifications to receive real-time alerts in case of critical events or abnormalities within the RAID 0 setup. This allows for timely intervention and prevention of data loss.
Performing Regular Backups On Raid 0
Although, RAID 0 offers enhanced performance and storage capacity, it lacks fault tolerance. This means that if one drive fails in the array, all data may be lost.
Therefore, it is essential to perform regular backups to safeguard your valuable data.
Consider the following backup strategies:
- Scheduled backups: Set up automated backups on a regular basis using reliable backup software. This ensures that your data is consistently backed up without any manual intervention.
- Off-site backups: Store backups in off-site locations such as cloud storage or external drives. This protects your data from unforeseen circumstances like physical damage or theft.
- Redundant backups: Maintain multiple backups by storing data on different storage devices or in different locations. This provides an additional layer of protection against data loss.
- Verify backup integrity: Regularly test and verify the integrity of your backups. Ensure that the backup files are accessible and can be restored successfully if needed.
Addressing Common Issues With Raid 0
Although, RAID 0 offers improved performance and storage capacity, it also comes with certain risks and issues. Being aware of these common problems allows you to address them effectively.
Consider the following steps to address common RAID 0 issues:
- Drive failure: In the event of a drive failure, replace the faulty drive as soon as possible. Ensure that you have spare drives readily available for quick replacement.
- Data loss: Implement a reliable backup strategy to mitigate the risk of data loss. Regularly create backups and store them in secure locations.
- Data corruption: Run regular disk checks and scans to identify and rectify any potential data corruption issues. Utilize appropriate disk checking utilities or RAID management software.
- Performance degradation: Watch out for signs of performance degradation, such as increased response time or reduced transfer speeds. Thoroughly analyze the underlying causes and take necessary actions like optimizing file systems or hardware upgrades.
- Compatibility issues: Before adding or replacing drives in the RAID 0 array, ensure compatibility with the existing drives to prevent compatibility-related complications.
By effectively monitoring and maintaining your RAID 0 configuration, performing regular backups, and addressing common issues, you can maximize the performance and resilience of your NVMe SSD RAID 0 setup. Stay vigilant to ensure the safety and availability of your valuable data.
FAQ About How To Raid 0 Nvme Ssd
What is RAID 0 for an NVMe SSD?
RAID 0 is a type of data storage system wherein data is divided and spread across multiple storage drives. It is used to increase the storage capacity, as well as the overall performance of an NVMe SSD.
How do I configure RAID 0 on my NVMe SSD?
To configure RAID 0 on an NVMe SSD, you must first set up the NVMe controller to support RAID. Then, connect each NVMe SSD to the controller and create a RAID array. Lastly, configure the RAID settings and create the partition.
Are there any risks associated with using RAID 0 for an NVMe SSD?
Yes, there are risks associated with using RAID 0 for an NVMe SSD. Data stored on a RAID 0 array is more susceptible to being lost if one of the drives fails. Therefore, it is important to back up important data regularly.
What are the performance benefits of using RAID 0 for an NVMe SSD?
Using RAID 0 for an NVMe SSD can give you faster read and write speeds, as well as improved overall performance. RAID 0 also increases the
Conclusion
RAID 0 with NVMe SSDs can significantly enhance your system’s performance and speed up data transfers.
By striping data across multiple drives, RAID 0 maximizes the utilization of NVMe SSDs’ lightning-fast speeds, giving you unparalleled read and write performance.
With the right hardware and configuration, you can experience blazing fast boot times, reduced loading times for applications and games, and improved overall system responsiveness.
However, it’s important to note that RAID 0 does not provide any data redundancy, so proper backup measures should be in place to prevent data loss in case of drive failure.
Additionally, it’s recommended to regularly monitor the health of your drives to identify any potential issues.
With the right setup and precautions, RAID 0 with NVMe SSDs can take your system’s performance to new heights, delivering an exceptional user experience.
Can You Raid 0 Nvme?
Yes, you can RAID 0 NVMe! This is a great way to increase the speed of your NVMe storage and can be done with either two or four drives.
When using four drives, it is recommended to use a hardware RAID controller for the best performance.
Can You Raid Nvme Ssd?
Yes, you can RAID NVMe SSD.
Here’s how:
1).You need to have a compatible motherboard that supports NVMe RAID.
2).You need to install the latest BIOS update for your motherboard.
3).You need to install the Intel Rapid Storage Technology (RST) driver.
4).You need to create a RAID volume in the Intel RST software.
5).You need to format the RAID volume and install your operating system on it.
6).You’re done! You can now enjoy the benefits of having a fast and reliable RAID array with your NVMe SSDs.
Should I Raid on Nvme Ssd?
Solid State Drives (SSDs) have been around for a while now and they offer many advantages over traditional hard disk drives (HDDs).
One of the latest advancements in SSD technology is the NVMe interface. NVMe stands for “Non-Volatile Memory Express” and it is a high-speed interface designed specifically for SSDs.
So, should you RAID on NVMe SSDs? The answer depends on your needs and requirements. If you need the absolute highest performance possible, then RAIDing NVMe SSDs is a good option.
This will give you the best possible performance, but it comes at a cost. RAIDing NVMe SSDs can be expensive and it requires more technical knowledge to set up and maintain than a single drive setup.
If you don’t need the absolute highest performance and you want to save some money, then a single drive setup is probably a better option for you.
You can still get very good performance from a single NVMe SSD without having to pay for the extra cost and complexity of a RAID setup.
How Do I Set Up Nvme Raid?
RAID is a data storage virtualization technology that combines multiple physical disk drive components into one or more logical units for the purposes of data redundancy, performance improvement, or both.
NVMe (Non-Volatile Memory Express) is a specification for accessing SSDs attached through the PCI Express bus.
The two technologies can be used together to create a high-performance, redundant storage solution.
Here’s how to set up NVMe RAID:
1. Choose your RAID level.
The most common RAID levels are 0, 1, and 5, but there are others available as well. Each has its own tradeoffs in terms of speed, capacity, and redundancy.
For example, RAID 0 offers the best performance but no redundancy; if one drive fails, all data is lost.
Conversely, RAID 5 offers good performance and decent redundancy; if one drive fails, the data on that drive can be reconstructed from the parity information on the other drives.
Decide which level is right for your needs before proceeding.
2 . Gather your drives .
You’ll need at least two NVMe SSDs for a basic setup; more drives can be added for additional capacity or improved performance (depending on the RAID level).
Make sure all drives are of similar capacity; mixing drive sizes will result in lower total capacity and may cause problems during creation or expansion of the array later on.
3 . Connect your drives .
Physically connect each drive to an available PCIe slot on your motherboard or host system. If you’re using a hardware RAID controller , connect it to an appropriate interface port as well (usually SATA or SAS).
4 . Configure BIOS/ UEFI settings .
In order to use NVMe drives in a RAID configuration , you’ll need to enable support in BIOS/UEFI first .
This setting is often located under Storage > Device Configuration or something similar; consult your motherboard manual if you’re unsure where to find it . Once enabled , save your changes and exit BIOS/ UEFI setup utility .
5 . Install operating system:
After completing BIOS/UEFI configuration , boot into your OS installation media and begin installing Windows or Linux ( whichever you prefer ) onto your new storage array.
As with any clean install , this process will erase everything currently stored on the target disks ; make sure you have backups of important files beforehand !
Nvme Raid Mode on Or off
The short answer is that you should turn on NVMe RAID mode if you have an Intel Z270 or X299 motherboard and are using two or more NVMe SSDs in a RAID configuration.
The benefits of doing so include increased data protection and performance. However, there are also some potential downsides to consider, so be sure to read on for all the details.
Why Use NVMe RAID Mode? There are two main reasons why you might want to use NVMe RAID mode: data protection and performance. Let’s take a look at each of these in turn.
Data Protection If you’re using multiple NVMe SSDs in a RAID configuration, then turning on NVMe RAID mode will help to protect your data in the event of one of the drives failing.
This is because when NVMe RAID mode is enabled, the data on each drive is mirrored across the other drives in the array.
So if one drive fails, you’ll still have access to your data from the other drives. This can be vital if you’re storing important files or documents on your RAID array.
Nvme Raid 0 Worth It
Is Nvme Raid 0 Worth It? The short answer is yes, NVMe RAID 0 is definitely worth it. The long answer is a bit more complicated.
Let’s start with a brief overview of what NVMe RAID 0 is and how it works. NVMe (Non-Volatile Memory Express) is the latest generation of solid state storage technology, offering significantly higher performance than its predecessors SATA and SAS.
One of the key benefits of NVMe is its much lower latency, which results in much faster data access speeds.
This makes it ideal for demanding applications such as gaming, video editing, and other resource-intensive tasks. RAID (Redundant Array of Independent Disks) is a storage technology that combines multiple disk drives into a single logical unit.
RAID 0 Stripe Width refers to the number of disks in a RAID 0 array – the more disks there are, the wider the stripe width and the greater the potential performance benefits.
However, it’s important to note that RAID 0 does not offer any data redundancy or protection against drive failure – if one drive fails, all data on all drives in the array will be lost.
So now that we know what NVMe and RAID 0 are, let’s answer the question – is NVMe RAID 0 worth it? In short, yes absolutely!
The main benefit of NVMe over SATA or SAS is its much lower latency which leads to significantly faster data access speeds.
When you combine this with the increased bandwidth available through striping multiple drives together in a RAID array, you get an incredible boost in performance that can make even the most demanding applications feel snappy and responsive.
Of course, this comes at the cost of increased risk should any drive in your array fail – but if you have a good backup strategy in place then this shouldn’t be an issue.
Overall, we think NVMe RAID 0 is definitely worth considering for anyone looking to get the most out of their solid state storage setup!
Nvme Raid Controller
NVMe RAID controllers are becoming increasingly popular as the demand for higher performance storage continues to grow.
With NVMe RAID controllers, users can take advantage of the high speed and low latency of NVMe SSDs while also benefiting from the increased protection that comes with using multiple drives in a RAID configuration.
There are a few things to keep in mind when considering an NVMe RAID controller:
First, make sure that the controller is compatible with your motherboard and CPU. Second, ensure that the controller supports the number of drives you plan on using in your RAID array.
And finally, check that the controller has enough PCIe lanes to support the bandwidth you need. Once you’ve found a compatible NVMe RAID controller, setting it up is relatively straight-forward. Simply install the controller into your computer and connect your NVMe SSDs to it.
Then configure your BIOS or operating system to use the new controller and create your desired RAID array.
That’s it! You’re now ready to enjoy the benefits of both fast NVMe storage and data redundancy with a RAID configuration.
Nvme Raid 0 Stripe Size
An NVMe RAID 0 stripe size is the amount of data that can be transferred between two or more drives in a RAID 0 configuration.
The stripe size is important because it determines the maximum amount of data that can be read from or written to a drive in a single operation. The most common NVMe RAID 0 stripe sizes are 128 KB, 256 KB, and 512 KB.
There are also 1 MB, 2 MB, and 4 MB stripe sizes, but they are less common. The largest stripe size is 8 MB. The 128 KB stripe size is the default for most NVMe RAID controllers.
It provides good performance and is large enough to support most workloads. The 256 KB and 512 KB stripe sizes offer better performance for demanding workloads such as video editing and gaming.
The 1 MB, 2 MB, and 4 MB stripe sizes are typically only used for enterprise applications that require the highest levels of performance.
The choice of NVMe RAID 0 stripe size depends on the needs of the application or workload. For most applications, the 128 KBstripe size will provide adequate performance.
For demanding workloads, larger stripe sizes may be necessary to achieve acceptable levels of performance.