How to add crypto to trezor

How to add crypto to trezor images are available in this site. How to add crypto to trezor are a topic that is being searched for and liked by netizens today. You can Find and Download the How to add crypto to trezor files here. Find and Download all free images.
If you’re searching for how to add crypto to trezor pictures information connected with to the how to add crypto to trezor keyword, you have pay a visit to the ideal site. Our website always provides you with suggestions for seeing the highest quality video and image content, please kindly search and find more informative video articles and images that match your interests.
How To Add Crypto To Trezor. Sending crypto from your Trezor One. Select the cryptocurrency that you wish to send from the top left of your screen. Plug your Trezor in and go to the Send tab. You have to use ADALite or Yoroi.

Ledger Nano S Full Review Bitcoin Wallet Cryptocurrency Top Cryptocurrency From pinterest.com
Token name Trezor One Trezor Model T Wallets Links. Follow the steps below. Add a custom token by going to your Ethereum account clicking on the drop-down ellipsis and selecting Add token. It is now also possible to manually add ERC20 tokens to your Trezor. You have to use ADALite or Yoroi. Select the cryptocurrency that you wish to send from the top left of your screen.
You can access more although you will need to use a third-party wallet.
Follow the steps belowz. 26082021 connect your Trezor wallet to your computer and click the CONNECT TO TREZOR button. Bitcoin clones should be added to the commondefsbitcoin subdirectory as. Add a custom token by going to your Ethereum account clicking on the drop-down ellipsis and selecting Add token. Select the Trezor wallet ETH wallet address you want to manage and click UNLOCK to complete. Plug your Trezor in and go to the Send tab.

Source: kriptobr.com
22122020 Are you wanting to send your crypto from your Trezor to another wallet. Add a custom token by going to your Ethereum account clicking on the drop-down ellipsis and selecting Add token. Choose the cryptocurrency you want to buy enter your payment details and receive your crypto directly to your Trezor device. Please I need your help. Ethereum ETH ERC20 copied.

Source: pinterest.com
Ethereum ETH ERC20 copied. A seamless stress-free experience. Please note the Trezor Model T only supports so many cryptocurrencies. Bitcoin BTC ERC20 copied. Use one of these addresses as the destination address when you send your ETH from other wallets exchanges.

Source: in.pinterest.com
Select the cryptocurrency that you wish to send from the top left of your screen. 26082021 connect your Trezor wallet to your computer and click the CONNECT TO TREZOR button. Choose the cryptocurrency you want to buy enter your payment details and receive your crypto directly to your Trezor device. Select the Trezor wallet ETH wallet address you want to manage and click UNLOCK to complete. Ethereum ETH ERC20 copied.
Source: pinterest.com
Plug your Trezor in and go to the Send tab. Follow the steps below. You can help by following the relevant steps below. Please note the Trezor Model T only supports so many cryptocurrencies. Sending crypto from your Trezor One.

Source: pinterest.com
You can help by following the relevant steps below. Or are you wanting to sell some of your assets back to us. Buy Bitcoin and other cryptocurrencies directly from Trezor Suite. Click on Get started with Trezor Connect your Trezor Model T enter your PIN code and click continue to select address Confirm the action on the Trezor Model Ts touchscreen. Download and install the SimpleStaking wallet.

Source: pinterest.com
Select the cryptocurrency that you wish to send from the top left of your screen. Use one of these addresses as the destination address when you send your ETH from other wallets exchanges. You can access more although you will need to use a third-party wallet. A seamless stress-free experience. Add a custom token by going to your Ethereum account clicking on the drop-down ellipsis and selecting Add token.

Source: kriptobr.com
Please note the Trezor Model T only supports so many cryptocurrencies. Or are you wanting to sell some of your assets back to us. It is now also possible to manually add ERC20 tokens to your Trezor. Enter the Trezor wallet PIN. Are you wanting to send your crypto from your Trezor to another wallet.
Source: youtube.com
Plug your Trezor in and go to the Send tab. Click on Get started with Trezor Connect your Trezor Model T enter your PIN code and click continue to select address Confirm the action on the Trezor Model Ts touchscreen. Select the Trezor wallet ETH wallet address you want to manage and click UNLOCK to complete. Trezor One Trezor Model T Wallets Links. Select the cryptocurrency that you wish to send from the top left of your screen.

Source: fi.pinterest.com
Follow the steps belowz. Safe smooth and simple. You can access more although you will need to use a third-party wallet. Hello Im new in this beautiful crypto world so I just bought some Solana and I want to send it to my Trezor One Wallet. Select the cryptocurrency that you wish to send from the top left of your screen.
Source: pitrezor.com
You can see all the animated steps below. A seamless stress-free experience. Download and install the SimpleStaking wallet. Trezor One Trezor Model T Wallets Links. You have to use ADALite or Yoroi.
Source: youtube.com
01092021 There is an exception to this rule which applies to the following groups of altcoins which require minimal changes to add support for. 26082021 connect your Trezor wallet to your computer and click the CONNECT TO TREZOR button. Ethereum ETH ERC20 copied. Use one of these addresses as the destination address when you send your ETH from other wallets exchanges. Or are you wanting to sell some of your assets back to us.
This site is an open community for users to do sharing their favorite wallpapers on the internet, all images or pictures in this website are for personal wallpaper use only, it is stricly prohibited to use this wallpaper for commercial purposes, if you are the author and find this image is shared without your permission, please kindly raise a DMCA report to Us.
If you find this site serviceableness, please support us by sharing this posts to your preference social media accounts like Facebook, Instagram and so on or you can also bookmark this blog page with the title how to add crypto to trezor by using Ctrl + D for devices a laptop with a Windows operating system or Command + D for laptops with an Apple operating system. If you use a smartphone, you can also use the drawer menu of the browser you are using. Whether it’s a Windows, Mac, iOS or Android operating system, you will still be able to bookmark this website.
How to Add Token to Trezor List
Find the ultimate guide on how to add your token to the list of coins supported by Trezor.
Do you want to make your ERC20 token more attractive for buyers, traders, and holders? If the answer is yes, then read the guide below. You will know how to add your ERC20 token to the List of all coins & tokens supported by Trezor. Moreover, it’s free of charge.
Also, make your token more attractive at no cost by:
-
��; ;
- detecting all approaches to include a token emblem to MetaMask ��; ; for free; ;
- using a step-by-step guide to making successful coin; ;
- adding coin to the TokenInsight tracking app; ;
- adding the currency to the Blockspot tracker;
- applying to list on Coincost tracker;
- including the asset into the DigitalCoinPrice tracker;
- making the coin visible on the Coindataflow portal;
- listing the coin on the CoinCheckup tracker;
- adding a token to the LiveCoinWatch;
- getting an ultimate list of the best coin voting platforms;
- adding the coin on MEW; ; at no cost;
- enabling Bank Cards and Apple Pay;
- adding it on Ledger.
How to add a token to the List of coins & tokens supported by Trezor?
Follow eight simple steps to add your Ethereum token to the Trezor List.
Step 1. Get a token address in ERC-55 format
Use this application to convert your token’s smart contract address to the ERC-55 format. To pass Trezor verification you should use the ERC-55 address format in the steps described below.
Step 2. Open Github
After signing Github, go to that page.
Step 3. Create a File on Github
Click on the Add file button. Then press on ‘Create new file’.
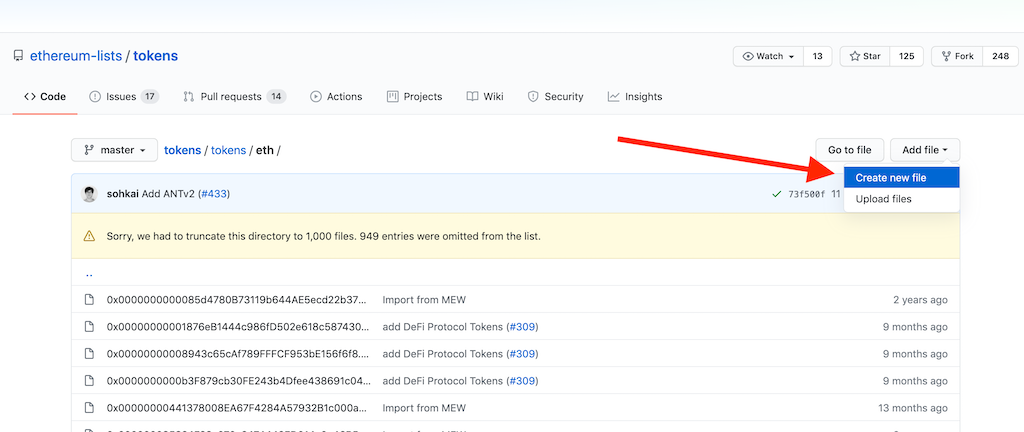 Create a file on GitHub
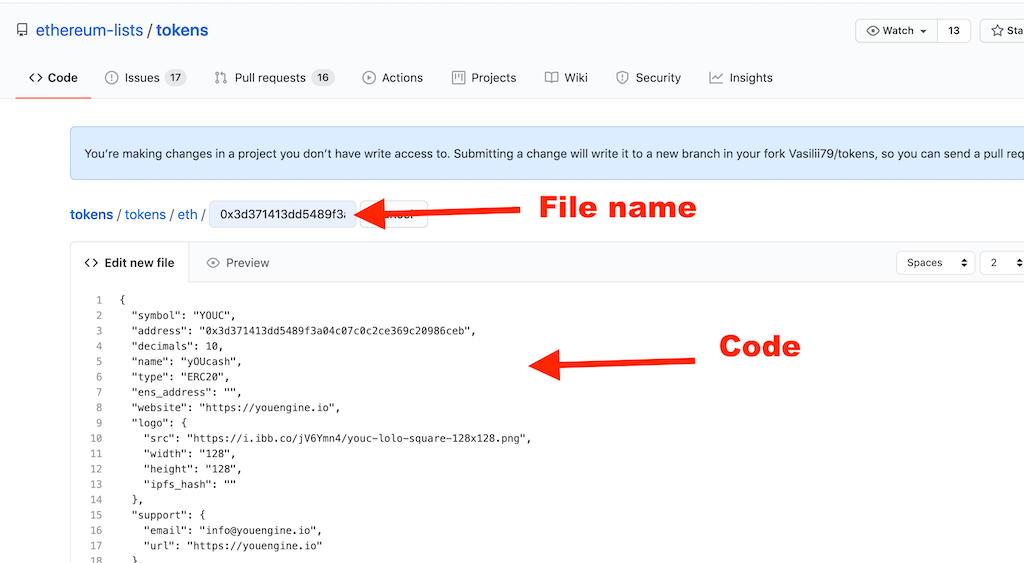
Step 4. Enter the name
Enter the name of your file. It should be your ERC20 token’s smart contract address but in ERC-55 format. Example: 0x3D371413dd5489F3A04C07c0C2CE369c20986ceb.json
Don’t forget to add a .json extension into the file name.
 Enter file name and code
Step 5. Write the code
The simplest way to write code for your token is to copy the example below. Just copy-paste the code below and edit by entering your token parameters. Replace YOUC with your token symbol, enter your token smart contract address, decimals, and so on.
Note that the required parameters that you must include in the code are:
- symbol : Short ticker-style symbol of your token.
- name: long token name token (take it from Ethercsan).
- address: Ethereum address of ERC-20 token, but in ERC-55 format
- decimals: The decimals of the token. As a Number and not a String.
Optional parameters are the following:
- logo : An optional logo of your token. Must be a square (recommended: 128×128) PNG w/ transparent background.
- support : A support email, support URL, or other way people can get assistance regarding the token.
- website : the link to your project website, and
- other links to your project’s social accounts.
We suggest you include as many as possible parameters.
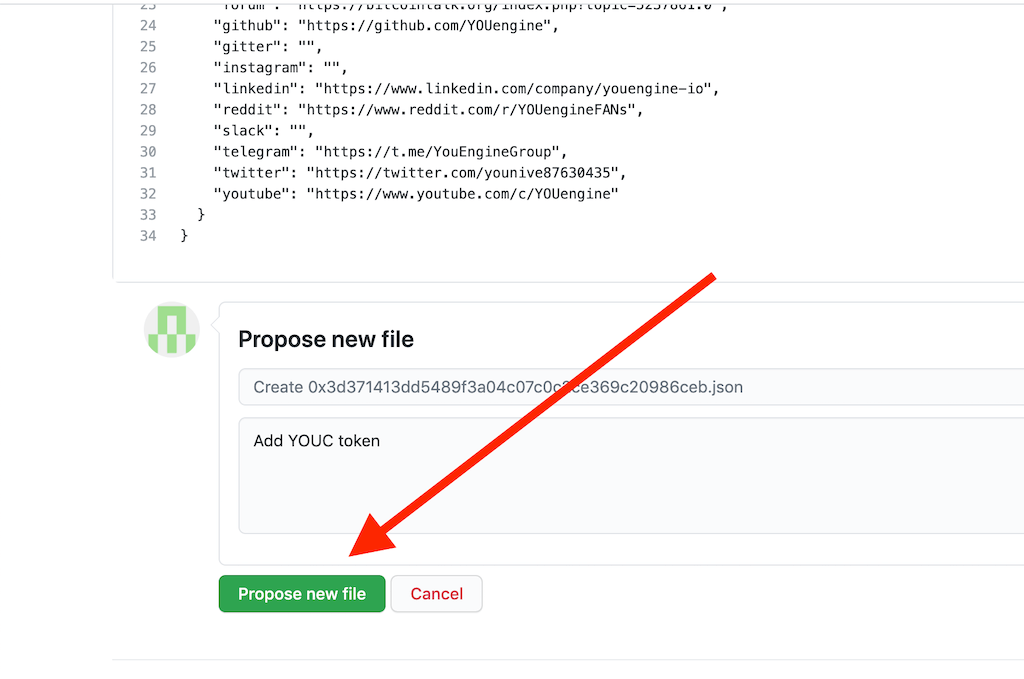
Step 6. Check and confirm
After you entered the file name and code (as on the picture above), scroll down and click on ‘Propose new file’
 Propose your file on GitHub
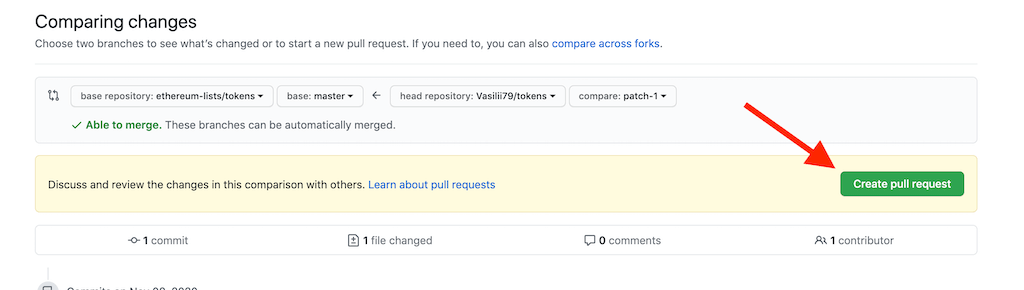
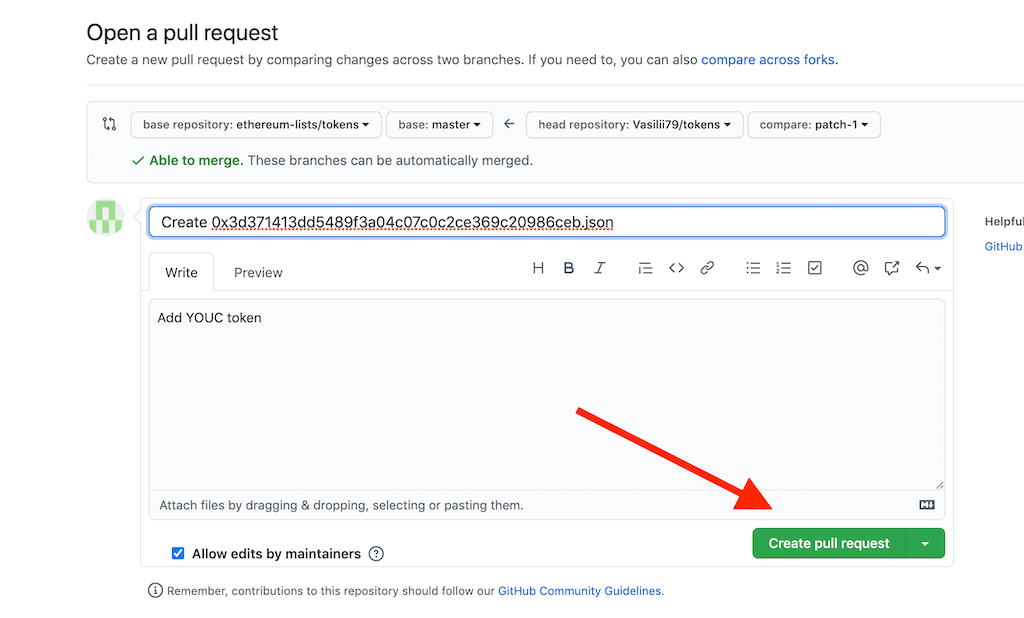
Step 7. Create a pull request
Confirm your submission two times, as shown below. Also, you can add a comment like “Add [your token name] token.” As a result, you create a Pull Request.
 Create Pull Request on Github
 Confirm pull request creation
Step 8. Wait for checking
If you successfully created the file (without any errors) then you see the status of your Pull request as verified (colored green on the picture below).
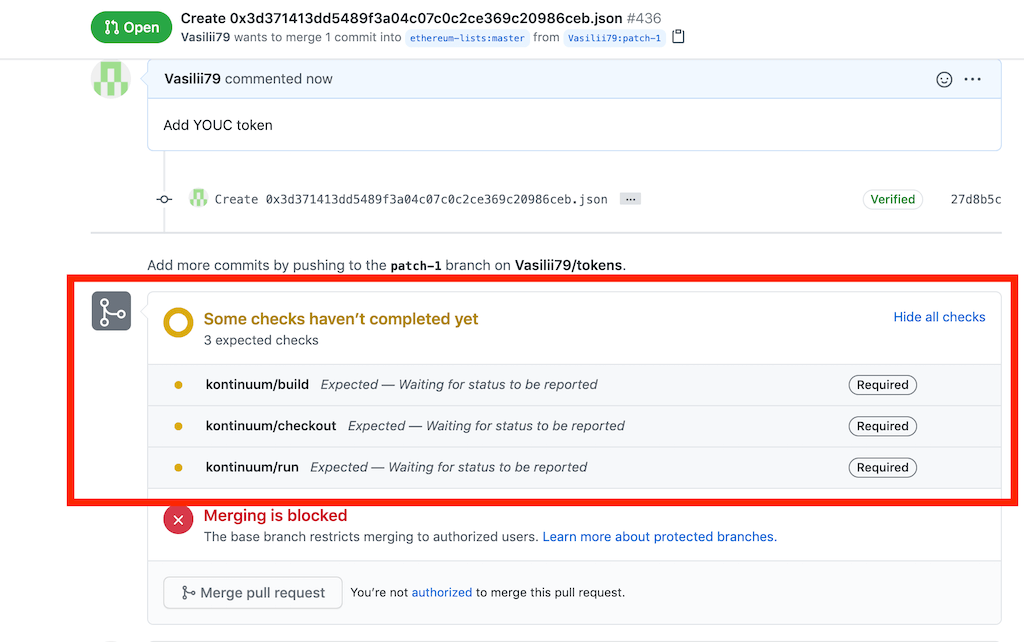 Pull request checking
Note that your request will require additional checking. Trezor’s authorized team will do it. Your need just to wait to pass it.
Also, you can check the status of your request in this folder.
The gray color means that the request is under checking. A green checkmark indicates that Pull Request has successfully passed Trezor checking.
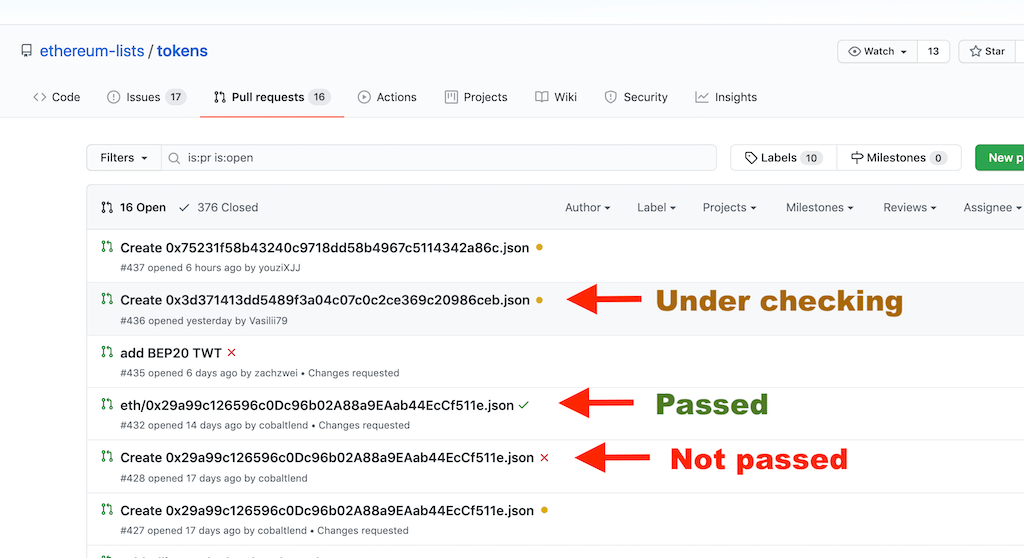 Checking status
Trezor team will review your issue and give feedback. They will confirm if they would like to add your token in the firmware. Otherwise, they will decline. Please note that they can not merge each and every token.
When your Pull Request successfully passes all checking, you see it in this section. It means that Pull Requests merged into the Master. After that, just wait for the next Trezor firmware update to see your token in the List.
 Pull Request successfully merged to master
Step 9. Check your token on Trezor
After you completed all the above steps, start checking (periodically) your token’s symbol in Trezor’s list.
- Go to that page and enter your token’s symbol into the search bar
- if you correctly submitted the application, you will see that your asset is coming soon. It means will be added to the Trezor’s devices soon.
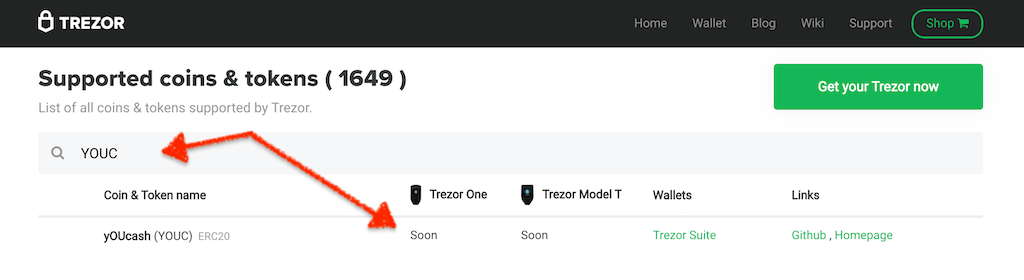 Check your token on the Trezor’s listt
I can’t pass Trezor verification. What to do?
If you can not pass the verification, then review your code, fix errors, and create a file again as described in 1-7 Steps above. If it doesn’t help, contact us via telegram, and we will help.
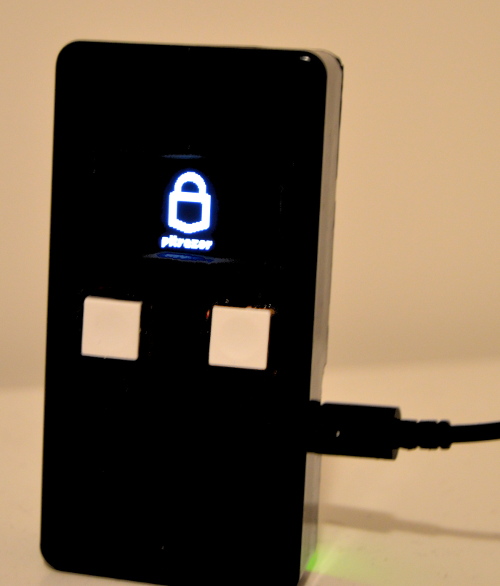
What’s the Trezor?
Trezor is a hardware wallet. Many thousands of people use it to safely store their coins and tokens. Trezor is a small device. A simple connection to your computer with a USB cable allows you to make all operations with your cryptocurrencies.
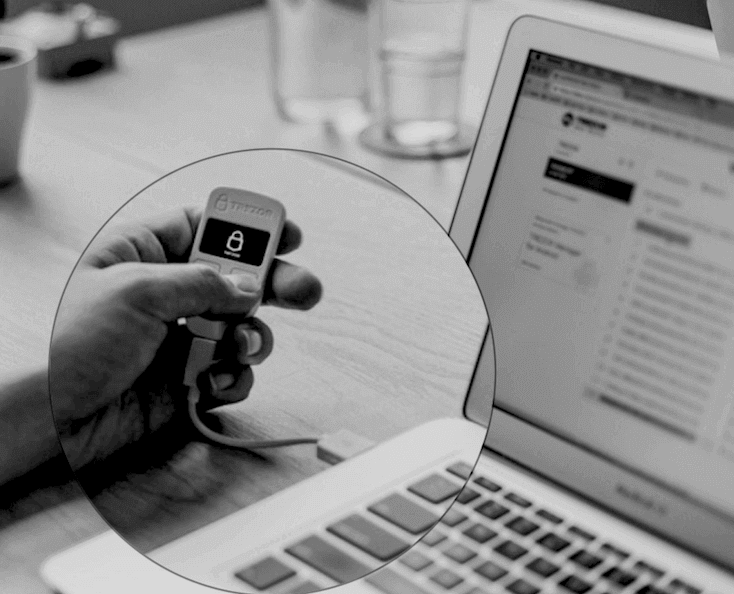 Trezor hardware wallet
Moreover, Trezor allows making secure payments without exposing your private keys to a potentially compromised computer.
Nowadays, many online exchanges and wallet providers can be hacked or just disappear. So, a hardware wallet like a Trezor is the safest way to manage cryptocurrencies.
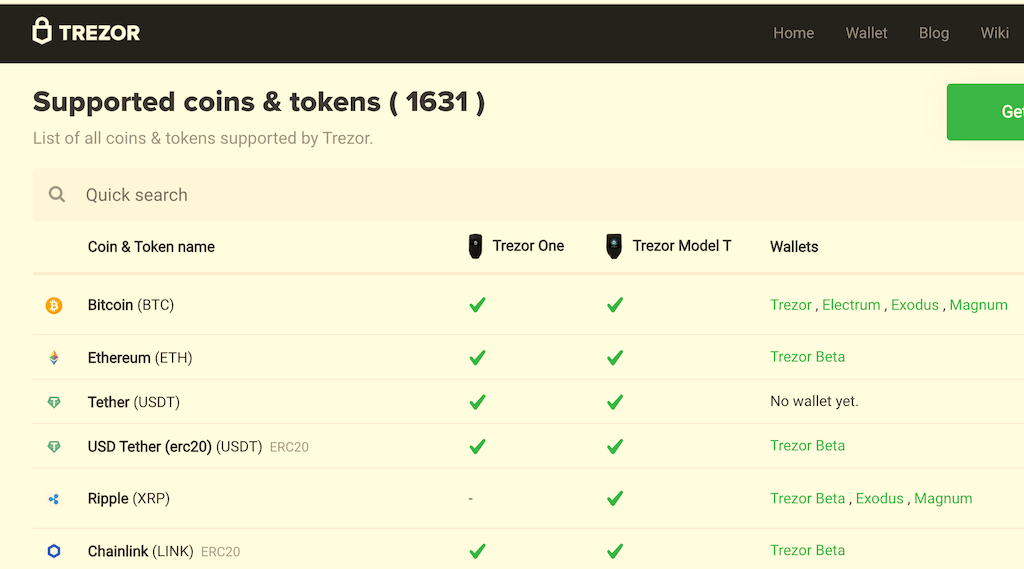
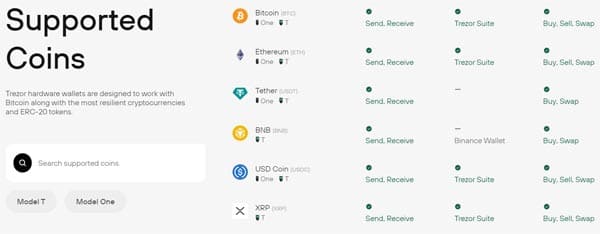
What’s the List of coins & tokens supported by Trezor?
The list of coins and tokens supported by Trezor is a list of cryptocurrencies. There are more than 1631 coins and tokens on the list right now.
So, if a crypto asset is on that list then Trezor’s users can search it by using name and symbol. If your token is not in the list, then Trezor’s users have to use a smart contract address to find your token.
Fortunately, your token doesn’t have to be a Top 30 cryptocurrency to be added to the list. Also, you don’t have to pay to be added.
What are the benefits of being on Trezor’s List?
The first benefit that you get is a promotion. After adding your token to the Trezor list of coins, you can publish great news. That achievement can inspire your project’s community.
The second benefit is the growth of trust among the holders of your token. Especially it might be necessary for new big buyers of your coins.
Finally, all Trezor’s users could easily search for your token inside the wallet by using just your token’s name or symbol. Also, users could see the logo of your token inside the Trezor interface.
So what’re you waiting for? Add your ERC20 token to the List of coins & tokens supported by Trezor for free. It’ll make your token a much more reliable and attractive asset for all existing and potential token-holders.
Список монет которые поддерживает Trezor One
При покупке аппаратного кошелька, желательно посмотреть список монет которые поддерживает Trezor One.
Trezor предлагает поддержку множества монет различных стандартов и блокчейнов, включая ERC20, Bitcoin и другие.
Поддержка ERC20
Аппаратные кошельки Trezor уникальны тем, что они являются единственными аппаратными кошельками, предлагающими встроенную поддержку всех токенов ERC20.
Поскольку он поддерживает все токены ERC20, нет необходимости в интеграции MyEtherWallet или MyCryptoWallet в кошелек Trezor.
Хотя эта особенность может показаться кому — то незначительной, она обеспечивает еще большую безопасность, чем другие аппаратные кошельки, и избавляет от необходимости использовать сторонние интеграции для защиты ваших активов.
Отправка любого количества токенов ERC20 на другой кошелёк требует от отправителя наличия в кошельке достаточного количества Эфира для покрытия комиссии за транзакцию.
Комиссия за транзакцию зависит от сложности транзакции. Эта плата за транзакцию называется Gas (Газ).
Другие монеты, поддерживаемые устройствами Trezor
Помимо токенов ERC20, Trezor предлагает поддержку всех основных криптовалют, включая:
- Bitcoin
- Ethereum Classic
- Ethereum
- Bitcoin Cash
- Litecoin
- Bitcoin Gold
- DigiByte
- Dash
- Dogecoin
- Namecoin
- Vertcoin
- Zcash
- И более 1289 других ERC20 токенов!
Несмотря на то, что поддержка более чем одной криптовалюты дает компаниям право называть свои кошельки «мультивалютными», Trezor демонстрирует истинное значение этого слова.
При поиске поддерживаемых токенов, помните, что в этой таблице есть монеты, которые в реальности не поддерживаются на аппаратном уровне кошельками Трезор.
Монета BNB есть в списке поддерживаемых монет, но это означает, что Вам необходимо установить программных кошелёк Metamask, и подключить его к аппаратному кошельку Трезор. Теперь все операции необходимо подтверждать через Трезор. Управлять монетой можно только в программном кошельке Метамаск.
Для монеты Monero, нужно установить программных кошелёк Exodus и привязать его к Trezor One.
Различия между устройствами Trezor
Независимо от того, какой холодный кошелёк Trezor вы используете, они обеспечивают поддержку более 1000 криптовалют.
Оба устройства Trezor One и Trezor T считаются мультивалютными кошельками. Несмотря на то, что оба устройства Trezor поддерживают огромное количество криптовалют, они отличаются всего лишь несколькими монетами.
Поддерживаемые монеты
Устройство Trezor One не поддерживает монеты:
- Ripple (XRP)
- Cardano
- Monero
- Zencash
С другой стороны, Trezor Model T не поддерживает:
- Qtum
- Dexon
Заключение
Аппаратные кошельки — это самые надежные и безопасные формы хранения данных, при этом простые в использовании. Производитель кошельков Trezor заслужил свое место на вершине индустрии аппаратных кошельков.
Невозможно отрицать, что каждый криптовалютный пользователь должен иметь несколько аппаратных кошельков, чтобы защитить свои инвестиции наилучшим образом.
Устройства, предлагаемые компанией Satoshi Labs, обладают потрясающими функциями по доступным ценам.
Учитывая это, каждый выбор сводится к личным предпочтениям, которые в конечном итоге и решат, какое устройство выбрать.
Мы рекомендуем приобрести несколько аппаратных кошельков от разных производителей. На данный момент оптимальным считается китайский холодный кошелёк SafePal S1. Обзоры этого кошелька читайте тут и здесь.
Полный список монет которые поддерживает Trezor One вы можете найти, перейти по ссылке на официальный сайт.
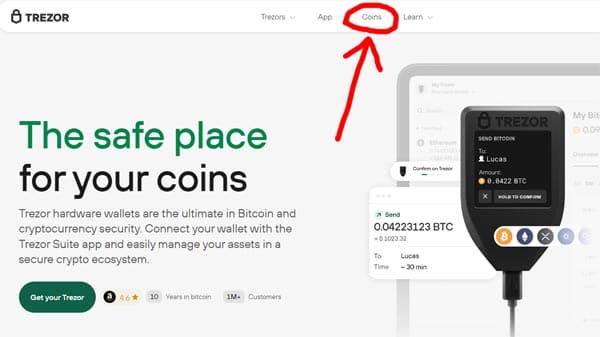
На главной странице в меню «Coin». При нажатии на её, вы попадёте на список монет поддерживаемых кошельками Trezor One и Trezor Model T.
How to use XDC Web Wallet with Trezor and store your XDC and XRC-20 tokens on Trezor hardware wallet.
![]()
Trezor is a hardware wallet providing advanced security for handling Bitcoin, ETH, XDC, and other cryptocurrencies private keys.
Unlike traditional cold storage methods (offline storage or paper wallets), Trezor makes secure payments without exposing your private keys to a potentially compromised computer.
Trezor is a small single-purpose computer. It is designed to protect your private keys from possible online and offline risks. To do this, Trezor keeps the private keys away from the Internet and confirms the transactions in-device. That way, you can always check the screen for the right address, amount, and transaction fee before sending your bitcoins.
In layman’s terms, you can connect Trezor to an infected computer and still be able to have 100% control over the funds in your device.
So let’s start with a step by step guide on How to use Trezor hardware wallet on XinFin Web Wallet
Before we start you need to download a bridge that will connect Trezor and XinFin web wallet link to download the bridge and make sure you download it as per your operating system https://wallet.trezor.io/#/bridge
Step:1 Go to https://wallet.apothem.network and select Access wallet, select Hardware wallet and select Trezor and click on continue.
Step:2 As you have already installed the Trezor bridge it will redirect you to https://connect.trezor.io/8/popup.html# where you just need to allow it for the session
Step:3 After allowing the access you will have to select export
After that, you will have to enter your Trezor mnemonic phrase and make sure you enter the passphrase using your computer keyboard
Step:4 After that you will have to follow the instruction and confirm it on your Trezor wallet
On your Trezor wallet, it will ask for your confirmation you need to confirm it
It will show your phrase and will ask for the confirmation that you want to use this phrase and you need to confirm it
Step:5 After confirming it you will be redirected to the XinFin web wallet and you will find the list of the address make sure you need to select the first Address and click on access my wallet
Step:6 You will find the dashboard and now you can send your XDC or XRC-20 tokens to your public address
Step:7 To send your XDC tokens you need to click on send and enter the amount and the address where you want to send the XDC or XRC-20 tokens
Step:8 After clicking on send you will be redirected to Trezor bridge and you will have to follow the steps and confirm the Transaction on your Trezor wallet
And it will show you the amount you are sending and the gas fees for the transaction you need to confirm it
Step:9 After that you need to click on confirm and send
And after the transaction has been done you can check the transaction on Apothem explorer at https://explorer.apothem.network
The above steps are for the apothem network to store your main-net XDC you just need to click on change
And change the network to XinFin Network where you can send your main-net XDC tokens and store your XDC tokens and follow the same steps to send your main-net XDC tokens
Note: Entire process done using apothem/testnet network. Please select the mainnet while transferring the actual XDC.