Гайд по MetaMask
Эта статья нацелена на новиков, так что я буду пытаться расписывать всё максимально доходчиво. Начнем с того, что такое этот ваш MetaMask.
Metamask — это крипто кошелек, созданный в 2016 году, который встраивается в браузер (в виде расширения). Поддерживает множество сетей (ERC20, BEP20, Polygon и другие). С помощью него вы можете получать/переводить токены, взаимодействовать с DApps и множество другого.
1. Установка MetaMask на компьютер
Как я уже писал выше, это расширение, то есть устанавливать мы его будем в браузер. На данный момент установка возможно в браузеры на базе Chromium и Mozilla Firefox.
MetaMask также поддерживает IOS/Android, но в туториале будет рассматриваться установка только на компьютер.
Переходи на сайт MetaMask , жмем на синюю кнопку по центру.
Далее показаны браузеры, которые поддерживаются, нас же интересует Chrome, так что выбираем "Install MetaMask for Chrome".
После нажатия у нас открывается страница интернет-магазина Chrome, там нажимаете "Установить".
Дальше подтверждаете установку и ждете пока расширение установится (в основном меньше минуты).
После установки у вас автоматически откроется вкладка с кошельком. Найти расширение вы можете в верхнем правом углу нажав на пазл, для удобства советую закрепить расширение (стрелочкой на скриншоте указано куда нажимать).
Затем нажимаете кнопку по центру экрана — "Начало работы". После этого должно появится такое окно.
На этом этапе установка расширения завершена, теперь вам нужно выбрать — импортировать кошелек или создать новый, об этом в следующем разделе.
2. Создание кошелька
Для создания кошелька выбираете " Создать кошелек".
Далее выбираете на свое усмотрение — я всегда нажимаю "Нет, спасибо".
Теперь вам нужно создать пароль для кошелька, советую генерировать сложный — длиной не меньше 10 символов и содержащий спецсимволы (*!%#), например — 0bXP#pIH!ke6LJ. Не забудьте сохранить свой пароль в надежном месте.
Вводите пароль, ставите галочку что вы всё прочитали и нажимаете "Создать".
Дальше нам предлагают просмотреть видео о безопасности, пропускаем, ну или смотрите кто хочет, не принципиально.
Теперь главный этап — создание MEMO (seed-фразы). Очень внимательно прочитайте следующие:
-
надежно сохраните эту фразу, так как если вам нужно будет восстановить свой кошелек, без нее это невозможно сделать, вообще никак, даже если на вашем кошельке лежат миллионы тот, кто будет знать эту фразу сможет получить полный доступ к вашему кошельку без каких-либо паролей или дополнительных подтверждений. Никогда никому не сообщайте и не передавайте эту фразу — ни поддержка MetaMask, ни любая другая поддержка, никто не попросит у вас MEMO (seed-фразу).
Чтобы просмотреть ваше MEMO, нажмите на серое поле. Как я написал выше — надежно сохраните эти слова (после нажатия слова можно скопировать).
Затем кнопка "Далее" станет доступна, после того как сохранили seed-фразу, можете нажимать ее. Теперь вас просят воспроизвести фразу, которую вы только что сохранили. CTRL + V тут не работает, так что нужно поочередно выбрать слова.
После того как вы выбрали все слова, кнопка "Подтвердить" станет доступной и если вы сделали всё правильно, сможете перейти на следующий шаг.
В конце вы должны увидеть сообщение об успешном создании кошелька, нажимаете "Все выполнено"
После этого вы окажетесь непосредственно на странице своего кошелька. Можете сразу закрыть окно с новостями.
На этом создание кошелька готово, поздравляю!
3. Знакомство и базовые настройки кошелька
Начнем с знакомства с базовыми элементами. Сильно глубоко я вникать не буду, так как дальше в статьи будут отдельно рассматривать вещи, которые затронут эти элементы.
1 — сеть кошелька
2 — название и адрес кошелька (адрес можно скопировать нажав на него)
3 — баланс токенов, которые вы добавили в кошелек
Теперь напишу об основных настройках, которые могут вам пригодится. Напоминаю что статья для новичков, так что я затрону только самые базовые.
-
название кошелька — тут особо нечего расписывать, название, которое будет отображаться во время использования вашего кошелька. Чтобы изменить проследуйте инструкции ниже:
Готово, теперь название изменено, в моем случае на "AK".
-
время автоблокировки кошелька (через сколько минут неактивности кошелек автоматически заблокируется, то есть вам придется вводить пароль заново). По умолчанию — это 15 минут, если это ваш рабочий ПК, советую изменить время, чтобы постоянно не вводить пароль, для этого проделываете следующие действия:
После перехода в раздел "Дополнительно", прокручиваете в низ до параметра "Таймер автоблокировки (минуты)". Указываете время в минутах.
Допустим 2 часа = 120 минут. Тут уже как вы посчитаете нужным.
-
язык кошелька — часто работать с кошельком удобней на английском. Это связано с неполноценным переводом и версткой — например могут криво переносится слова, не влезать слова в кнопки или сложно понять что это за настройка на русском, так как большинство терминов на английском. Так вот, чтобы изменить язык, заходите в настройки кошелька, там выбираете категорию "Общее" и в выпадающем списке "English".
Готово, теперь весь интерфейс кошелька на английском.
Для того чтобы меня понимали те, у кого не очень с английским, я верну язык интерфейса назад на русский.
На этом знакомство с кошельком и его базовыми настройками закончено.
4. Импорт MetaMask
Иногда вам понадобится импортировать кошелек, чтобы например работать параллельно на ноутбуке и ПК или же просто восстановить нужный вам кошелек.
Для импорта на этапе где мы на странице с вопросом "Впервые в MetaMask", нажимаем на кнопку "Импортировать кошелек".
Затем вас вновь спросят про сбор статистики, выбирайте на ваше усмотрение, я вновь нажму нет.
Далее нужно ввести MEMO фразу, которая у вас должна быть сохранена. Если у вас она длиннее, чем в 12 слов, можете изменить длину в выпадающем списку, но в основном это 12 слов.
Не обязательно вручную писать каждое слово, просто наведитесь например на первое слово и вставить вашу seed-фразу с помощью CTRL + V.
Затем прокрутите страницу вниз и задайте пароль, напоминаю еще раз — пароль хранится у вас на ПК, то есть можете вводить тот что у вас был, можете новый, на ваше усмотрение. После ввода пароля не забудь нажать на галочку, затем "Импорт"
Если вы сделали всё правильно, у вас появится уже знакомое вам сообщение, дальше всё так же как и при создании кошелька.
5. Добавление сети в MetaMask
После создания кошелька у вас есть только сеть эфира (Ethereum Mainnet), так как кошелёк создан для эфира, но вы конечно же можете добавить другую сеть.
Можно это делать вручную, но пока не думаю что это вам нужно. Проще добавить новую сеть используя сайт, как это сделать я покажу на примере с BSC (Binance Smart Chain).
Для добавления идем на Chainlist . Стрелкой я указал поле, куда вы можете вводить название сети и искать нужную вам, основные сети находятся вверху.
Так как BSC довольно популярная сеть, нам не нужно ее искать, она уже находится вверху.
Нажимаем на кнопку "Connect Wallet" на нужной вам сети.
Далее подтверждаете действия в вашем кошельке. Сейчас я предоставлю пример, но на будущее — это стандартная процедура работы с кошельком (подключение к сайтам, подтверждения, подписи).
Теперь у вас есть кнопка "Add To Metamask", нажимаете на нее.
Подтверждаете всё в кошельке.
Если вы сделали всё правильно — поздравляю, у вас теперь есть сеть BSC. Чтобы переключаться между сетями, нажимаете на название текущей (обвел прямоугольником на скрине) сети и выбираете нужную вам.
6. Добавление токена в MetaMask
Токены можно добавлять в разных сетях, я же продолжу на примере BSC. Есть два способа добавления: через сайт или вручную. Начнем с первого способа.
Также важно чтобы вы понимали — даже если у вас есть какой-либо токен на кошельке, до добавления токена вы не увидите баланс этого токена.
Для того чтобы добавить токен в ваш кошелек в сети BSC, заходите на сайт BscScan и начинаете вводить название нужного вам токена, допустим BUSD (стейблкоин в сети BSC), далее нажимаете на него.
Вы находитесь на странице токена, чтобы добавить его, идете в правую часть экране и нажимаете на троеточие, затем на "Add Token to Web3 Wallet"
После нажатия у вас автоматически откроется окно MetaMask, там подтверждаете добавление.
Всё, теперь токен находится в вашем кошельке.
Ну а другой способ — это добавить токен через контракт. Контракт можно искать на том же BscScan , но далеко не обязательно. Этот способ также для тех у кого уже есть контракт и им просто нужно добавить токен по этому контракту.
Я покажу на примере CAKE, контракт токена — 0x0E09FaBB73Bd3Ade0a17ECC321fD13a19e81cE82
Заходите в MetaMask и нажимаете "Импорт токенов"
Затем просто вставляете адрес токена, если всё хорошо — символ токена подтянется автоматически, затем нажимаете на кнопку "Добавить пользовательский токен".
Затем "Импорт токенов".
Готово, теперь токен также виден в вашем кошельке.
7. Транзакции (отправка/получение токенов)
Отправка токена
Начнем с отправки токена. В первую очередь стоит понимать что для отправки токена вам нужно будет оплатить комиссии.
Комиссию вы будете оплачивать токеном сети — это тот токен, который есть у вас по умолчанию при добавлении сети. Например для оплаты комиссий в сетях ETH и BSC вам понадобится ETH и BNB соответственно.
Продолжу показывать пример на BSC. По сути чтобы отправить токен вам понадобится: сам токен, адрес получателя, деньги на оплату комиссии. Я покажу последовательность действий скриншотами.
После отправки вам нужно будет подождать подтверждения. Следить за статусом вашей транзакции можно во вкладке "Активность".
Получение токена
Чтобы получить токен просто скопируйте свой адрес кошелька. Адрес в сети BSC и ETH будет одинаковым, это нормально.
8. Экспорт MEMO (seed-фразы)
Если вы потеряли MEMO, но у вас всё еще есть доступ к кошельку и вы знаете пароль, можно получить seed-фразу. Для этого проделываете следующие действия:
FAQ (Часто задаваемые вопросы)
Тут я подытожу часто задаваемые вопросы новичков, ответы на них есть в статье, но я дополнительно вынес их сюда.
Вопрос: Если я импортирую кошелек, какой пароль мне указывать ?
Ответ: Какой пожелаете, так как пароль хранится только на вашем ПК, главное знать MEMO фразу.
Вопрос: Я потерял MEMO (seed-фразу), что делать ?
Ответ: Если у вас все еще есть доступ к кошельку и вы знаете пароль, можете экспортировать ее (вновь увидеть фразу для вашего кошелька), как это сделать писал тут . Но если же вы потеряли доступ к кошельку и MEMO фразу — никак. Ни поддержка, никто вам не сможет ни за какие деньги восстановить кошелек, даже если там на балансе миллионы.
Вопрос: Можно ли делится MEMO фразой ?
Ответ: Нет. Любой, кто будет знать ваше MEMO, сможет получить полный доступ к средствам на кошельке, без каких-либо подтверждений. НИКОГДА, НИКОМУ не сообщайте эту фразу.
Как найти адрес депозита и tag/memo?
Для внесения криптовалюты на OKX со сторонних бирж и некастодиальных кошельков вам потребуется адрес депозита, а также tag/memo для внесения соответствующих криптовалют. В этой статье мы расскажем, как найти адрес и tag/memo для внесения депозита.
В приложении
- Откройте приложение OKX, перейдите в раздел Активы и нажмите Пополнить.
- Выберите криптовалюту, которую хотите внести и сеть депозита
- Вы увидите Адрес депозита и, при необходимости, tag/memo.
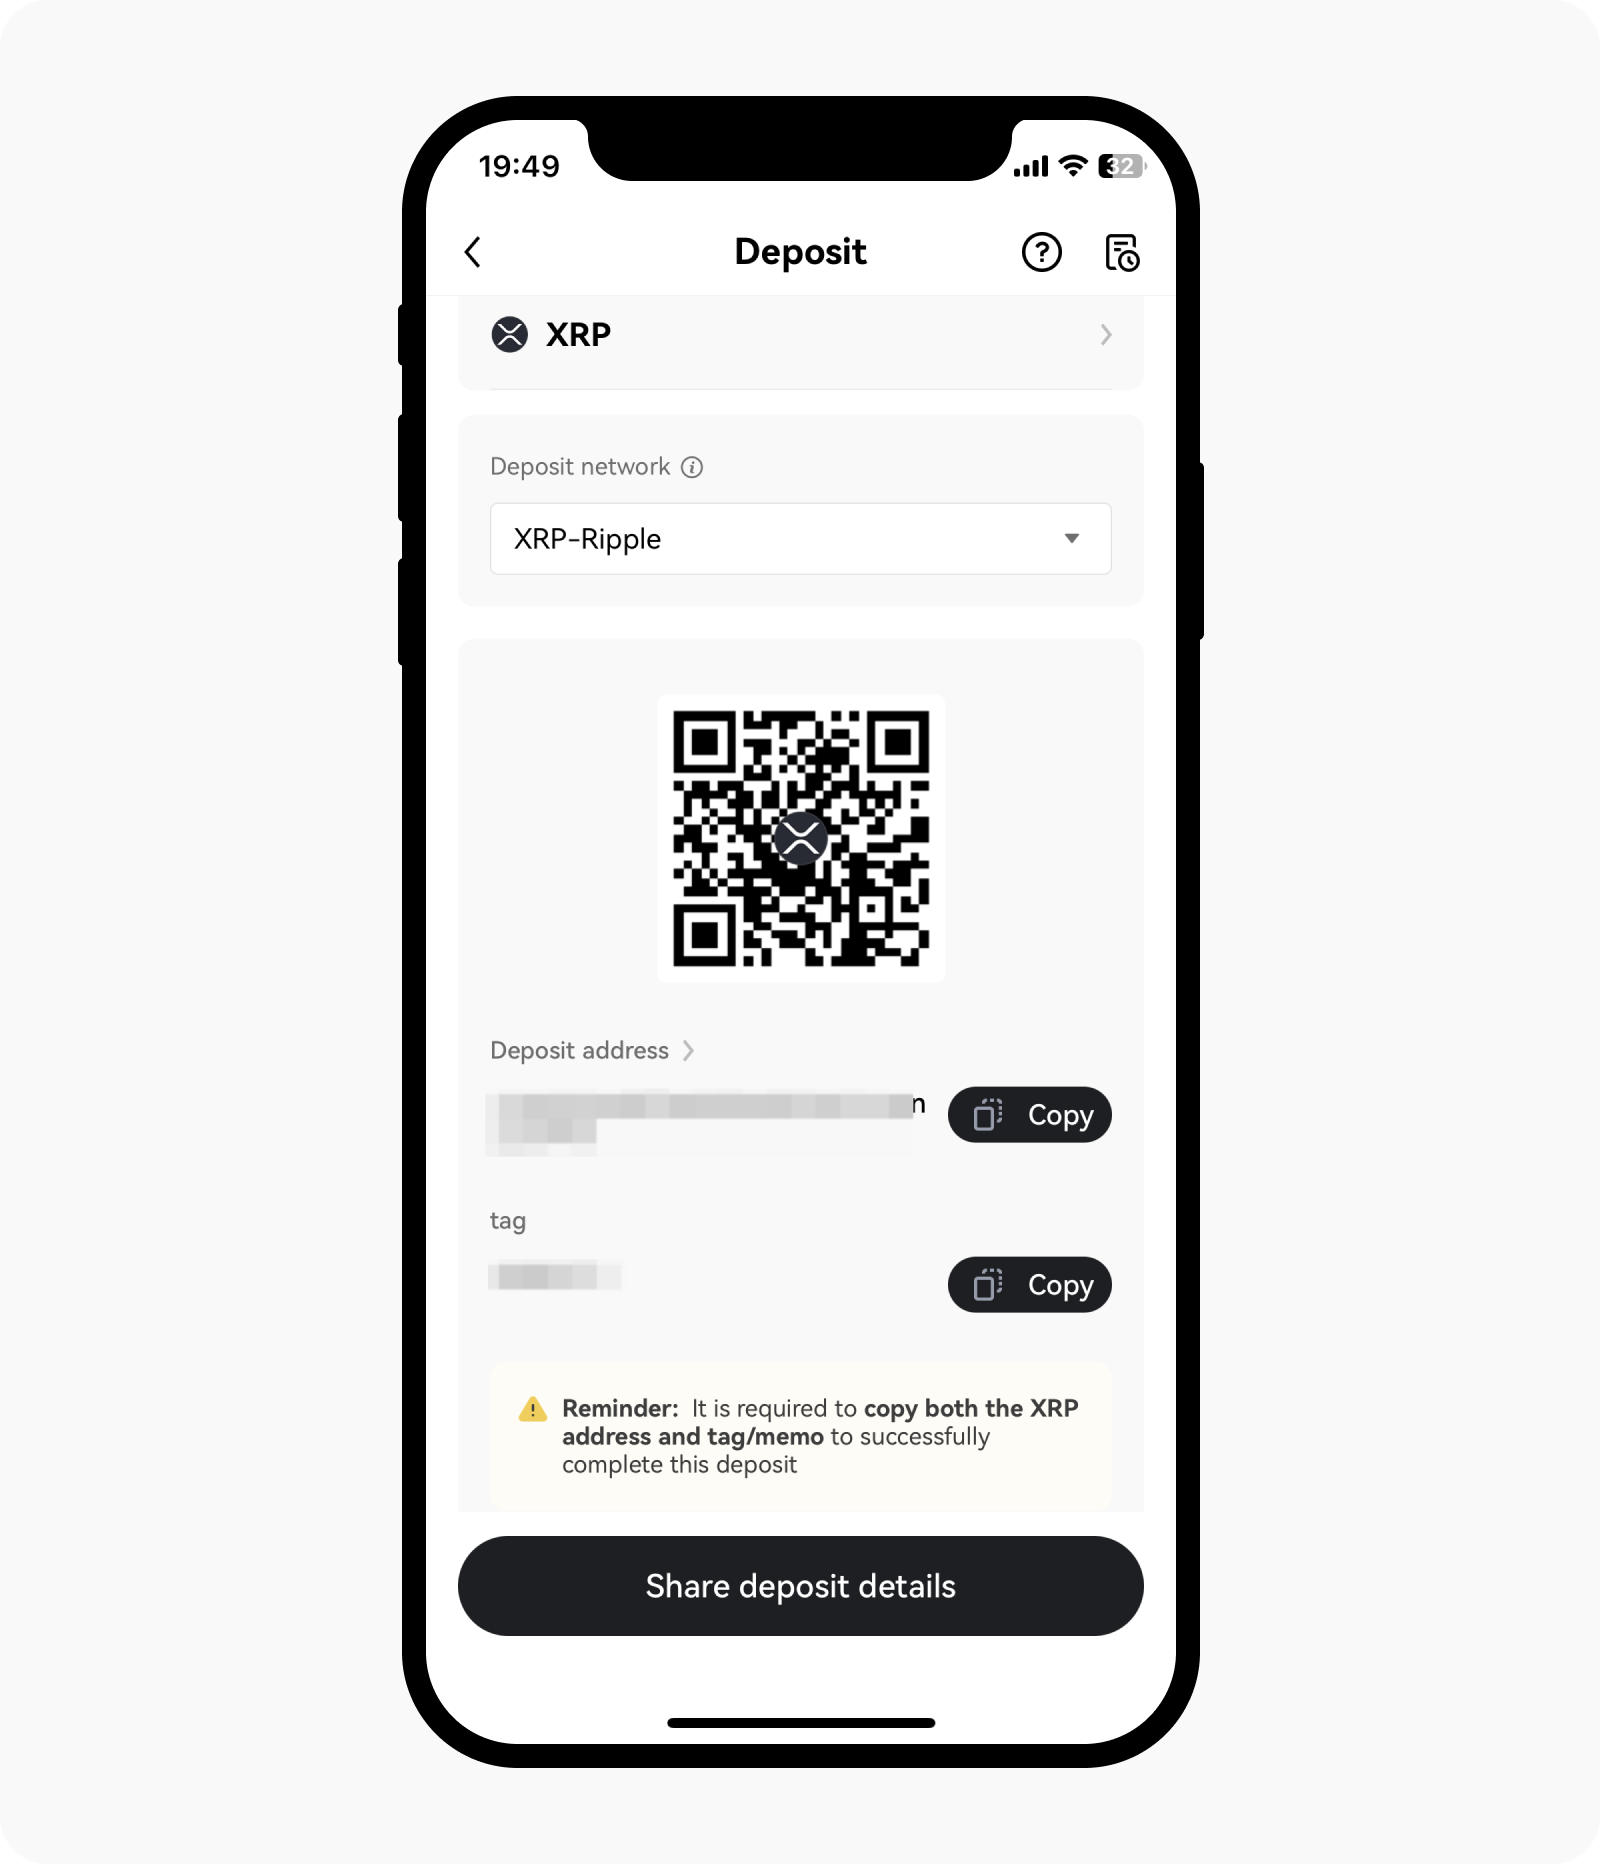
Через сайт
- Войдите в аккаунт OKX, откройте в раздел Активы и нажмите Пополнить.
- Выберите криптовалюту, которую хотите внести и сеть депозита.
- Вы увидите Адрес депозита и, при необходимости, tag/memo.
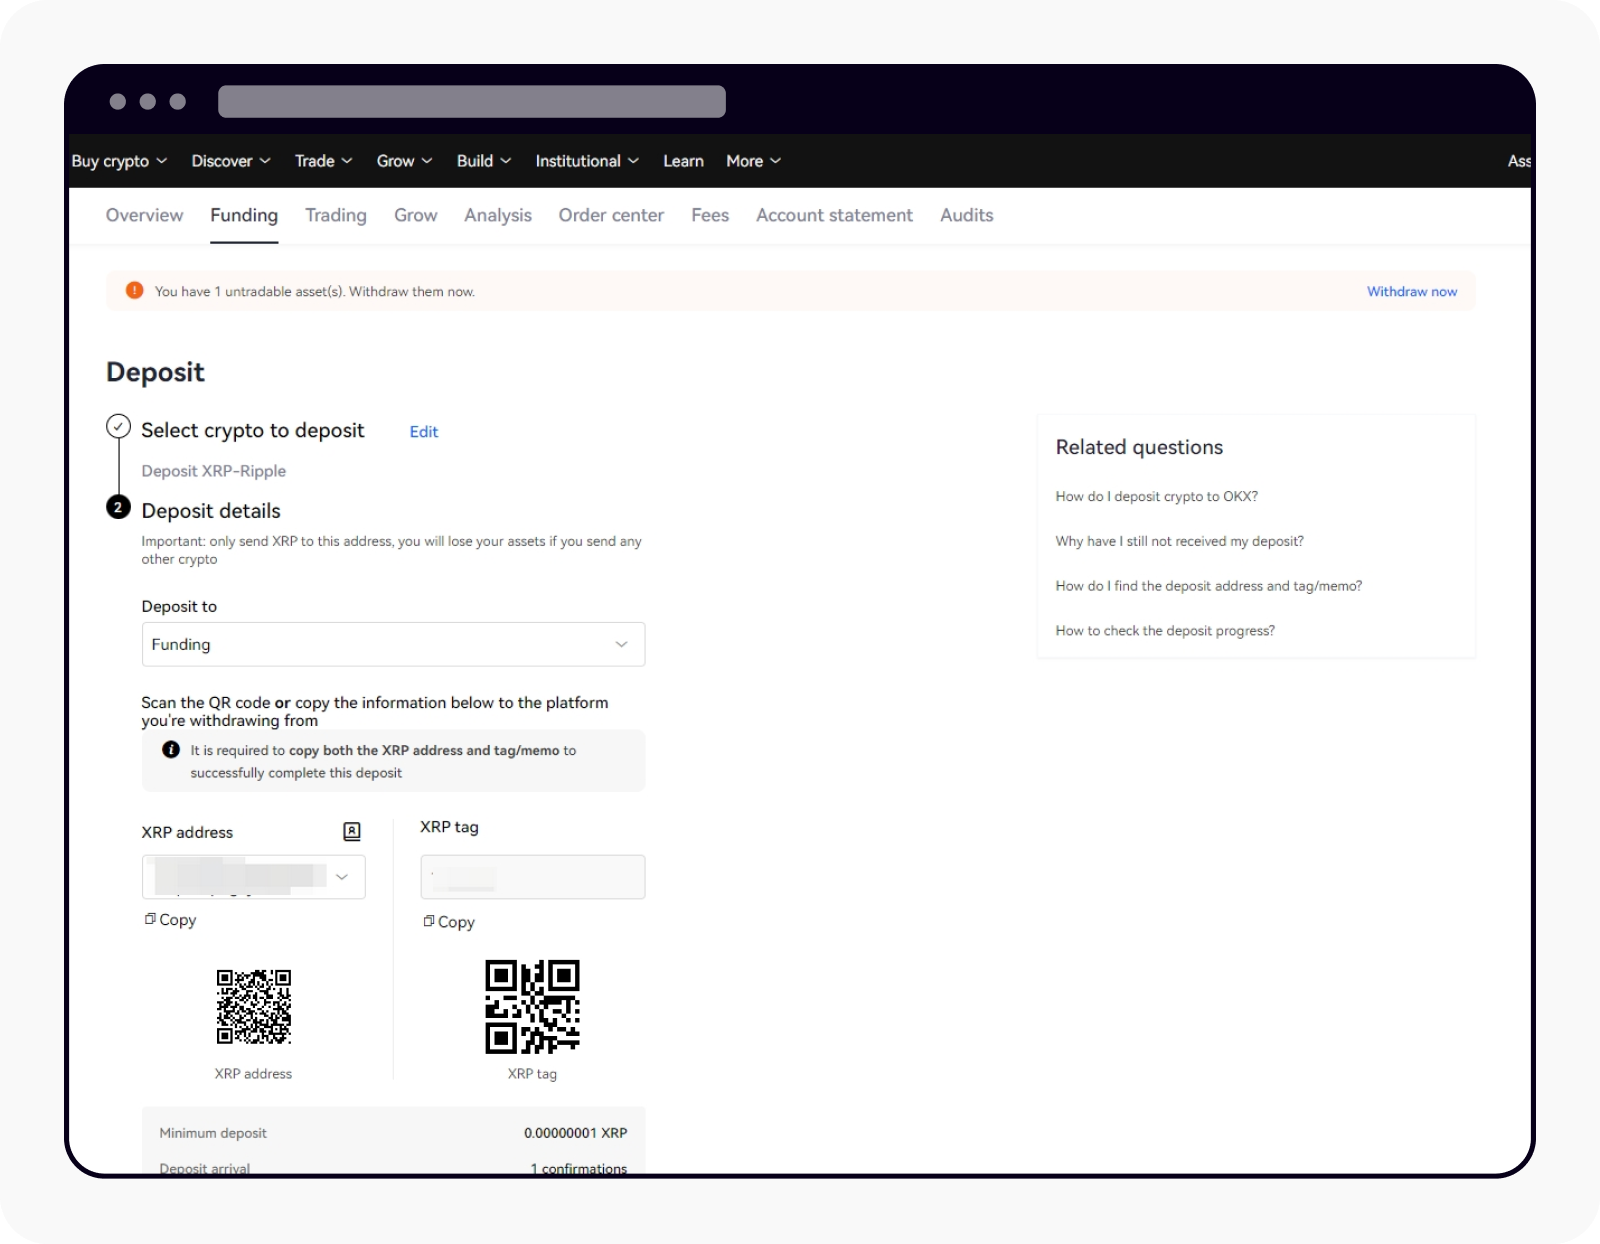
Примечание:
— Скопируйте адрес депозита и tag/memo, вставьте их на странице вывода средств используемой платформы и следуйте дальнейшим инструкциям.
— Убедитесь, что сеть вывода средств на выбранной платформе совпадает с адресом депозита на OKX.
— Tag/memo требуется не для каждой криптовалюты и сети. Если тег необходим, то убедитесь, что вы указали его, чтобы избежать возможных потерь. Если tag/memo не требуется, достаточно указать только адрес депозита.
4 Steps To Add MEMO And Wrapped MEMO To Your Metamask Wallet
After you’ve staked Time on the Wonderland app, your TIME will be converted to MEMO tokens in a 1:1 ratio.
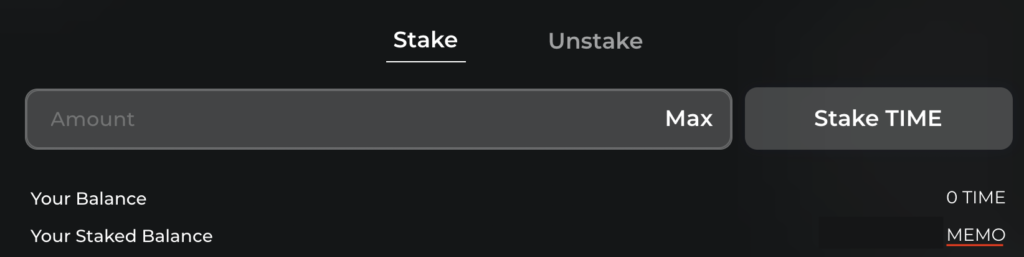
If you’re using a Metamask wallet to connect to the Wonderland app, you may want to view your MEMO balance in the wallet as well.
Similar to TIME, you will need to import MEMO as a custom token to your Metamask wallet.
Here’s what you need to know.
How to add MEMO to Metamask
- Go to Metamask and ensure that you are using the Avalanche Network
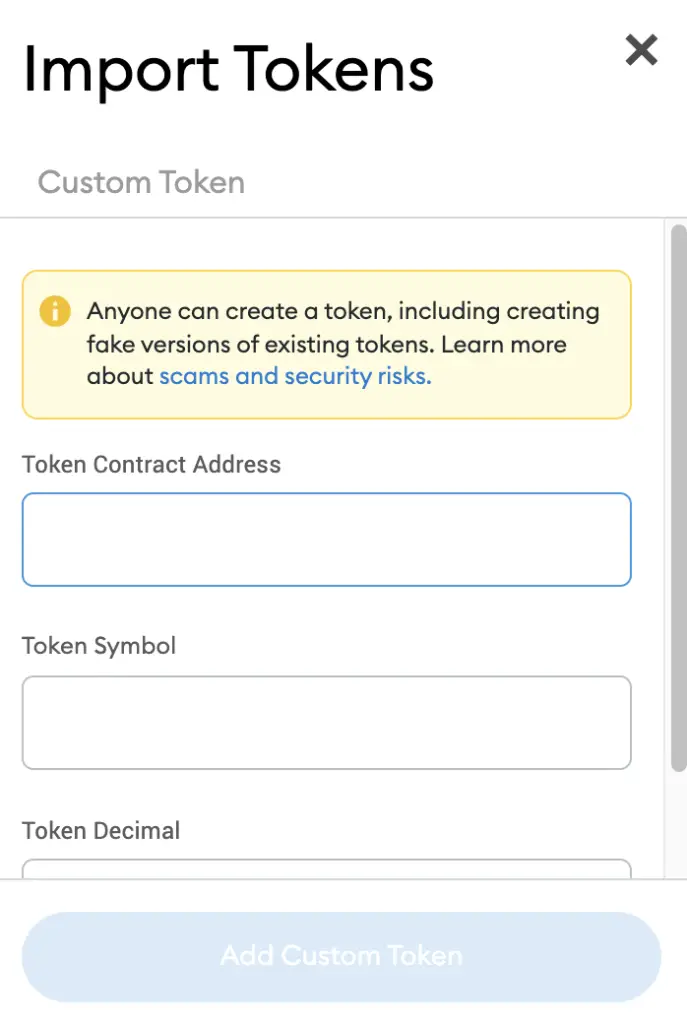
- Select ‘Import Tokens’, and then ‘Import Custom Token’
- Copy the MEMO contract address from the Wonderland documentation
- Double check that MEMO is detected and select ‘Add Custom Token’
Go to Metamask and ensure that you are using the Avalanche Network
The first thing you’ll need to do is to ensure that you are using the Avalanche Network on Metamask.
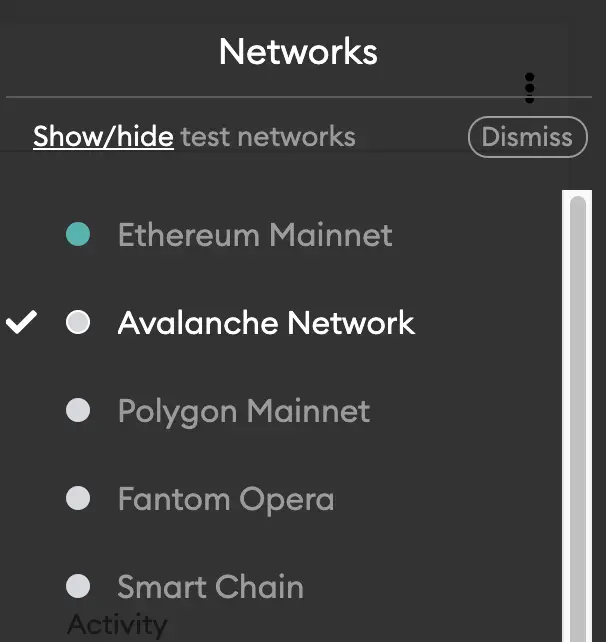
If you have not set up the Avalanche Network on your Metamask wallet, you can check out this step-by-step guide here.
Select ‘Import Tokens’, and then ‘Import Custom Token’
Once you’re on the Avalanche Network, the next step will be to select ‘Import Tokens‘.
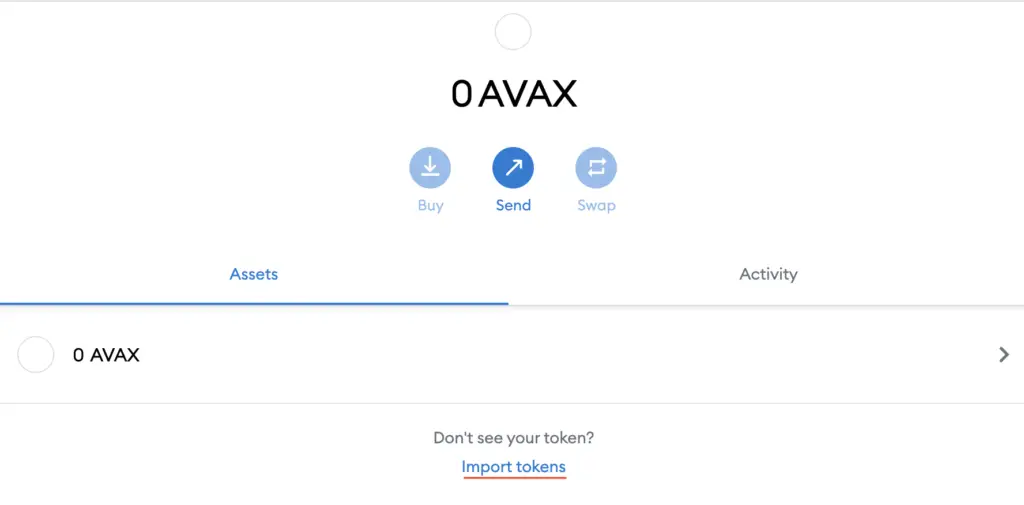
On the Avalanche network, you are only able to import custom tokens.
Copy the MEMO contract address from the Wonderland documentation
For the next part, you can go to the Wonderland app documentation. On this page, you will see the contract address for MEMO:
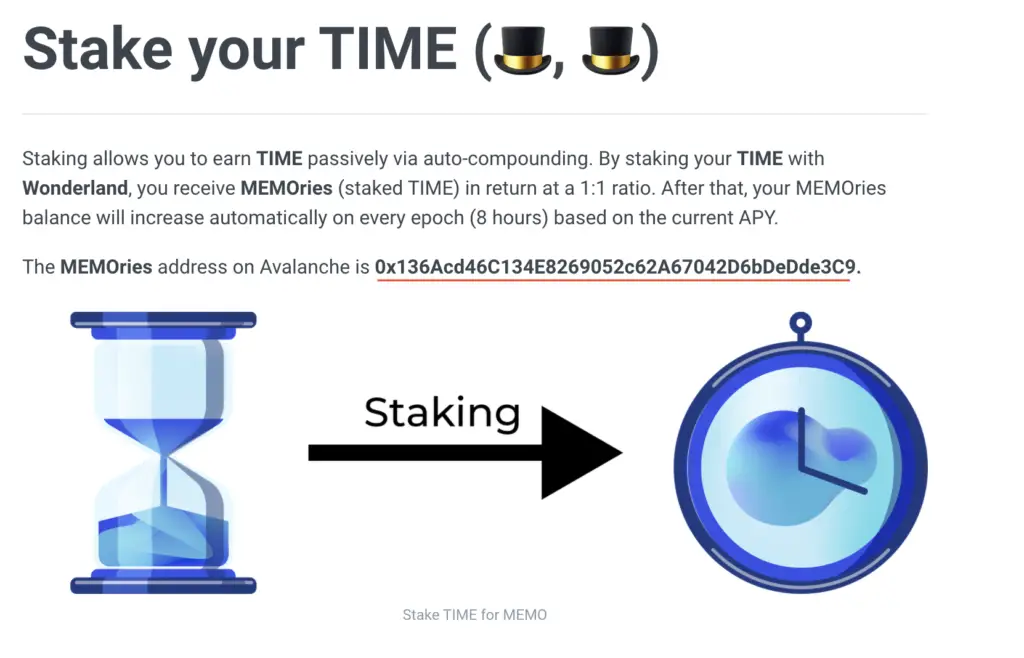
You will need to copy the contract address to your Metamask wallet.
Double check that MEMO is detected and select ‘Add Custom Token’
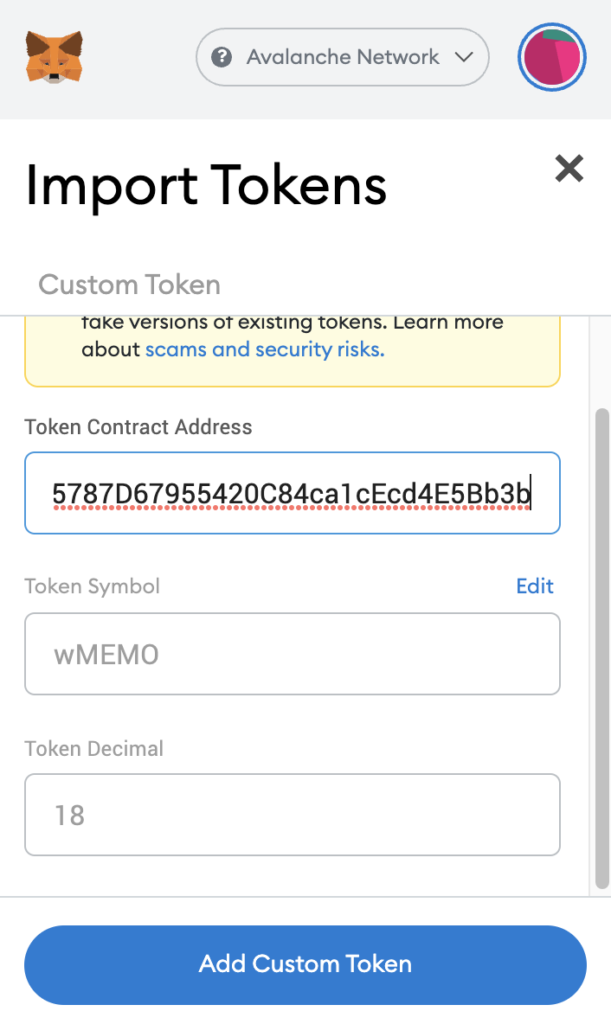
Once you’ve copied the Contract Address, you can paste it in the ‘Token Contract Address‘ field in Metamask.
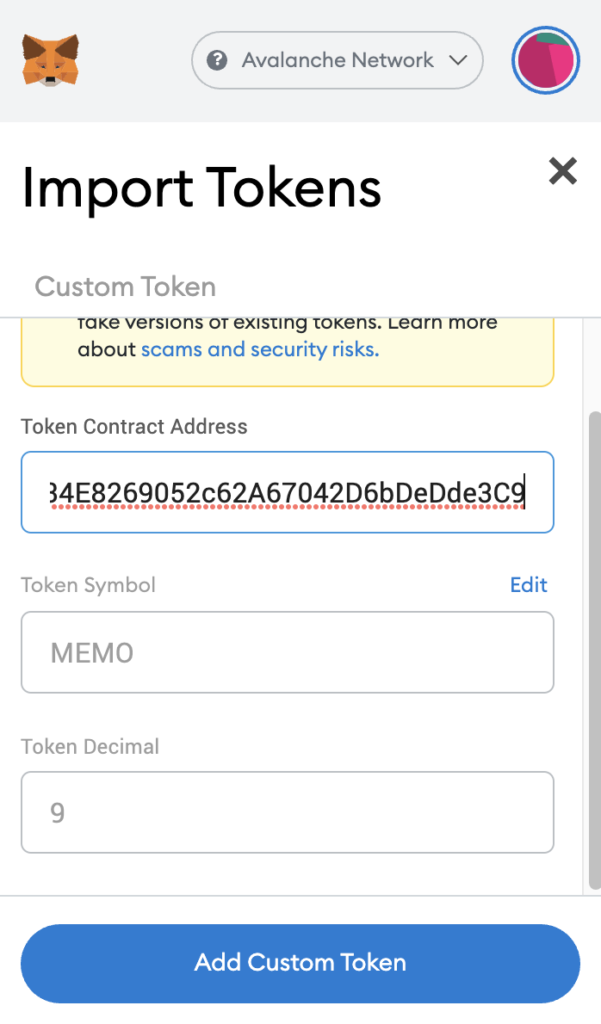
If you pasted the correct contract address, MEMO should automatically appear as the Token Symbol.
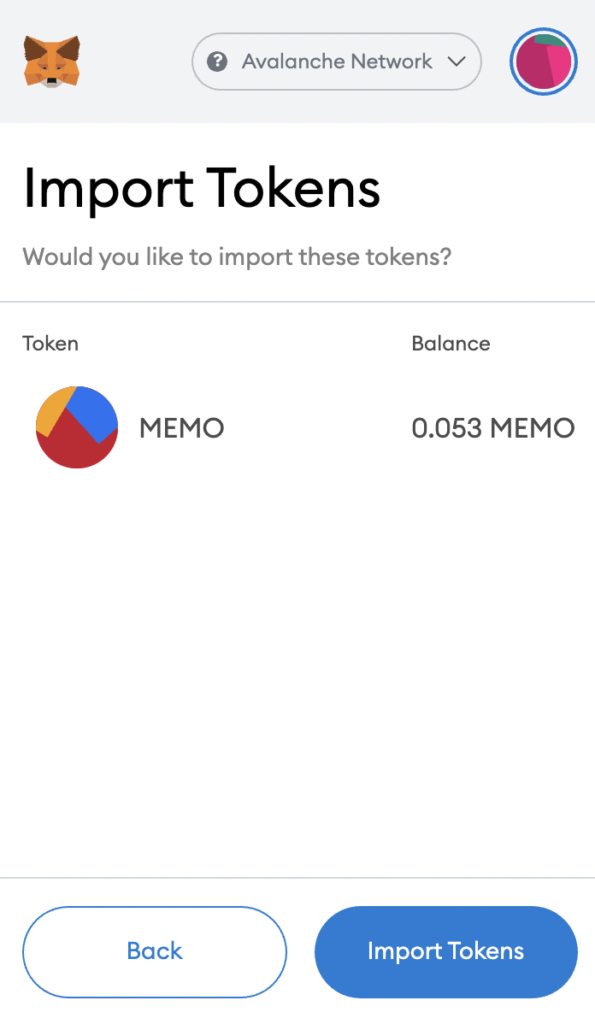
After selecting ‘Add Custom Token‘, you will need to confirm importing MEMO one more time.
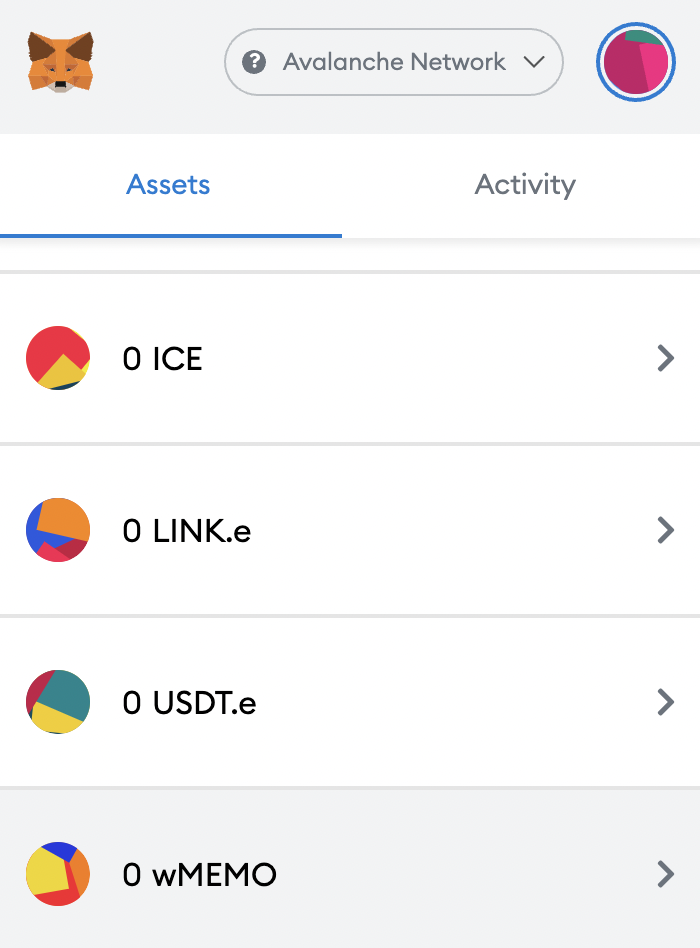
Once you’ve successfully imported MEMO to your Metamask wallet, you should see it as one of your assets under the Avalanche Network.
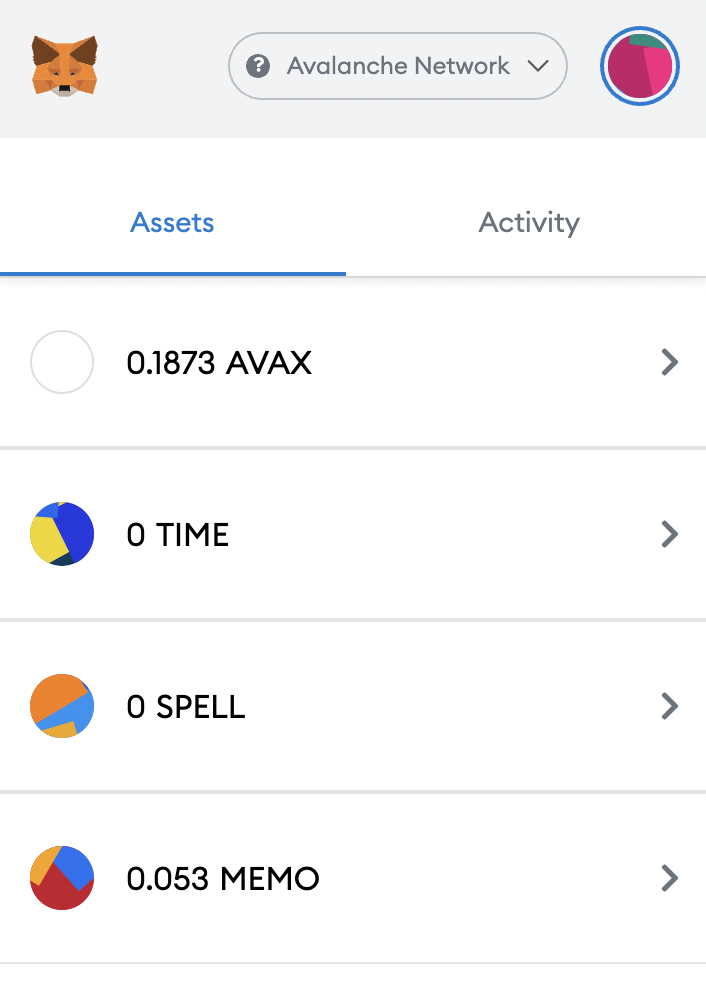
This will allow you to view any MEMO that you’ve deposited via the Avalanche network!
How to add wrapped MEMO to Metamask
To add wrapped MEMO (wMEMO) to your Metamask wallet, you will need to copy the appropriate contract address that is specific to each network (Avalanche, Fantom, Ethereum or Arbitrum) and import wrapped MEMO as a custom token.
Wrapped MEMO can be added into 4 different networks, and here are the contract addresses:
If you want to add these versions of wMEMO to your Metamask wallet, you will need to select the appropriate network first.
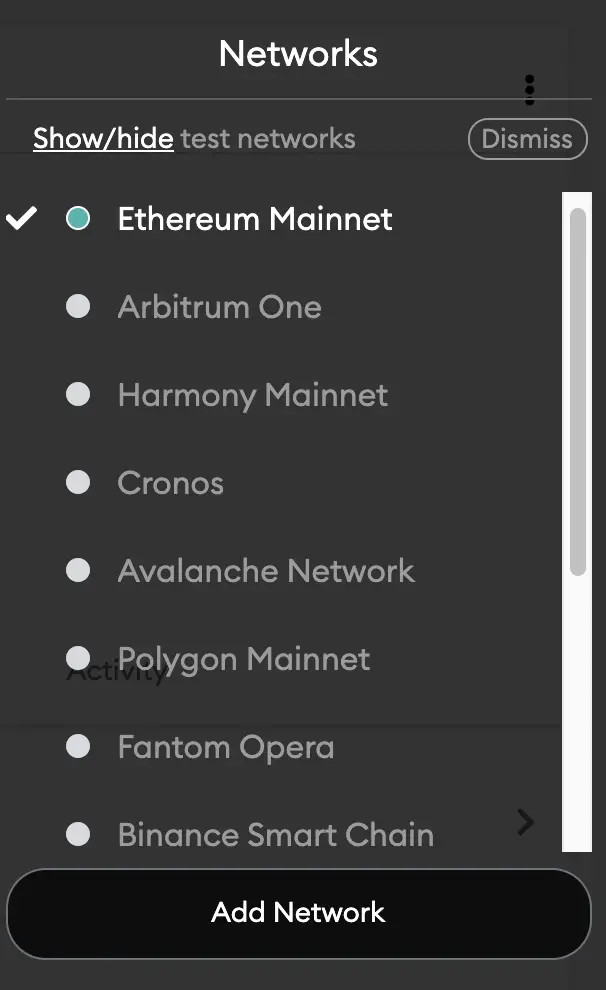
You can view these guides to add the Fantom or Arbitrum networks to your Metamask wallet to find out more.
I will be adding the AVAX version of wMEMO to my Metamask wallet, where I will copy the contract address on SnowTrace.
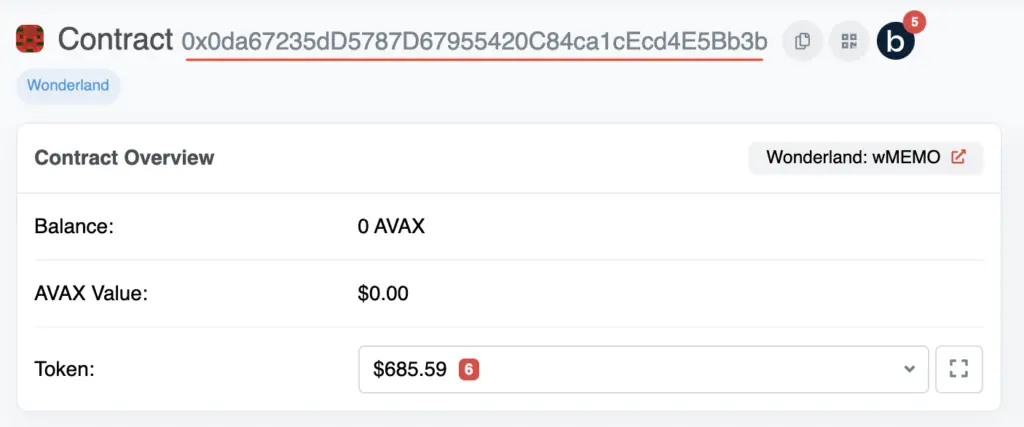
After that, I will copy the contract address to my Metamask wallet when it is connected to the Avalanche network.
This will then allow you to have wMEMO added to your Metamask wallet under the Avalanche network.
You can repeat these steps when you want to add wMEMO to the Fantom, Ethereum or Arbitrum networks.
Unlocking the Power of Memo Token: A Step-by-Step Guide to Finding and Adding the Address to Your Metamask [with Stats and Tips]

What is Memo Token Address in Metamask?
Memo token address metamask is a unique wallet address where you can send, receive and store your memo tokens using the Metamask browser extension. It serves as a digital identifier that allows you to access and manage your memo tokens on the ethereum blockchain.
To find your memo token address in Metamask, simply click on ‘Account Details’ > ‘Export Private Key’. From there, copy your private key or seed phrase and enter it into any other supported cryptocurrency wallet. Keep in mind that sharing this information puts all of your assets at risk – never disclose it publicly or with anyone who isn’t authorized to use it.
Step-by-Step Guide: Using Memo Token Address with Metamask
Are you tired of entering in long and complicated wallet addresses every time you want to transfer cryptocurrencies? Fear not! Memo Token Address with Metamask is here to make your life so much easier.
What is Memo Token Address?
Before we dive into the step-by-step guide, let’s talk about what Memo Token Address actually does. Essentially, it allows users to create shortened versions of their wallet addresses that are linked to a memo or message. This makes it easier for users to send and receive cryptocurrencies without having to remember or type out lengthy addresses each time.
Step 1: Install Metamask
If you haven’t already, install the Metamask extension on your browser. It’s available for Chrome, Firefox, Brave and Microsoft Edge browsers.
Step 2: Creating a new address
Once installed, go ahead an open up Metamask by clicking on the fox icon located just beside your URL bar. If this is your first time using the platform, follow instructions on creating an account and setting up a password before proceeding onto creating a ETH address.
Step 3: Understanding Your Ethereum Wallet
There are three important pieces of information associated with every Ethereum-based crypto token transmission:
– The Recipient’s Public Key
– Sender’s Private Key (Kept secure by MetaMask)
– Transaction Message
The public key is like one giant combination code that begins “0x”. So instead of remembering this combination code which will be almost impossible for anyone who doesn’t have photographic memory; we can simply include extra useful info like receiving party name along with transaction detail allowing us room to add as much additional details as possible
Step 4: Making Transactions Using Memo Addresses
To start using the memo feature while making transactions through MetaMask:
i) Click on Send button in metamask Pop-Up UI;
ii) Enter amount which will update other fields greyed out previously; including recipient address input field;
iii) Click on Memo
iv) Here one can add memo message (Binance deposit transaction id, sender’s name and any other useful/important information for record keeping sake)
v) Hit Send
Success! In just a few simple steps you’ve created a more user-friendly way to send and receive cryptocurrencies. Now you don’t have to worry about remembering long wallet addresses again.
Note: Though Binance exchange was mentioned as example but this feature would work with almost all ETH based crypto transactions where recipient doesn’t have hard coded public address such as NFT transfers on opensea.io
In conclusion, Metamask’s Memo Token Address is a great tool for users looking for an easier way to send or receive cryptocurrencies. By creating shortened wallet addresses linked to memos or messages, users can streamline their cryptocurrency transactions while also ensuring that important details are included in the transfer process.
Frequently Asked Questions About Memo Token Address Metamask
Memo Token Address Metamask is a relatively new concept that has emerged in the world of cryptocurrencies. It refers to a unique identifier assigned to each account or wallet holding Memo tokens. As with any new technology, it is natural for users to have some questions and concerns when using this feature on Metamask. In this blog post, we aim to answer your frequently asked questions about Memo Token Address Metamask.
A Memo token address identifies your wallet and enables you to send or receive transactions involving Memo tokens within the P2P electronic cash system called Bitcoin Cash (BCH). Each sender must include the receiver’s memo token address as an additional piece of information to guarantee that funds are transferred securely.
How do I check my Memo token address on Metamask?
To access your account, go to My Accounts in the main menu of Metmask browser extension or mobile app. Clicking on “show details” will display more information about all units available, including their respective addresses.
Is it possible to change my existing Memo Token Address?
Once created, a memo token address becomes permanent until further changes effectuated through reserving another one on BCHN blockchain network which can be hardforked by multiple groups agreeing upon sanctions similarly resembling BTC network where dedicated pools accept specific blocks after intense competition generating enough rewarded cryptocurrency mining power while maintaining security and avoiding censorship attempts from governments around the globe.
How many wallets can I link with my single memo token address in MetaMask?
Only one crypto wallet per BCH unit – hence also only one worth linking with Memopay bridge linked via BCH block validation functioning ensuring safe transaction settlement without intermediaries thereby allowing commission-free micropayments instantly online worldwide consensus preventing fraudsters trying different schemes transferring restricted contents knowing excessive fees required make such operations financially not viable
Can I transfer assets other than BCH coins utilizing this protocol?
Currently no custom asset support incorporated as original network protocol focus remains on BCH as P2P cash system preventing deterioration of transaction processing speed and capacity when network traffic volume increases.
Does Memo Token Address Metamask entail any privacy or security concerns?
Privacy-wise, your Memo token address represents a part of your personal information rendered public. Therefore it would be recommended to take certain measures avoiding correlation with other details that associate you directly with specific digital assets stored in the wallet.
As for some possible risks related to security, kindly make sure no one else can control access by installing extra front-end browser extensions that resemble official ones but act maliciously copying user authentication data entered after providing sensitive intelligence such as passwords or crucial account credentials thereby causing pertinent damages once hacker takes over control usurping ownership regarding personal funds involved likely remaining unnamed because validation confounded during the attack stage represented poorly inadequate decentralized blockchain technology inherent vulnerability predicting potential hacks through various hacking techniques we’ve been trying to patch there is already practical proof this has caused overwhelming financial distress occasionally leading toward bankruptcy financially ruining entire families who trusted crypto due lack of knowledge cybersecurity expertise incorporating reference material provided warning users accordingly changes may need be effected remaining alert reminder taken into account stressful malicious actionable schemes undertaken mostly not compensated at all due legal regulatory framework being absent compared traditional banking institutions where deposit guarantees accepted around world mitigating these types systemic risk ignoring repeated lessons learned from past incidents involving known exchanges ultimately facing consequences seeing punitive measure imposed governments acknowledging cryptocurrencies importance facilitating peer paying respecting laws regulations enforced ensuring market staying free abuse unwanted activity prevention collectively fighting important making blockchain innovation possibility future internet electronic monetary transfer based consensus finally realizes vision Satoshi Nakamoto developed decade ago revolutionize modern economy thus creating unprecedented opportunity mankind progression journey towards more if not perfect improved validated trustless reality allowing us bypass arbitrary middlemen stripping away unfair costs jeopardizing sustained economic growth potential boosting productive energy creativity activities while enhancing our social wellbeing enjoyment work-life balance achievable greater time spent meaningful interactions loved ones sparking interest passion ingenuity wealth generation positive impact global civilization forging lasting connections within vibrant ecosystems reminiscent early internet communities started way expanding dynamically based ingenuity transformative inventions widespread adoption unfettered creativity spawning entirely new economies inspiring people seek unexplored possibilities regardless age gender ethnicity background education financial status social standing etc.
Top 5 Facts You Need to Know About Memo Token Address Metamask
If you’re familiar with the world of cryptocurrency, then you likely have already heard about Metamask. For those who haven’t, Metamask is a browser extension that allows users to securely store and interact with their digital assets on the Ethereum network.
One feature of Metamask that you may not be as familiar with is Memo Token Address – this powerful tool can streamline your transactions and make participation in various blockchain networks more user-friendly. Here are the top 5 facts you need to know about Memo Token Address Metamask:
1) What Is Memo Token Address?
Memo Token Address is a unique address provided by several different decentralized applications (DApps) for sending tokens via their platform. This address links directly to your wallet within Metamask so when DApps prompt for an address, it opens up automatically pulling from your selected wallet.
2) How Do I Set Up My Memo Token Address?
Setting up your Memo Token Address on Metamask only takes one simple step! Once logged in to Metamask simply click “Deposit” or “Send Tokens” on any supported DApp and if they support MetaMask’s token detection functionality it will auto fill the correct memo token address associated with your account making transacting much simpler.
3) Why Should I Use It?
Using a memo token address frees up valuable time that would otherwise be wasted inputting complex addresses into transaction fields every single time coins were sent or received. With less time spent manually copying-and-pasting long alphanumeric codes errors like typos become less common
4) Which Applications Support It?
Some popular DeFi projects such as Aave (one of my favorite lending protocols), Serum USDC Trading pairs via Solana , Binance Smart Chain exchanges PancakeSwap along with hordes other gain from seamless authorizations utilizing MetaMask and its ability sync non-native wallets through easily accessible memos interfaces greatly improving adoption levels overall
5) Is There Any Cost Associated with Using Memo Token Address?
No, there are no additional fees attached to using Memo Token Address on Metamask. Transaction costs and Gas prices are determined solely by the network which in turn they operate. When interacting with a DApp their protocol will initiate transfer operation highlighting any minor operational cost changes in order submit it without issue.
In conclusion, utilizing MetaMask’s memo token address feature offers real benefits for anyone looking to participate within various DeFi projects and sidechain ecosystems like Solana or Binance Smart Chain—or if you’re simply sick of wasting your time inputting addresses manually again-and-again during transaction . Plus, this cutting-edge tool frees up more time to make trades or experience other features that await online so why not try it out now?
The Benefits of Using Memo Token Address with Metamask
As the popularity of cryptocurrencies continues to rise, so too does the importance of efficient and secure transactions. To ensure these transactions occur smoothly, many users turn to Ethereum-based MetaMask – a browser extension that allows for easy access to decentralized applications (dApps) such as exchanges and wallets.
One key aspect of using MetaMask is the Memo Token Address feature, which might not be familiar to all users at first glance. So why should you start using Memo Token Address with your MetaMask wallet? The answer lies in its numerous benefits.
For starters, Memo Token Address provides an additional level of security when sending tokens or Ether from one account to another. Through this feature, users can attach specific memos or messages within their transaction details. This may include noting who the recipient is or offering any other relevant information regarding said transfer.
By including vital notes through this process, it adds another layer of protection against threats like phishing scams where hackers try posing as legitimate entities asking for payments. With Memo Token Address elements included in transfers sent between trustworthy parties it will help protect both involved from potential fraud events.
Furthermore, using Memo Tokens also makes managing multiple accounts much more manageable. It’s often easy enough just copy-pasting unique identifiers on various blockchain-related services but utilizing memo addresses saves even more time by eliminating extra steps required during every move kept between distinct custom-made identities scattered across different platforms.
Perhaps most importantly still is how it facilitates clarity concerning incoming assets or payments received within a particular account while organizing outgoing transfers clearly associated with given campaigns created around each discreet asset contract address held there-off as well making accounting seamless across several fronts simultaneously paralleled alongside unwavering trust issues commonly encountered along sideswiping erratic crypto value swings encompassing sudden uncertainty revolving around fluctuations exhibited throughout market trends observing winding economic shifts over evolving network perspectives ahead adjusted course strategy towards emerging technologies encroaching upon more forefront strategies geared toward attaining predictability amidst volatilities faced by cryptocurrency markets today.
Basically, when you use Memo Token Address with MetaMask, it streamlines transaction processes and provides additional levels of security to protect users from scams. So why not start using it today? Your crypto wallet will thank you for providing so much extra attention to detail!
Common Mistakes to Avoid When Working with Memo Token Address on Metamask
Working with Memo Token Address on Metamask is a tricky and sometimes daunting task, especially for people who are relatively new to the realm of blockchain technology. Misunderstanding or mismanaging the process can lead to costly mistakes that could result in losing all your crypto assets. Here we will discuss some common mistakes to avoid when working with Memo Token Address on Metamask.
Mistake #1: Not Having Enough Gas
One of the biggest mistakes one can make while sending tokens through memo address is not having enough gas limit set up. It may sound trivial, but it’s a critical step as an insufficient amount of gas would result in failed transactions. When this happens, you underperform and interfere with the performance of other users’ transactions.
To ensure smooth processing, do extensive research about optimal transaction fees concerning network congestion levels before carrying out any transaction.
Mistake #2: Failing To Verify The Destination Addresses
The importance of verifying destination addresses cannot be overemphasized when working with memo tokens on metamask public wallets. Double-checking becomes crucial because one wrong character in individual wallet addresses might transfer your valuable cryptocurrency holdings into someone else’s wallet mistakenly.
Always verify every piece of information typed into each field manually by comparing them against each other several times before submitting to avoid making irreversible errors like this.
Mistake #3: Leaving Everything On Auto-Pilot Mode
Leaving everything auto-pilot mode unconditionally without checking anything during token exchanging puts investors at high risk damaging their entire portfolio completely inside-out within seconds without being able even scapegoat anyone including themselves for any loss incurred whatsoever due to lack self-awareness investment game plan adherence failure issue freedom management policy caliber upgraded standard ethics functionality checkup capability practice in general cryptocurrencies digital asset economy space decentralization revolution fields better understood regulated evolving landscape milieu habitat ecosystems elements parts nodes behaviors patterns metrics indicators valuation indexation signals innovation breakthrough trend prediction future analytics changing market trends analysis dynamic monetary policy changes regulatory framework updates property rights and smart contract laws regarding digital assets.
Mistake #4: Not Testing Transferal with Small Amounts Before Sending Large Ones
Before attempting to make significant transactions through memo token on Metamask, it is essential to test/pilot the transferring process using a smaller amount of crypto-assets first.
This helps ensure & establishes trust levels that both addresses (sender’s and receiver’s) connect flawlessly in real quick time without having any delay while capturing data from one digital asset wallet address system onto another seamlessly inside/outside given blockchain network interfaces universally accepted standards specifications requirements compatibility consistency compliance verification confirmation feedback mechanisms etc., depending upon how extensively these components are integrated together into a coherent interconnected framework infrastructure layer aiding service utility proposition performance speed in enabling smooth functioning operations related tasks endeavours activities efficiently effectively sustainably well-organized managed controlled monitored audited customized personalized user-friendly transparent trustworthy reliable bug-free open source code reviewable accessible scalable safe secure risk mitigated environment context compatible with social ethical responsibility precautions taken care of which help reduce various types risks associated handling storing transacting securing maintaining cryptocurrency holdings custody under the umbrella high level prudential norms governance rules regulations frameworks policies protocols procedures guidelines codes conduct best practices industry benchmarks ground-breaking innovations breakthrough trends pioneers development research insights experiences shared stakeholders consultants professionals cryptographers engineers business analysts tech-savvy enthusiasts be aware what’s trending underground overground About future prognostics signals predictions market intelligence reports whitepapers handbooks wikis eBooks blogs vlogs podcasts events meetups forums webinars seminars round-table conversations contribution communities ventures startups accelerators incubators angel investors venture capitalists governments central banks financial institutions universities researchers students firms corporates SMEs freelancers self-employed individuals NGOs charities philanthropic organizations manage uncertainties impacts implications opportunities threats challenges potentials strengths weaknesses managing risks.
By following these tips, you can minimize your risk of making significant Memo Token Address transaction errors when working with memo token address on Metamask, ensuring a secure transfer of your cryptocurrency assets. Good luck out there!
Tips and Tricks for Maximizing Your Experience with Memo Token Address Metamask
Memo Token Address Metamask is a versatile platform that can help you maximize your experience with Ether and cryptocurrency transactions. Whether you’re just starting or already an expert, there are several tips and tricks to make the most of Memo Token Address Metamask.
Firstly, it’s essential to understand what Memo Token Address Metamask can offer. It’s primarily designed to allow users to store their cryptocurrencies safely in one place. However, it goes beyond storing; this platform provides users with a secure way to transact ethereal blockchain tokens directly from within their browser, which simplifies the whole process significantly.
One great tip when using Memo Token Address Metamask is always ensuring that you have enough gas whenever making any transaction on Ethereum blockchains. Lowering gas fees could result in unsuccessful completion of transactions as miners may not be interested in processing them without adequate incentives.
Secondly, always ensure that you’re connected securely whenever interacting with decentralized applications (dapps) such as Uniswap and other similar platforms where trading occurs through multiple protocols hence risks vulnerability attacks by malicious parties targeting network nodes hosting unsuspecting low-security applications.
Furthermore, Memo Token Address Metamask maintains compatibility across different wallets including hardware-based wallets like Ledger Nano S and X so users should take advantage of this feature for added safety during usage.
Thirdly, understanding how ERC-20 tokens work with MEMO compatible wallets is crucial – These transfers primarily use smart-contracts which tend to have different functions than those implemented by non-smart contract-enabled ETH accounts such as sending regular ether coins.
Lastly yet importantly then Tip#4 would be exploring advanced features accessible via MetaMask add-ons under settings->advanced section whereby user can customize networks selection like Etherscan instead default web3 socket etc., view app permissions & improve memory management conditions including managing session backups across devices/interfaces spanning over remote www/ http servers secured encryptions keys access restrictions setup configurations based personal preferences & needs optimization levels.
In conclusion, Memo Token Address Metamask is an excellent platform both for beginners and advanced users of Cryptocurrencies. By following these tips and tricks, you can maximize your experience with this platform and make the most out of trading in Ethereum blockchain assets facilitated by web-based open-source wallet services providers.MetaMask’s many features are a key differentiator among other OS wallets available in today’s market such as Atomic Wallet,Yoroi, Exodus etc., offering high ROI (return on investment) under complex user scenarios involving various ERC-20 token types circulating around decentralized finance ecosystems globally.
Table with useful data:
| Cryptocurrency | Memo Token Address | MetaMask |
|---|---|---|
| MEMO | 0x50dc29d13c34a30e0a649af8c4cf6a818be68733 | Compatible with MetaMask |
Information from an expert:
As a blockchain expert, I can say that Memo Token Address is used to identify a specific Memo token on the network. It is important to have the correct address when sending or receiving tokens because transactions cannot be reversed once placed on the blockchain. Metamask is a popular cryptocurrency wallet that allows users to interact with decentralized applications (dApps) built on Ethereum. To add a new Memo Token to your Metamask Wallet, you will need to find the token’s contract address and add it manually via Metamask’s “Add Token” function. Always verify that you have the correct address before making any transactions!
Historical fact:
Memo token address is a cryptocurrency that operates on the Bitcoin Cash network and was first introduced in 2018. It is commonly used for sending messages and small amounts of BCH between users, and can be stored using compatible wallets such as Metamask.