How to Reset Gigabyte BIOS
If you’re experiencing system instabilities due to corrupted or incorrect BIOS settings, resetting it can be an effective solution. This can even help erase the custom/administrator password if you have forgotten or are unaware of it.
You can restore your BIOS settings using both firmware and hardware methods. The former involves loading optimized defaults from the BIOS Setup screen. On the other hand, the hardware method involves removing the onboard battery or using a jumper to clear the CMOS values.
Whether you rock an AORUS, AERO, GAMING, or ULTRA DURABLE motherboard, this article will guide you through the different ways of resetting the Gigabyte BIOS.
Table of Contents
Use Clear CMOS Button
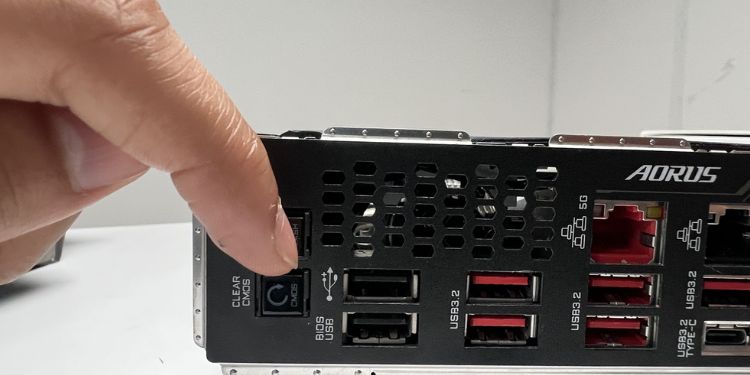
If you’re using a newer high-end motherboard, you’re probably going to find a Clear CMOS button. It can be located either in the rear I/O panel or within the system board itself (along with the other headers).
Without a doubt, this is the most convenient and quickest way to perform a BIOS reset on any mobo. All you have to do is press the dedicated button and it will restore the CMOS values (system clock and other hardware parameters) to factory defaults.
Even though the BIOS configuration is stored within the Southbridge or Super I/O chips these days, it’s still the CMOS that powers them. Hence, clearing your CMOS will erase the data stored in the RAM and revert the motherboard settings.
Caution: Never use the CMOS button when the system is turned on. You may lose your valuable data or in the worst case, it could even damage the motherboard.
Follow the provided instructions below to learn the proper way of resetting a Gigabyte motherboard BIOS.
-
Start by locating the button first:
-
If yours is available in the rear I/O panel, you’ll likely find a reset icon with the label CLEAR CMOS.
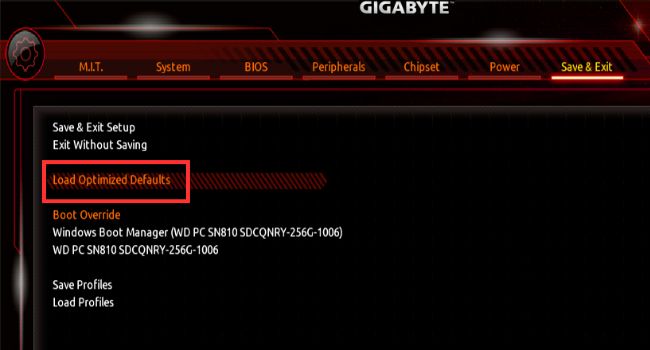
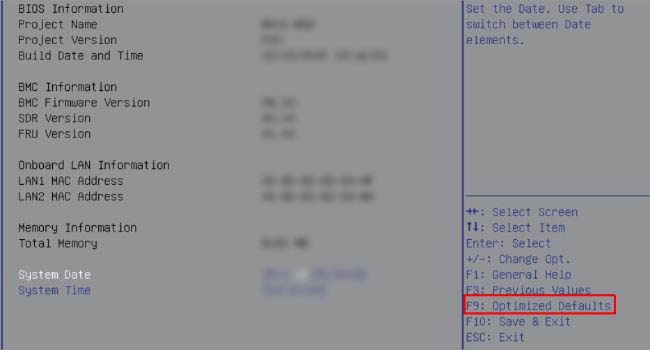
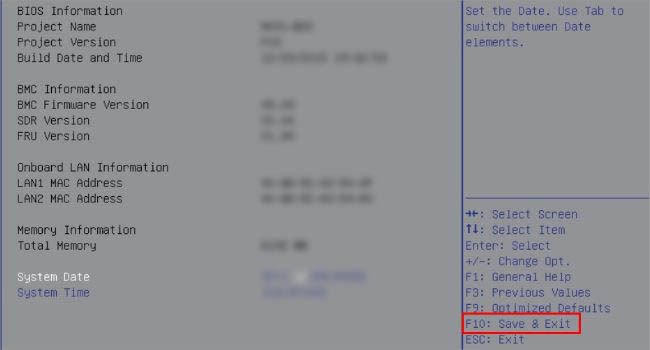
Load Optimized Defaults From BIOS
While using the CMOS button is the most effective and quickest method for BIOS reset, it’s not present on every motherboard. Instead, you can perform this from your UEFI/Legacy Utility, which is accessible on any system.
Note that this can only be useful if you’re not experiencing any boot/system failures and your PC successfully passes the Power-On-Self-Test (POST). Apart from that, you require to manually load the factory defaults even after clearing the CMOS.
Considering the fact that most users utilize the UEFI mode these days, here are the general guidelines on how to load the optimized defaults:
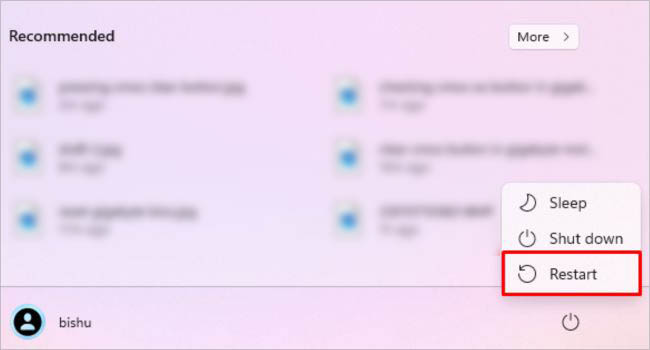
- First, look into the user manual or check for the BIOS Menu key for your model online.
- Now, close all the running programs and restart your computer.
The general idea for resetting Gigabyte BIOS on legacy mode is almost similar. Without further delay, let’s get into the necessary steps:
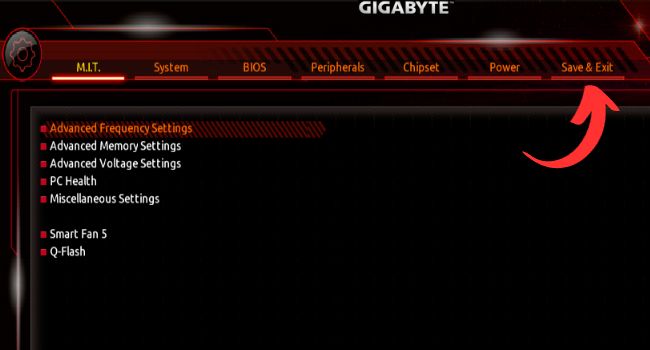
- As demonstrated earlier, restart your computer, and use the BIOS Menu key to enter the interface.
- Check the right pane and find the key used for optimizing defaults. In most models, it’s F9 as shown below.
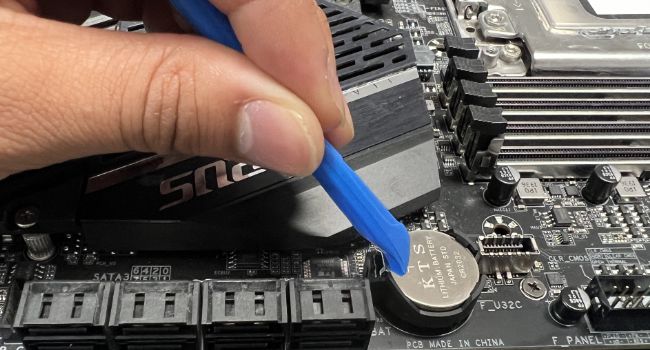
Remove CMOS Battery
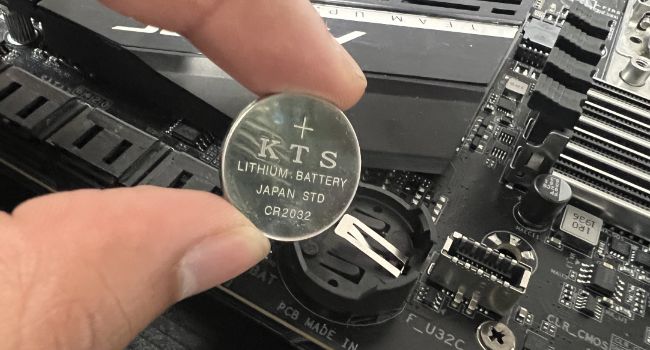
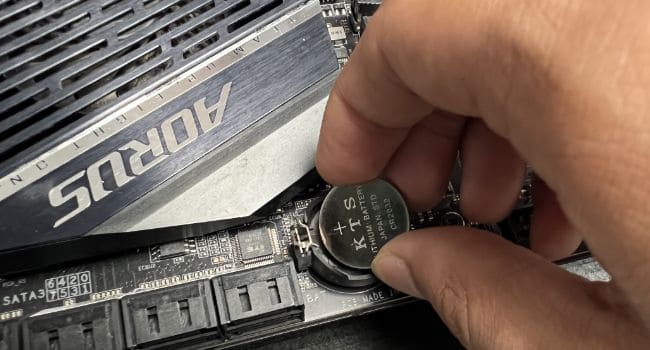
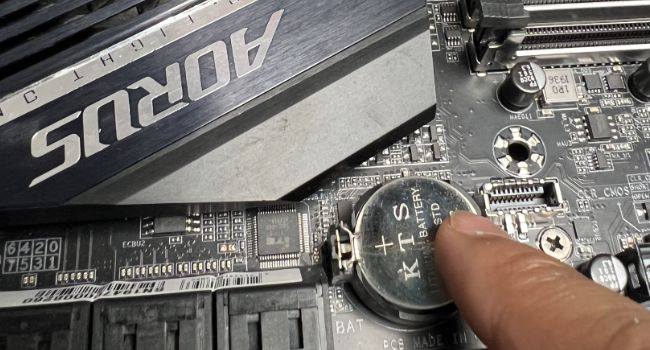
Every motherboard has a small coin-shaped battery that retains power even after your computer turns off. It keeps supplying an adequate amount of power to the RTC RAM, which holds all the BIOS configurations.
When removing the CMOS battery, we are basically cutting off power. Now, the CMOS chip can’t retain the stored settings and everything gets restored to the default state once you put it back.
The exact location of the onboard battery varies based on models. This could be between the PCIe slots or above the front panel headers. It’s always a good idea to refer to the motherboard’s user manual to identify the correct position.
While clearing CMOS using this method sounds a bit technical, it’s actually quite easy if you follow my instructions the right way. This can help solve any issues that could have arouse due to power outages, hardware incompatibilities, failed/corrupted BIOS updates, and more.
Caution: Ground yourself or the PC to get rid of the possible static buildup that may damage the internal components when you’re operating them. Refer to our other guide that discusses in detail on this subject.
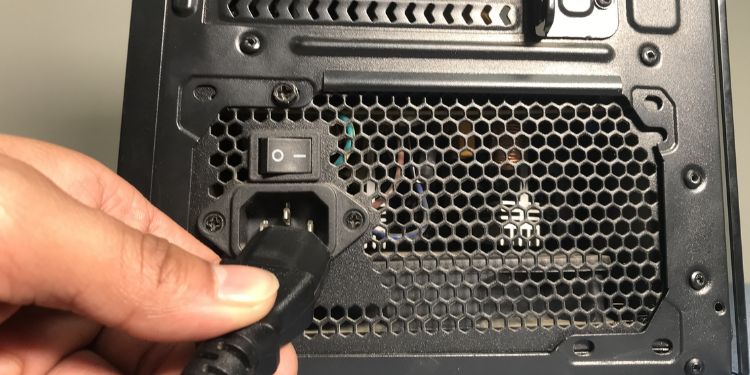
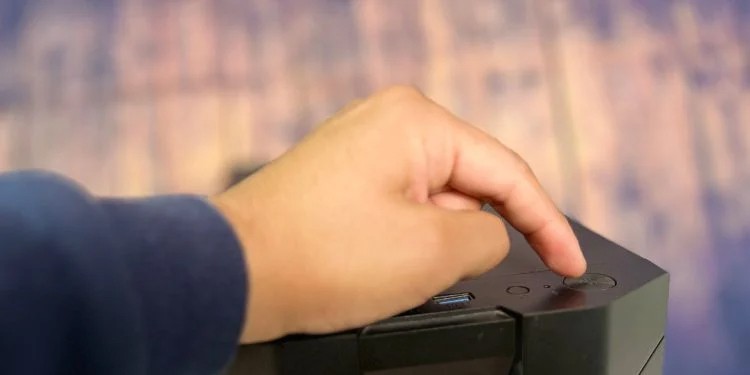
- Start by turning off your computer.
- Along with that, remove the PSU’s power supply and also unplug all the external devices.
- Press and hold the power button for up to 10 seconds. This will discharge all the remaining static electricity.
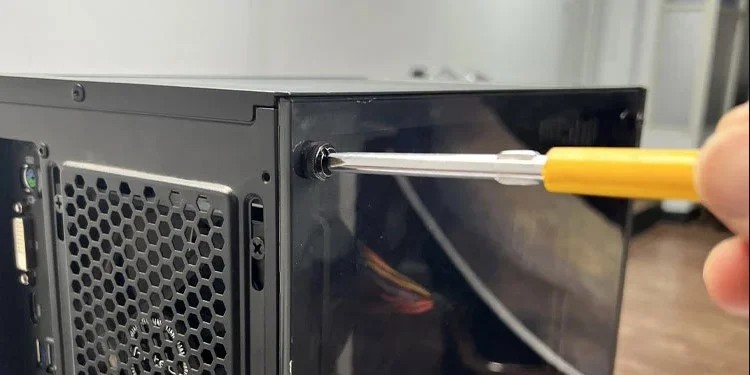
Clear CMOS Using Jumper
Another possible way to clear CMOS values and reset the Gigabyte BIOS is to make the jumper pins short-circuit using a metal conductor. You may use a screwdriver or a jumper cap.
In most Gigabyte motherboards, the jumper is located somewhere near the CMOS battery (labeled CLR_CMOS). Since it’s comparatively difficult to find, I highly advise referring to the user manual to quickly locate it.
Most Gigabyte models embed a 2-pin CMOS jumper. Even my TRX40 AORUS MASTER motherboard includes this. Here’s a quick demonstration of how I cleared CMOS using the jumper method that should help you get a general concept:
- Shut down your PC, remove the power plug, and discharge capacitors by holding down the power button for 10 seconds. Don’t forget to ground yourself to prevent the components from ESD (Electronic Discharge).
- Next, open the case of your PC to access the system board.
- Locate the CLR_CMOS jumper and identify the number of pins.
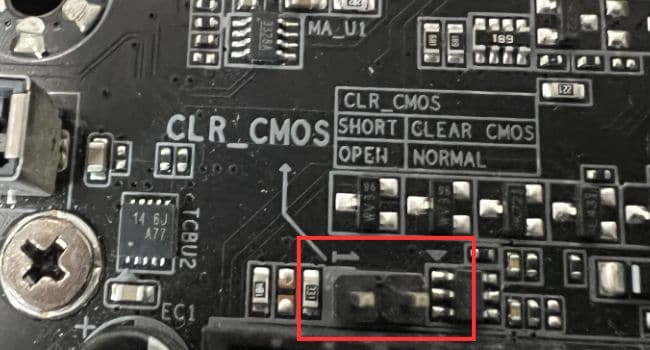
-
Take a screwdriver or any other metal conductor and touch the two pins.
Как обнулить BIOS на материнской плате Gigabyte
Биос — это система базового ввода-вывода, ответственная за настройку и управление аппаратными компонентами компьютера. Иногда возникают ситуации, когда настройки в биосе материнской платы Gigabyte требуется сбросить до заводских значений. Это может потребоваться, например, после переразгонки или при возникновении проблем с загрузкой системы. В этой статье мы расскажем, как выполнить сброс настроек биоса на материнской плате Gigabyte.
Перед тем как начать сброс, рекомендуется сохранить все важные данные, так как сброс настроек биоса может привести к потере информации. После этого можно переходить к процедуре сброса.
Первым шагом необходимо выключить компьютер и отключить его от источника питания. Затем откройте корпус компьютера и найдите на материнской плате батарейку с кнопкой, которая питает биос. Обычно она имеет форму плоской монеты и находится рядом с процессором или слотом оперативной памяти.
Для сброса настроек биоса необходимо удалить батарейку с помощью небольшого плоского отвертки. Если батарейка зафиксирована с помощью пластикового крепления, осторожно отодвиньте его в сторону и вытащите батарейку. После этого подождите около 10-15 минут, чтобы биос полностью разрядился и все настройки сбросились.
Помните, что при сбросе настроек биоса могут быть проблемы с распознаванием жестких дисков или других устройств, поэтому может потребоваться внести изменения в настройки после сброса. Рекомендуется записать текущие настройки, чтобы вернуться к ним в случае необходимости.
После ожидания времени биоса можно вернуть обратно в материнскую плату батарейку, убедившись, что она правильно зафиксирована. Затем закройте корпус компьютера и подключите его к источнику питания. При следующем включении компьютер запустится с заводскими настройками биоса.
Как сбросить настройки биос на материнской плате Gigabyte
Прежде всего, важно отключить питание компьютера и отсоединить все подключенные устройства.
1. Найдите на вашей материнской плате джампер Clear CMOS. Обычно он расположен рядом с батарейкой CMOS.
2. Убедитесь, что ваш компьютер выключен и отключен от источника питания.
3. С помощью пинцетов или маленькой отвертки переместите джампер со своего текущего положения в положение Clear CMOS. Обычно это означает перемещение джампера на соседние контакты в течение доли секунды.
4. Подождите около 10 секунд, а затем верните джампер в исходное положение.
5. Подключите компьютер к источнику питания и включите его.
6. После включения компьютера проверьте настройки BIOS и убедитесь, что они сброшены до значения по умолчанию.
Теперь настройки BIOS должны быть сброшены на материнской плате Gigabyte. Если у вас остались проблемы с компьютером, рекомендуется обратиться к производителю или специалисту по обслуживанию компьютеров для получения дополнительной помощи.
Узнайте, как выполнить сброс биоса на материнской плате Gigabyte
Сброс настроек биоса может потребоваться, если вы столкнулись с проблемами в работе компьютера или если хотите вернуть биос к заводским настройкам. В этой инструкции мы расскажем вам, как выполнить сброс биоса на материнской плате Gigabyte.
Шаг 1: Включите компьютер и нажмите клавишу «Delete» или «F2» во время загрузки системы. Это позволит вам попасть в биос.
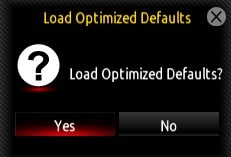
Шаг 2: При помощи клавиш со стрелками выберите вкладку «Exit» и затем найдите опцию «Load Optimized Defaults» (или аналогичную). Нажмите Enter.
Шаг 3: Выберите опцию «Yes», чтобы подтвердить сброс биоса и загрузку заводских настроек. Затем нажмите Enter.
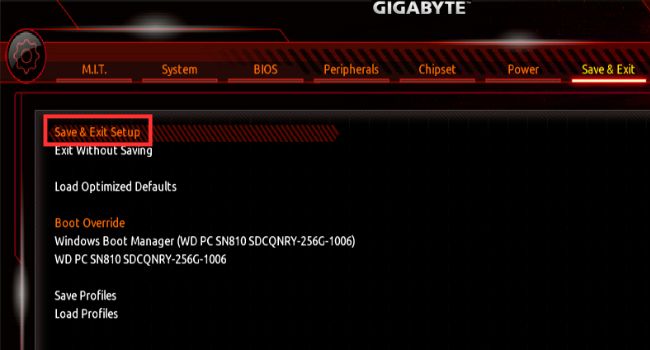
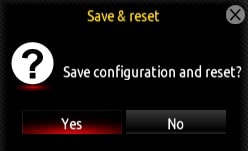
Шаг 4: Найдите опцию «Save Changes and Exit» (или аналогичную) и нажмите Enter. Это сохранит изменения и перезагрузит компьютер.
Ваша материнская плата Gigabyte теперь будет работать с заводскими настройками биоса. Обратите внимание, что все настройки и данные, включая пароли и профили памяти, будут удалены при сбросе биоса. Поэтому перед выполнением данной процедуры рекомендуется сохранить важные данные и настройки.
Подробная инструкция по сбросу настроек биоса на материнской плате Gigabyte
Сброс настроек биоса может быть необходим, если вы столкнулись с проблемами, связанными с конфигурацией вашей материнской платы Gigabyte. В этом случае сброс биоса может помочь восстановить стандартные настройки и устранить неполадки. В данной статье мы расскажем, как выполнить сброс настроек биоса на материнской плате Gigabyte.
| Шаг | Описание |
|---|---|
| 1 | Выключите компьютер и отсоедините его от источника питания. |
| 2 | Найдите на материнской плате два контакта подписанных как «CLR_CMOS» или «BIOS_RST». Они обычно располагаются рядом с батарейкой CMOS. |
| 3 | С помощью провода или металлической щетки соедините контакты CLR_CMOS или BIOS_RST, удерживая их вместе в течение нескольких секунд. Это приведет к сбросу настроек биоса. |
| 4 | Отсоедините провод или металлическую щетку и обратно присоедините блок питания к компьютеру. |
| 5 | Включите компьютер и дождитесь загрузки биоса с его стандартными настройками. |
После выполнения этих шагов, настройки биоса на материнской плате Gigabyte должны быть сброшены до заводских значений. Обратите внимание, что сброс настроек биоса также приведет к удалению всех пользовательских настроек, сохраненных в биосе. Поэтому не забудьте сделать резервные копии важных данных перед выполнением сброса.
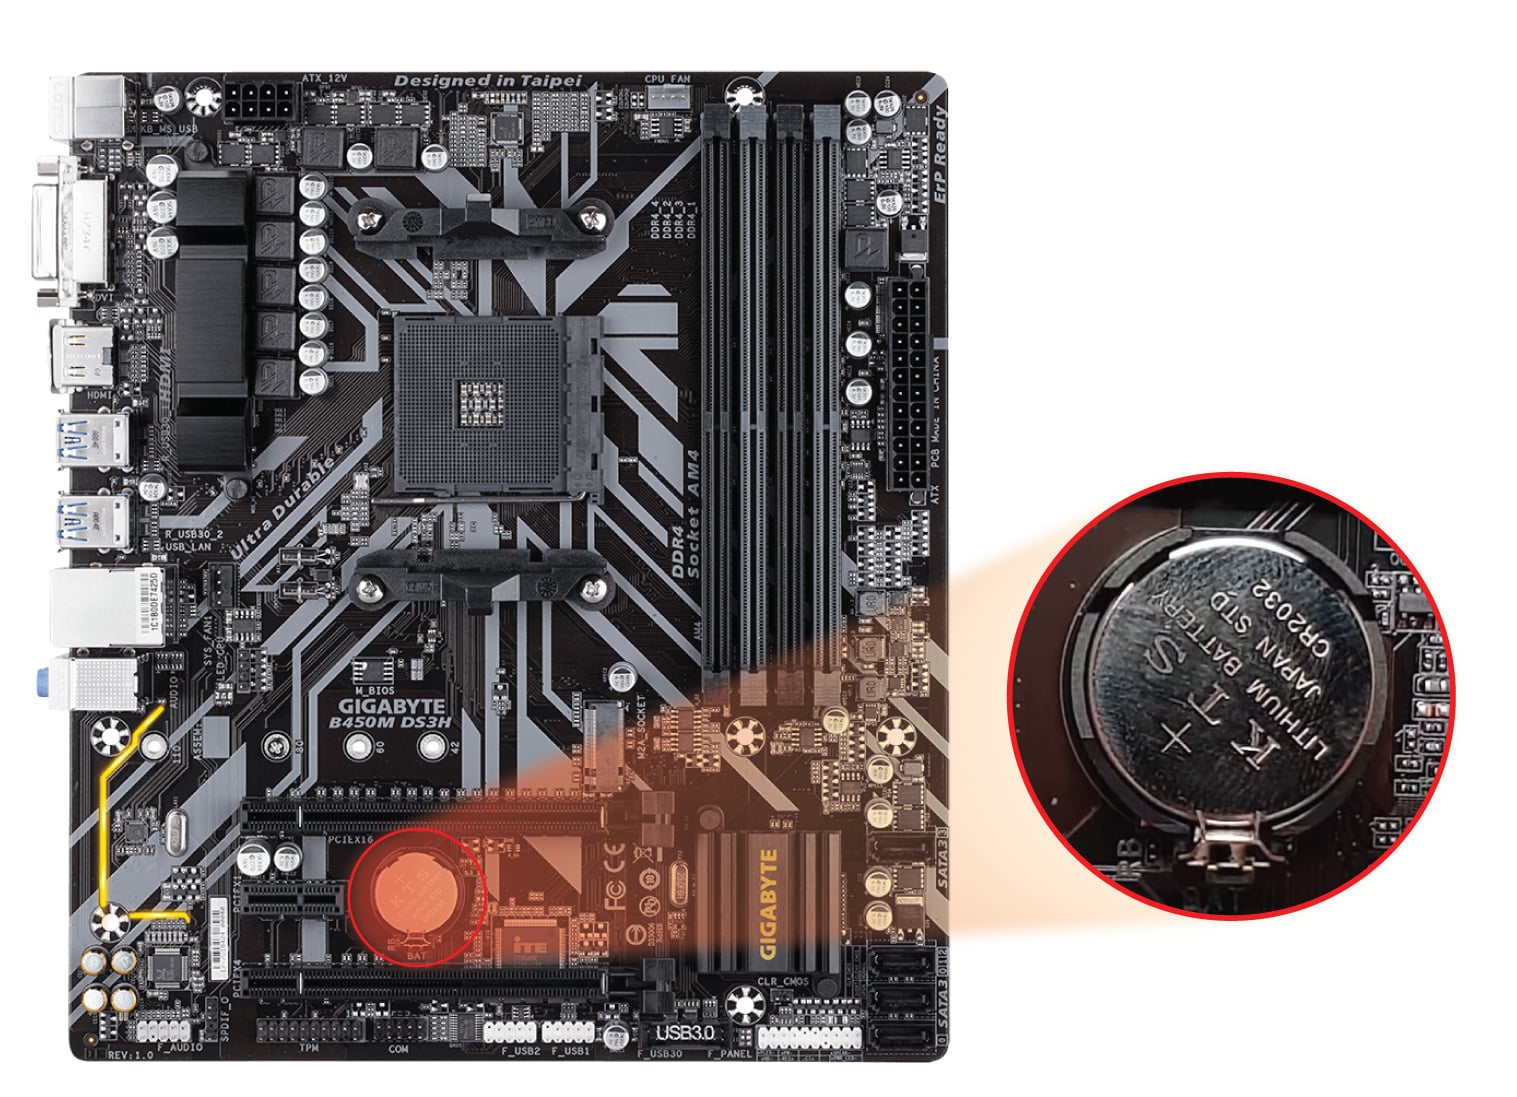
How to clear CMOS on GIGABYTE B450M DS3H (and V2/WiFi) Motherboard: 2 Methods
Summary: This article explains how to perform a BIOS, or CMOS reset and clear the NVRAM on your GIGABYTE B450M DS3H (or V2 or WiFi) motherboard.
There are several possible causes for BIOS data corruption. Power outages, incorrect BIOS settings, hardware incompatibilities resulting from specific configurations, etc. Clearing CMOS to its original settings is a common solution in such circumstances to reset BIOS to factory defaults.
Somtimes it’s also recommend to clear CMOS and resetting BIOS before installing a new CPU on the GIGABYTE B450M DS3H (or V2/WiFi) motherboard.
There are 2 methods to clear CMOS and reset BIOS on the GIGABYTE B450M DS3H (V2/WiFi) motherboard:
1. Reset Your CMOS by Re-seating the CMOS Battery
A battery is used to maintain settings in the motherboard. One way to clear CMOS on the GIGABYTE B450M DS3H (V2/WiFi) motherboard is to remove and reseat the battery. Here’s how to do it:
- Turn off your computer and unplug the power cord.
- Press the power button multiple times to clear any charge in the PSU capacitors.
- Locate the 3V CR2032 battery, gently remove it from the holder, and wait a few minutes to ensure the CMOS is clear.
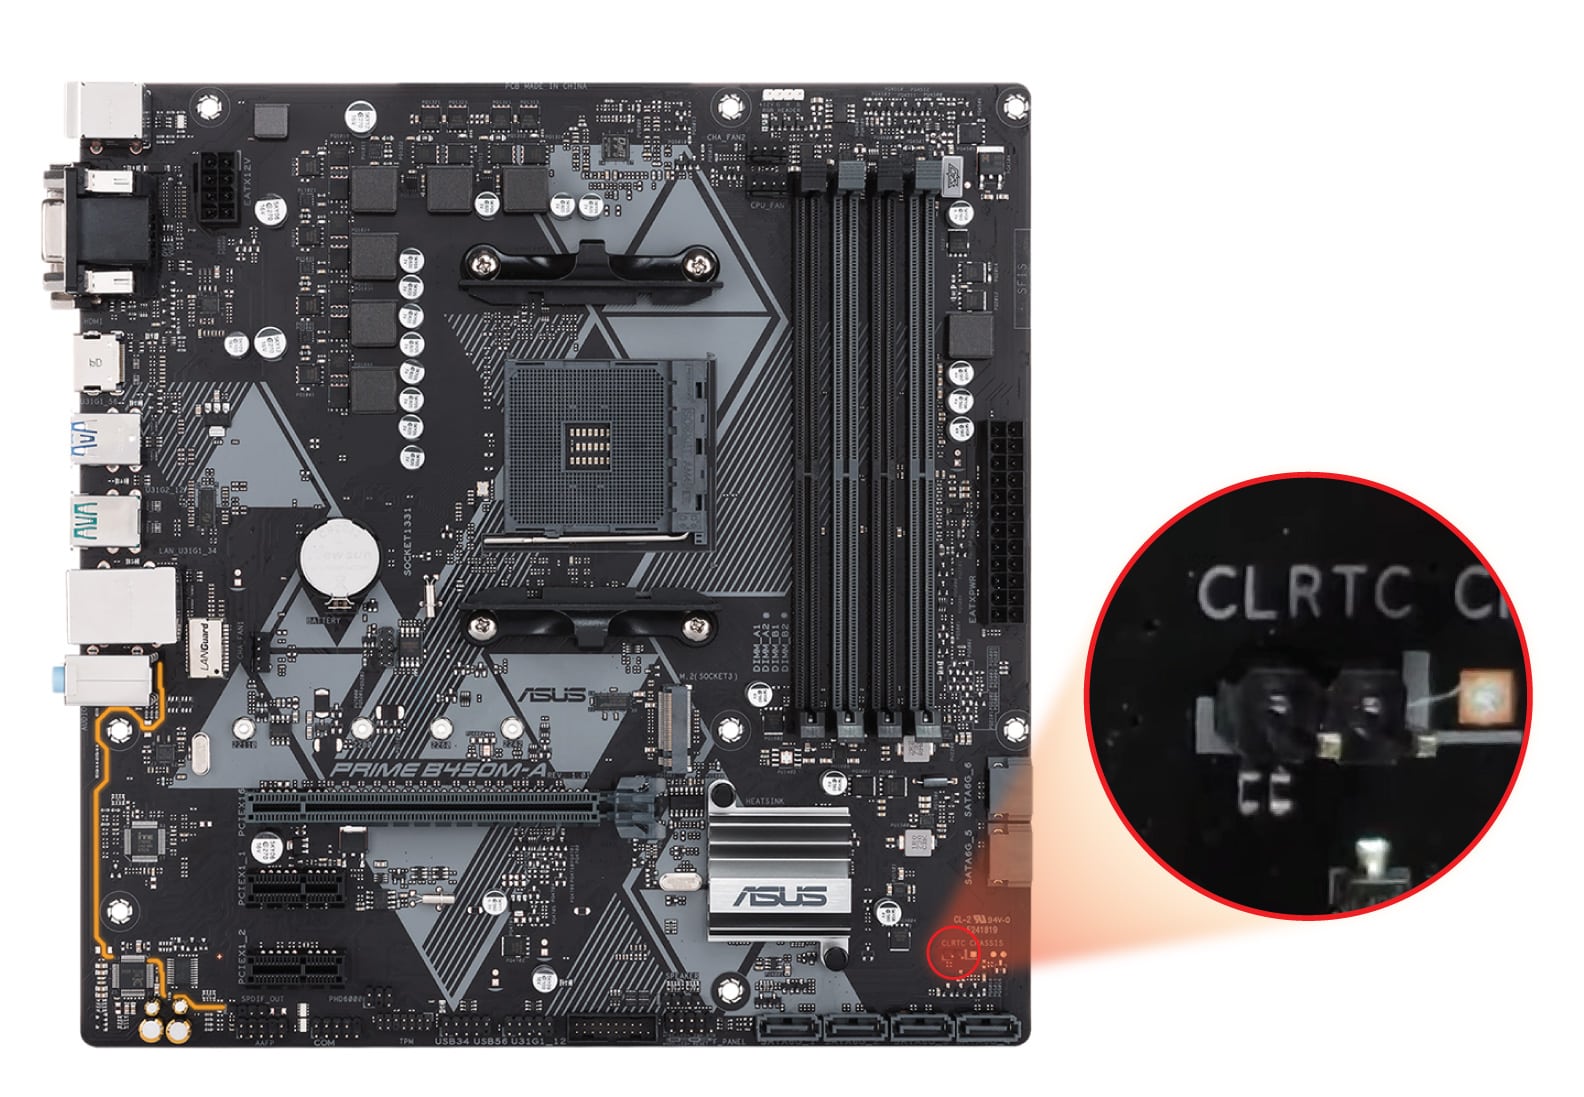
2. Reset Your CMOS with the Motherboard Jumper
The other way to clear CMOS on the GIGABYTE B450M DS3H (V2/WiFi) motherboard is to use the jumper. Here’s how to do it:
- Turn off your computer and unplug the power cord.
- Press the power button multiple times to clear any charge in the PSU capacitors.
- Locate the jumper with the label CLR_CMOS next to it.
I hope you find this guide helpful.
Dominique D’Ozen
Co-Founder / Editor
Hardcore gamer, IT engineer, musician, scrapyard lover. Yes, scrapyard! Highly proficient in everything RPG.
Народ, а как биос сбросить на ней (обнулить)? Подскажите пожалуйста, спасибо.

Народ, а как биос сбросить на ней (обнулить)? Подскажите пожалуйста, спасибо.
Комментарии 5
Про батарейку сказали. Но если ты умудрился в процессе обновления БИОСа вырубить / перезагрузить её — тогда тебе обеспечена прогулка в сервис к дяде вооруженному программатором.
как и на любой другой — при отсутствии джампера clear cmos — тупо вытащить батарейку минут на 5-10.

Стандартно включённой мб замкнуть контакты клир кмос! на 20 секунд на включенной плате, либо вытащить батарейку питания БИОС и так же зажать контакты на слоте питания в течении минуты 10