Как создать бота для торговли на бирже Binance

В данной статье мы расскажем вам о том, как создать и настроить вашего первого бота. Данная инструкция поможет вам лучше разобраться в интерфейсе и параметрах настройки. Итак, приступим:
Регистрируемся и логинимся в https://revenuebot.io/, переходим во вкладку «Bots» (https://app.revenuebot.io/office/#/bots/)
Раскрываем меню «CREATE NEW BOT»…
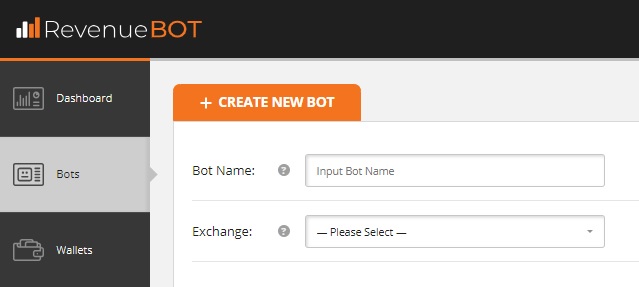
Идентификация, API и кошелек бота
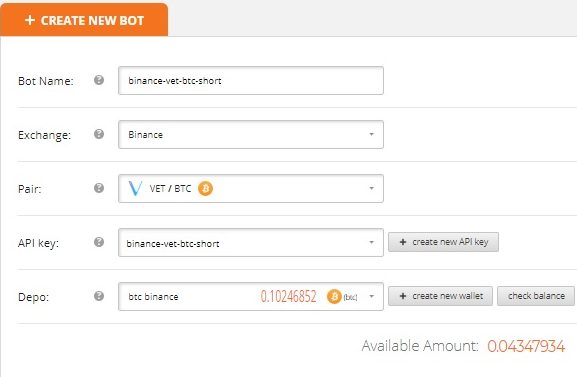
Bot name: Название бота (чаще всего в названии используются характеристики: биржа, торговая пара криптомонет, алгоритм работы и тп.)
Exchange: Выбираем биржу в выпадающем списке (рассмотрим на примере Binance)
Как только вы выберете биржу вам станут доступны следующие поля для заполнения:
Pair: Выбрать торгуемую пару криптомонет. О том, как выбрать эффективную торговую пару подробно написано тут — «Как подобрать эффективную торговую пару криптомонет»
API key: Выбрать API ключ из ранее созданных, либо создать новый.
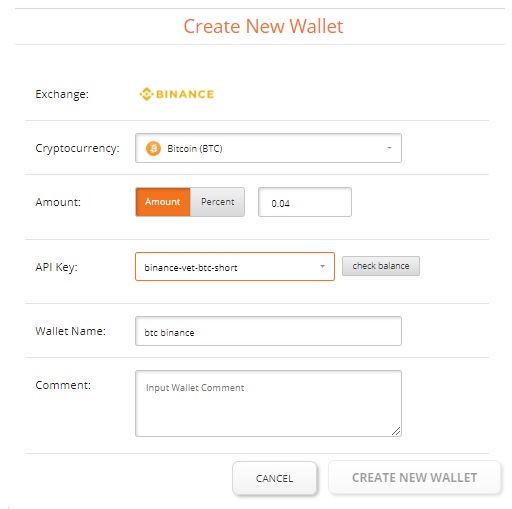
Depo: Выбрать виртуальный кошелек из ранее созданных, либо создать новый, где ввести:
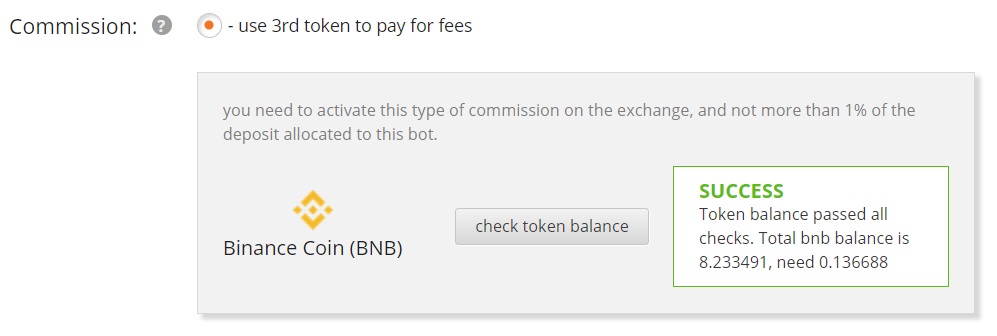
Commission: Выбрать вариант комиссии, которая будет применятся биржей. Данная настройка актуальна только для биржи Binance, так как на ней возможна оплата комиссии в третьем токене, который не участвует непосредственно в текущей торговле (BNB токен).
Для использования такого вида комиссии, необходимо активировать ее в аккаунте биржи Binance. Рекомендуем всегда использовать этот вид оплаты комиссии торговли на бирже Binance, так как это дешевле.
Необходимо лишь следить, чтобы BNB был на аккаунте. Для этого наш бот проверяет баланс BNB токена перед каждым пуском. Если баланс токена меньше необходимого, то бот не запускается в работу и отправляет нотификацию пользователю с информацией о необходимости пополнить баланс BNB токена для начала торговли.
Алгоритмы работы бота и его настройки
Algo: Выбрать алгоритм работы бота.
Бот использует API интерфейс бирж для выставления ордеров по выбранному алгоритму и отслеживания их выполнения.
На данный момент существует два алгоритма работы бота RevenueBot:
После выбора алгоритма работы бота, пользователю предлагается воспользоваться шаблонами настройки данного алгоритма: Light trade mode, Normal trade mode, Extreme trade mode.

Все поля настроек заполнятся автоматически при выборе любого из предложенных шаблонов.
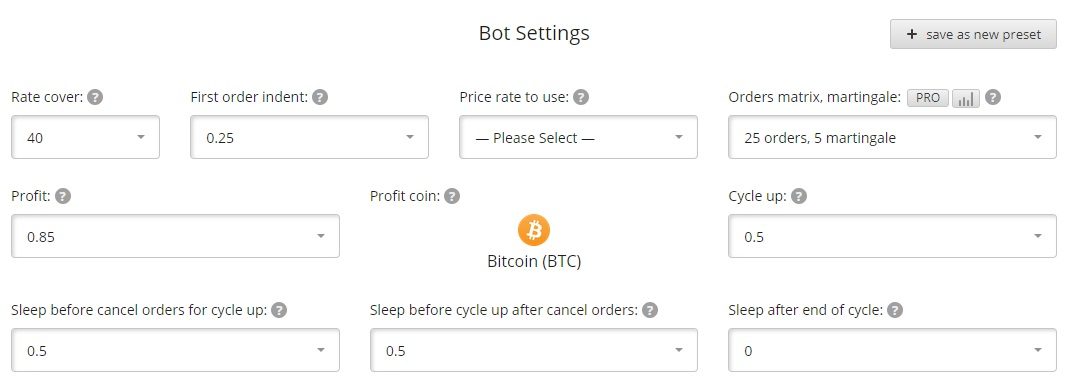
Rate cover: Процент перекрытия изменения цены для расчета сетки ордеров. Данная настройка определяет в процентах отступ последнего ордера в сетке ордеров.
First order indent: Отступ в процентах первого ордера в сетке ордеров.
Price rate to use: Выбор рейта на бирже, от которого вести расчет сетки ордеров. Это могут быть рейты buy, sell, average.
Orders matrix, martingale: Сетка ордеров и мартингейл.
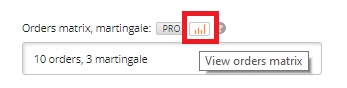
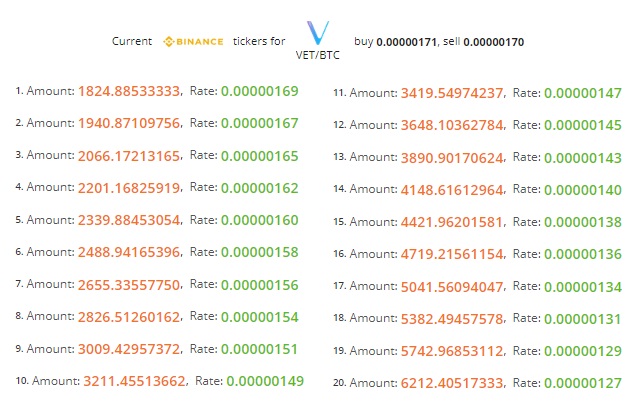
Тут задается количество ордеров в сетке и мартингейл (на сколько процентов каждый следующий ордер в сетке будет весомее предыдущего). Кликнув на view orders matrix, Вы сможете увидеть рассчитанную сетку ордеров.
Profit: Тут задаем в процентах профит, который будет заложен ботом при расчете цены завершающего цикл ордера.
Profit coin: Данная настройка доступна только для алгоритма short. Задает в какой из торгуемых монет будет профит.
Cycle up: Бывает, что бот выставил сетку ордеров, а цена ушла в другую сторону. Получается, что нужно ждать пока цена не вернется, а ждать можно долго.
Этого ожидания можно избежать, настроив актуализацию сетки ордеров к текущей цене. Тут задается процент, при достижении которого, текущая сетка ордеров отменяется и выставляется новая.
Sleep before cancel orders for cycle up: Тут задается задержка в минутах, перед тем как начать отменять текущую сетку ордеров, когда срабатывает настройка Cycle up.
Данная настройка позволяет избежать частых отмен текущей сетки ордеров, когда цена за очень короткое время изменилась и вернулась к прежнему уровню.
Можно выждать некоторое время, чтобы зря не снимать текущую сетку ордеров.
Sleep before cycle up after cancel orders: Тут задается задержка в минутах перед выставлением новой сетки после отмены предыдущей сетки ордеров.
Данная настройка также позволяет избежать негативных последствий в ситуации, когда цена за очень короткое время изменилась и вернулась к прежнему уровню.
Sleep after end of cycle: Тут задается задержка в минутах перед тем как начать новый цикл после завершения текущего цикла.
Так же можно задать каждую из этих настроек самостоятельно и сохранить свой шаблон.
Дополнительные настройки
add revenue to depo: При получении прибыли можно добавлять ее к депозиту который использует бот, таким образом увеличивая депозит.
При включенной настройке весь профит от работы бота зачисляется на виртуальный кошелек, который использует данный бот.
logarithmic scale for orders: Обычно сетка ордеров рассчитывается так, что все ордеры в ней расположены линейно, на одинаковом расстоянии друг от друга по всему перекрытию цены.
При небольших колебаниях цены будут чаще всего выполняться первые, самые маленькие по объему, ордеры в сетке.
Чтобы вовлечь побольше депозита в торговлю при небольших колебаниях цены, можно использовать логарифмическое распределение, которое позволит повысить плотность ордеров вблизи текущей цены и понизить плотность ордеров при удалении от текущей цены.
Плотность ордеров можно настроить для разных ситуаций по разному с помощью коэффициента logarithmic factor увеличивая или уменьшая его.
Для большинства случаев подойдет значение logarithmic factor = 1.5.
Кликнув на «view orders matrix», Вы сможете увидеть рассчитанную сетку ордеров.
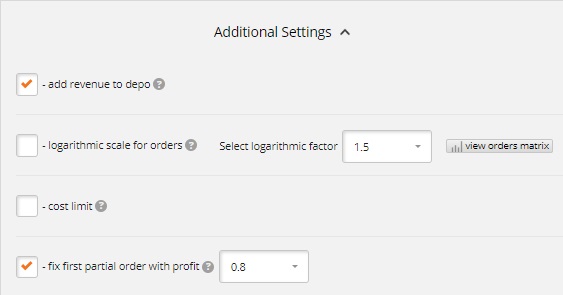
cost limit: Используйте эту настройку, чтобы не начать покупать слишком дорого и не начать продавать слишком дешево.
Задает максимальную цену, выше которой бот не начнет цикл для алгоритма Long и минимальную цену ниже которой бот не начнет цикл при алгоритме Short.
fix first partial order with profit: Бывает, что первый ордер в сетке частично выполнился, но цена пошла в другую сторону. Такое случается, когда бот оперирует большим депо и ордеры в сетке довольно объемные, даже самый первый.
В такой ситуации можно долго ждать возвращения цены и выполнения ордера полностью, чтобы работа алгоритма продолжилась. Включив данную настройку можно задать процент профита для расчета такой цены, при достижении которой мы получим профит, если отменим частично выполненный ордер и выставим на его сумму завершающий цикл ордер. Ведь цена ушла в ту сторону, где мы получим профит, просто ордер оказался слишком объемным.
Фильтры для старта бота
Мы рекомендуем всегда настраивать фильтры для старта бота. Они необходимы для того, чтобы бот начал торговлю в самое выгодное время, основываясь на выбранном алгоритме торговли и ваших предпочтениях. Подробнее читайте тут: «Фильтры для старта бота. Описание и настройка.»
How To Build A Profitable Trading Bot On Binance With Python-Binance (Step By Step Guide)

AI trading bots, also known as algorithmic trading, have become increasingly popular in recent years. The idea behind these bots is to use artificial intelligence and machine learning algorithms to analyze market data and make trades automatically. But can these bots really make you a profit?
The short answer is yes, AI trading bots have the potential to make you a profit. However, it’s important to note that there is no guarantee of success and the risk of loss is always present. Like any investment, it’s important to do your research and understand the potential risks and rewards before diving in.
One of the benefits of using an AI trading bot is that it can analyze large amounts of data and make trades at a faster rate than a human trader. This can potentially lead to more profitable trades. Additionally, because the bot is not affected by emotions, it can make trades based solely on data and market trends, rather than emotions.
However, it’s important to keep in mind that AI trading bots are not perfect and they can make mistakes. It’s important to monitor your bot’s performance regularly and make adjustments as needed. Additionally, it’s important to diversify your portfolio and not rely solely on an AI trading bot to make all of your trades.
If you’re interested in coding your own AI trading bot, GPT-3 is one of the best AI models to use for this purpose. GPT-3 is trained on a massive amount of data and can generate human-like text, making it a powerful tool for analyzing market data and making trades.
To code an AI trading bot using GPT-3, you’ll need to start by gathering market data and training the model on that data. You can use various libraries like pandas, numpy etc.
Next, you’ll need to create the algorithm that will be used to make trades. This will typically involve using machine learning techniques like supervised learning or reinforcement learning to analyze the market data and make trades based on that analysis.
Finally, you’ll need to test your bot and make any necessary adjustments to improve its performance. This will involve monitoring the bot’s trades and analyzing its performance over time.
Overall, AI trading bots have the potential to make you a profit, but it’s important to understand the risks and do your research before diving in. Additionally, coding your own AI trading bot using GPT-3 can be a complex process, but with the right knowledge and resources, it can be a powerful tool for analyzing market data and making profitable trades.
Building a trading bot on Binance using python-binance can be a great way to automate your trading strategy and potentially make profits on a 24/7 basis. Let’s go through the step-by-step process of building a basic trading bot on Binance using python-binance.
Step 1: Register to Binance and open a Futures account
Opening a binance account is a very simple process.
Step 2: Install python-binance
The first step is to install python-binance, a python wrapper for the Binance API. You can install it using pip by running the following command;
- pip install python-binance
Step 3: Create a Binance API Key
In order to use the Binance API, you need to create an API key. To do this, log in to your Binance account, go to the API Management page, and create a new API key. Be sure to enable trading and account access.
Step 4: Connect to the Binance API
Once you have your API key, you can connect to the Binance API using python-binance. The following code shows how to connect to the Binance API and print the current trading pair prices:
Step 5: Implement your trading strategy
Now that you are connected to the Binance API, you can start implementing your trading strategy. For example, you can use the trading pair prices to make buy and sell decisions based on a simple moving average (SMA) or some other indicator.
Here is an example of a simple trading bot that buys and sells based on the SMA of the last 100 trading pair prices:
Note: The above example is just a simple illustration of how you can implement your trading strategy and should not be used in actual trading, it’s not a good idea to use simple moving average as a buying and selling strategy, also this is not a complete code, you need to handle many other things like error handling, check the available balance, and order type (limit or market), etc. I’ll definetly write a story about much more complex trading bot.
Step 6: Test and Optimize your bot
Once you have your trading bot up and running, you can test it by simulating trades with historical data. You can also optimize your bot by fine-tuning your trading strategy and experimenting with different parameters.
In conclusion, building a trading bot on Binance using python-binance can be a thrilling and potentially lucrative endeavor. With the right strategy and a bit of optimization, your bot could be making you money while you sleep, eat or even while you’re out partying! It’s like having your very own robot money-making machine. Just make sure to always be aware of the risks and limitations of trading bots and to test and optimize your bot before using it in live trading. Happy bot trading!
Did you like my content? If so, i would love to have a coffee from you 🙂
How to build a crypto bot with Python 3 and the Binance API (part 1)
The first point about trading crypto currencies or any asset is to have a goal and a strategy to achieve. Here i’am not writing about trading strategy but just build a simple yet functional crypto trader bot to apply your strategy. Trade with caution this serie of post is just more like an automated crypto trading bot framework.
We’ll use python 3.9 (3.9.2) to first create the project file structure.
/exchanges
/strategies
/models
Here «exchanges» folder store the exchanges API wrappers, strategies your strategies and models the business object we gonna use.
The models
We’ll defined several business objects for this projects, such like price, currency or order for instance. First let’s begin with the Price one to use it on the strategy we’ll create just after.
Before we write a common abstract layer forour business object.
Exit fullscreen mode
Then our first Price class.
Exit fullscreen mode
The strategy part
Here if the biggest part of this system, the strategy will be responsible to run your own trading logic and to do so, there’s two way, a classic using an interval then run API calls to external exchanges API or even internal webhooks and route and a real time event based one using WebSocket.
To do so we’ll first create an abstract strategy class that our strategies will extend.
Exit fullscreen mode
Here our strategy abstract layer constructor signature need an Exchange instance, we’ll do this part later writing of first wrapper using the Binance API.
We define without any extra library a simple yet functional infinite interval runner, note that this every run will launch the next call on another thread but in fact your strategy will use never no more than two threads, one main and the current run iteration if you strategy take a lot of external call or heavy computation. Each thread consume 0.3% of RAM and 0 or 0.1 CPU usage, this also involve the Strategy to fetch ticker and orders, then store price and order related data on an another internal API.
Yet the interval run precision can drift a little bit on microseconds, but will be stable at seconds level.
Here a simple usage of that layer, a strategy that basically print your exchange account portfolio and the exchange price. We got method to also retrieve a symbol ticker from an external exchange we gonna connect later, and also a method to retrieve your current portfolio available on connected exchange.
Saved searches
Use saved searches to filter your results more quickly
You signed in with another tab or window. Reload to refresh your session. You signed out in another tab or window. Reload to refresh your session. You switched accounts on another tab or window. Reload to refresh your session.
Automated cryptocurrency trading bot
License
edeng23/binance-trade-bot
Name already in use
- Local
- Codespaces
Use Git or checkout with SVN using the web URL.
Work fast with our official CLI. Learn more about the CLI.
Sign In Required
Please sign in to use Codespaces.
Launching GitHub Desktop
If nothing happens, download GitHub Desktop and try again.
Launching GitHub Desktop
If nothing happens, download GitHub Desktop and try again.
Launching Xcode
If nothing happens, download Xcode and try again.
Launching Visual Studio Code
Your codespace will open once ready.
There was a problem preparing your codespace, please try again.
Latest commit
Git stats
Files
Failed to load latest commit information.
README.md
binance-trade-bot
Automated cryptocurrency trading bot
Follow me on Twitter 🙂
This project was inspired by the observation that all cryptocurrencies pretty much behave in the same way. When one spikes, they all spike, and when one takes a dive, they all do. Pretty much. Moreover, all coins follow Bitcoin’s lead; the difference is their phase offset.
So, if coins are basically oscillating with respect to each other, it seems smart to trade the rising coin for the falling coin, and then trade back when the ratio is reversed.
The trading is done in the Binance market platform, which of course, does not have markets for every altcoin pair. The workaround for this is to use a bridge currency that will complement missing pairs. The default bridge currency is Tether (USDT), which is stable by design and compatible with nearly every coin on the platform.
Coin A → USDT → Coin B
The way the bot takes advantage of the observed behaviour is to always downgrade from the «strong» coin to the «weak» coin, under the assumption that at some point the tables will turn. It will then return to the original coin, ultimately holding more of it than it did originally. This is done while taking into consideration the trading fees.
Coin A → USDT → Coin B
Coin B → USDT → Coin C
Coin C → USDT → Coin A
The bot jumps between a configured set of coins on the condition that it does not return to a coin unless it is profitable in respect to the amount held last. This means that we will never end up having less of a certain coin. The risk is that one of the coins may freefall relative to the others all of a sudden, attracting our reverse greedy algorithm.
Binance Setup
- Create a Binance account (Includes my referral link, I’ll be super grateful if you use it).
- Enable Two-factor Authentication.
- Create a new API key.
- Get a cryptocurrency. If its symbol is not in the default list, add it.
Tool Setup
Install Python dependencies
Run the following line in the terminal: pip install -r requirements.txt .
Create user configuration
Create a .cfg file named user.cfg based off .user.cfg.example , then add your API keys and current coin.
The configuration file consists of the following fields:
- api_key — Binance API key generated in the Binance account setup stage.
- api_secret_key — Binance secret key generated in the Binance account setup stage.
- current_coin — This is your starting coin of choice. This should be one of the coins from your supported coin list. If you want to start from your bridge currency, leave this field empty — the bot will select a random coin from your supported coin list and buy it.
- bridge — Your bridge currency of choice. Notice that different bridges will allow different sets of supported coins. For example, there may be a Binance particular-coin/USDT pair but no particular-coin/BUSD pair.
- tld — ‘com’ or ‘us’, depending on your region. Default is ‘com’.
- hourToKeepScoutHistory — Controls how many hours of scouting values are kept in the database. After the amount of time specified has passed, the information will be deleted.
- scout_sleep_time — Controls how many seconds are waited between each scout.
- use_margin — ‘yes’ to use scout_margin. ‘no’ to use scout_multiplier.
- scout_multiplier — Controls the value by which the difference between the current state of coin ratios and previous state of ratios is multiplied. For bigger values, the bot will wait for bigger margins to arrive before making a trade.
- scout_margin — Minimum percentage coin gain per trade. 0.8 translates to a scout multiplier of 5 at 0.1% fee.
- strategy — The trading strategy to use. See binance_trade_bot/strategies for more information
- buy_timeout/sell_timeout — Controls how many minutes to wait before cancelling a limit order (buy/sell) and returning to «scout» mode. 0 means that the order will never be cancelled prematurely.
- scout_sleep_time — Controls how many seconds bot should wait between analysis of current prices. Since the bot now operates on websockets this value should be set to something low (like 1), the reasons to set it above 1 are when you observe high CPU usage by bot or you got api errors about requests weight limit.
Environment Variables
All of the options provided in user.cfg can also be configured using environment variables.
Paying Fees with BNB
You can use BNB to pay for any fees on the Binance platform, which will reduce all fees by 25%. In order to support this benefit, the bot will always perform the following operations:
- Automatically detect that you have BNB fee payment enabled.
- Make sure that you have enough BNB in your account to pay the fee of the inspected trade.
- Take into consideration the discount when calculating the trade threshold.
Notifications with Apprise
Apprise allows the bot to send notifications to all of the most popular notification services available such as: Telegram, Discord, Slack, Amazon SNS, Gotify, etc.
To set this up you need to create a apprise.yml file in the config directory.
There is an example version of this file to get you started.
If you are interested in running a Telegram bot, more information can be found at Telegram’s official documentation.
Docker
The official image is available here and will update on every new change.
If you only want to start the SQLite browser
Backtesting
You can test the bot on historic data to see how it performs.
Feel free to modify that file to test and compare different settings and time periods
Developing
To make sure your code is properly formatted before making a pull request, remember to install pre-commit:
The scouting algorithm is unlikely to be changed. If you’d like to contribute an alternative method, add a new strategy.
Related Projects
Thanks to a group of talented developers, there is now a Telegram bot for remotely managing this project.
Support the Project
Join the Chat
- Discord: Invite Link
A list of answers to what seem to be the most frequently asked questions can be found in our discord server, in the corresponding channel.

Disclaimer
This project is for informational purposes only. You should not construe any such information or other material as legal, tax, investment, financial, or other advice. Nothing contained here constitutes a solicitation, recommendation, endorsement, or offer by me or any third party service provider to buy or sell any securities or other financial instruments in this or in any other jurisdiction in which such solicitation or offer would be unlawful under the securities laws of such jurisdiction.
If you plan to use real money, USE AT YOUR OWN RISK.
Under no circumstances will I be held responsible or liable in any way for any claims, damages, losses, expenses, costs, or liabilities whatsoever, including, without limitation, any direct or indirect damages for loss of profits.